🚀 Supercharge your YouTube channel's growth with AI.
Try YTGrowAI FreeDjango Class-Based Views – How to Build Class-Based Django Views?

In this article, we will learn how to use Django Class-Based Views with our Django REST API and then later change our function-based views to the Class-Based one.
Difference Between Class-Based Views vs. Function-Based Views
In the earlier article, we made the entire Rest API webpage using function-based views. Using function-based views, we can’t extend the functionalities of what views can do. And that’s where class-based views come into play.
In this tutorial, we will learn to use these functionalities and make our code simpler compared to what we did in the previous article.
Creating Class-based Views in views.py
The basic syntax of Class-Based Views is given below:
class Name(APIView):

    def GET(self,request):
        ''' Code'''
        return response

    def POST(self,request):
        '''code'''
        return response
Here all the HTTP methods will act as class methods inside the particular class. This is easy to understand if you learn about Object-Oriented Programming in Python.
So let’s create ItemsView class capable of showing a list of items on the webpage. Also, we will further extend our knowledge by creating an ItemView that will allow us to view, edit, and delete a specific item from the list.
from rest_framework.views import APIView
from rest_framework import status
Import the above two libraries which are required to use the Class-based Views and then write the following code:
class ItemsView(APIView):
    def get(self,request,format =None):
        items = ItemsModel.objects.all()
        serializer = ItemSerializer(items, many =True)
        return JsonResponse(serializer.data, safe =False)

    def post(self,request,format =None):
        data = JSONParser().parse(request)
        serializer =ItemSerializer(data = data)

        if serializer.is_valid():
            serializer.save()
            return JsonResponse(serializer.data,status = status.HTTP_201_CREATED)
        return JsonResponse(serializer.errors,status = status.HTTP_400_BAD_REQUEST)
Here:
- If you are familiar with Function-Based Views, You would have used an @csrf_exempt token to protect your webpage form forgery. But using Class-Based Views, it is already included inside APIView, and hence you don’t need to add it separately.
- Here, we need to give a request as an argument for each of the class methods.
- The HTTP methods are written as class methods.
- Inside the get() class-method, we store all the objects present in the DB into the items variable.
- Then we convert the particular information (stored in items list) into JSON format using serializer. Since we have taken all the objects from the DB, set many to TRUE.
- Once the information is converted to JSON, we return the appropriate JSON response.
- Inside the post() class method, we will take the <id> from the user in the request.
- So we need to pass the <id> as an argument into the post-class-method.
- Since the information that the user will send, will be in JSON format, we need to convert it into correct Python-Django readable syntax.
- So we use JSONParser to parse the request to get data related to the new item and then store it into the variable data.
- Then we use serializer to convert the parsed JSON text that we got from the request into python readable syntax.
- Now, if the parsed serialized data is valid, then we save it; otherwise, we show an error message.
- Django rest_framework provides us with HTTP statuses as the ones given above. So we can directly use them.
Django Rest_Framework – status library
Django rest_framework provides us with many HTTP statuses pre-installed, some of which are:
- status 201: this attribute is used when a new object is created, we use
status = status.HTTP_201_CREATED
- status 400: This attribute is used when the user makes a bad request=
status = status.HTTP_400_BAD_REQUEST
- status 404: This attribute is used when the particular information, that user asked is not present in the server.
status = status.HTTP_404_NOT_FOUND
- status 200: This attribute is used, when everything happens as expected. That is the process was “OK”.
status =status.HTTP_200_OK
Similarly, we will create the ItemView as well.
class ItemView(APIView):

    def get_objects(self,nm):
        try:
            return ItemsModel.objects.get(id = nm)
        except ItemsModel.DoesNotExist:
            raise Http404('Not found')

    def get(self,request,nm,format =None):
        item = self.get_objects(nm)
        serializer = ItemSerializer(item)
        return JsonResponse(serializer.data)

    def put(self,request,nm,format =None):
        item = self.get_objects(nm)
        data = JSONParser().parse(request)
        serializer = ItemSerializer(item,data = data)

        if serializer.is_valid():
            serializer.save()
            return JsonResponse(serializer.data)
        return JsonResponse(serializer.errors, status = status.HTTP_400_BAD_REQUEST)

    def delete(self,request,nm,format=None):
        item = self.get_objects(nm)
        item.delete()
        return HttpResponse(status =status.HTTP_204_NO_CONTENT)
Here:
- Again, @csrf_exempt is not required since its already included in APIView
- The try-except block is present to get the object that the user requested, under a separate class function since every class method will use it.
- Here in the try-except block, we pass the id of the item to the function, we then try to get the item from the database. If the thing is present, then we store it into an item variable; otherwise, we raise an HTTP 404 error.
- The HTTP methods are present as class methods.
- Again, in the HTTP class-methods, we code is similar to the above View for the GET and PUT methods.
- Here, we add a new DELETE method to delete the particular item.
- Django rest_framework provides us with HTTP statuses as the ones given above. So replace the earlier ones with this.
That’s it, see how simple it and structured the Class-Based Views are.
URL Mapping for Class-Based Views
Since our views are no longer function-based, our way of linking the Views to URL will also be changed.
Class-Based Views have their inbuilt function .as_view(), using which we can directly include the Views.
In urls.py we use the .as_view() as follows:
urlpatterns = [
    path('items/', ItemsView.as_view()),
    path('item/<int:nm>/', ItemView.as_view()),
]
It is very easy to use .as_view() function as well.
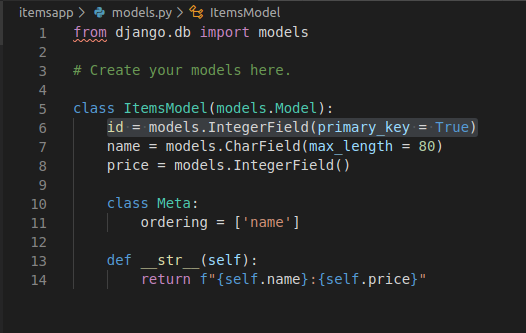
In the previous article, we learned in detail about the serializer file, model file, and created the ItemModel. Don’t worry if you have not checked it, I will post the code here as well.
Models.py
serializers.py

That’s it; now re-run the server and check in POSTMAN, we should get the same output as in the previous article.
Running server on POSTMAN
For checking, we will need POSTMan, which is a very efficient and quick way to run our REST APIs. If you want to know more about POSTMAN, you can check the official page.
1. GET /items
Enter the endpoint in the search button and press send. Here, see you will get the list of items

2. POST /items
Now, keeping the endpoint same. change the method to POST. We get the same output as before.

3. GET /item/<id>
Now change the endpoint as given above, and select GET method. Then hit send. Here as well, it will work the same way as before.

4. PUT /item/<id>
Similarly, keeping the endpoint the same, change the HTTP method to POST, and then hit send.

5. DELETE /item/<id>
Now to delete a particular object, enter the id in the endpoint, select the DELETE method, and then hit send. The item will get deleted just as before.

Conclusion
That’s it guys! That’s all for the Django Class-based Views tutorial! We hope you have gained all the basics of the Django Class-based Views and how they are used. Also, you can learn more about the Django REST Framework from the official documentation.
Stay tuned for more advanced tutorials on Django topics!


