🚀 Supercharge your YouTube channel's growth with AI.
Try YTGrowAI FreePython Pygame: Looping Background

Hi there! Today I am going to teach you how to make a fun a very fun looping background in Pygame! So let’s begin!
STEP 1: Importing Pygame
We will be importing the pygame module to start off with. We would also be initializing pygame into our program. We will also import python.locals library for the basic functionalities of the pygame window
The code for the same is shown below.
import pygame
from pygame.locals import *
pygame.init()
STEP 2: Creating a basic window
The next thing that is needed is to create variables to set the width and height of the game window. For now, let’s keep both width and height as 1000 and 500 respectively.
To create a window object using pygame function named display.set_mode and pass the height and width of the game window.
The code for the same is shown below:
width,height = 1000,500
window = pygame.display.set_mode((width,height))
STEP 3: Adding a background image
To add the background image all we need to do is use the function named image.load and add the path of the image as the parameter.
We will also be sizing the image to make sure it fully fills up the whole screen. And for that, we will be using transform.scale function and pass our original image along with the scaling size i.e. the screen dimensions.
The code for the same is shown below:
bg_img = pygame.image.load('Images/bg.jpg')
bg_img = pygame.transform.scale(bg_img,(width,height))
But this code will only display the window for some split seconds and then it’s gone. We don’t need that!
So we will add the logic which will make sure the screen keeps displaying until and unless the X on the screen is clicked by the user.
Let me show you the code first.
runing = True
while runing:
    window.blit(bg_img,(0,0))
    for event in pygame.event.get():
        if event.type == QUIT:
            runing = False
    pygame.display.update()
pygame.quit()
In the code, we created a running variable that is set True by default. The application runs as long as the running variable stays True.
And in order to place the image, we have to put a blit function inside the running loop. The blit function will take the image variable and the coordinates of the image.
To set the end game logic we will be keeping track of all the events and check the type of event happening in the game. If the event type is pressing of X button on the screen, we set the running value is False.
But the displaying of the background image is still not complete. In order to do that, we will add an display.update function to update the screen with all the elements declared.
After the whole screen is loaded and closed we quit the pygame we initialized earlier.
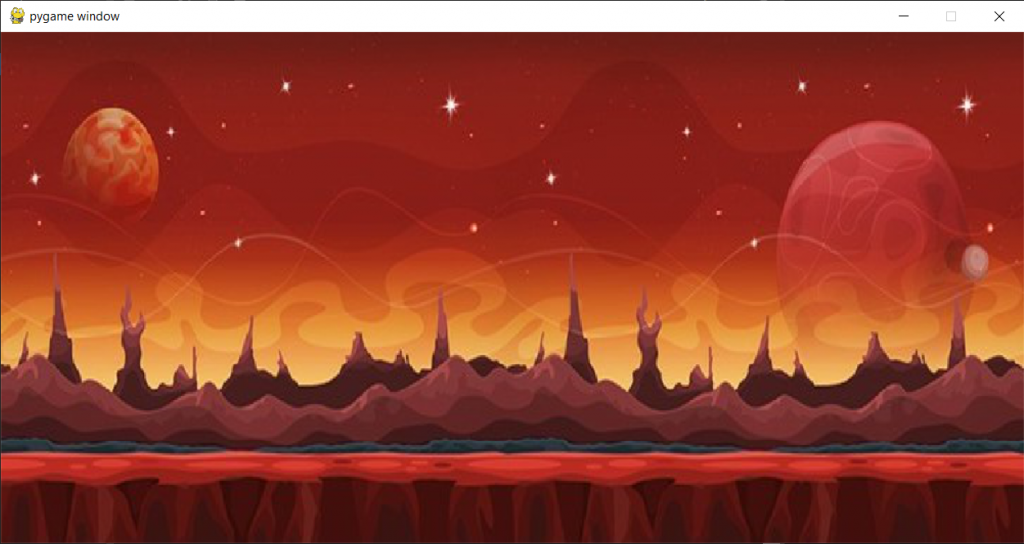
After we did all the necessary we will end up with a screen shown below. (Your background image or window shape may differ if you chose a different background image or size of the screen)
STEP 4: Looping background with Pygame
Our main aim is to loop the background image along the width of the screen. So for that, we will make use of an iterator, i and initialize it with 0 value to start off with.
We would be decreasing this iterator (i) because we have to go ahead along the with.
The progress of the code along with the necessary changes are shown in the code below. The changed lines are highlighted as well to make it easier for you to understand.
import pygame
from pygame.locals import *
pygame.init()
width = 1000
height = 500
window = pygame.display.set_mode((width,height))
bg_img = pygame.image.load('Images/bg.jpg')
bg_img = pygame.transform.scale(bg_img,(width,height))
i = 0
runing = True
while runing:
    window.blit(bg_img,(i,0))
    i-=1
    for event in pygame.event.get():
        if event.type == QUIT:
            runing = False
    pygame.display.update()
pygame.quit()
The video below shows the result of the code is. Oh and see the looping background to the right! But the end doesn’t look quite right.
The problem here is that we are not redrawing the image. Hence, the program stays with the last configuration of the pixels loaded.
Now in order to solve the issue, we are going to test the situation by putting a background color when the image is loaded completely. For the same we will be using fill function and pass the RBG format for the color. For now we will be using Black.
The code like for the same is shown below. This line will come right before the background image loading command.
window.fill((0,0,0))
The output of the same is shown below.
But instead of having black color, we want to load the background image after the width is over for the background image. For the same, we will be using the blit function and apply the background image at the future coordinates. The code line for the same is shown below.
window.blit(bg_img,(width+i,0))
The output after the code line is added is shown below. The background images displays itself twice but then returns to the back background again. We don’t want that.
Now the cause of this happening is that i reaches negative of the width of the screen. We need to handle the same situation and that is done by using the blit function when i reaches negative of the width. Also i value is reset i.e. set to 0.
The code for the same is shown below. This code is added between the i decrement command and the initial loading background image.
if (i==-width):
        window.blit(bg_img,(width+i,0))
        i=0
The final code is shown below. Hope you are now clear with all the concepts.
import pygame
from pygame.locals import *
pygame.init()
width = 1000
height = 500
window = pygame.display.set_mode((width,height))
bg_img = pygame.image.load('Images/bg.jpg')
bg_img = pygame.transform.scale(bg_img,(width,height))

i = 0

runing = True
while runing:
    window.fill((0,0,0))
    window.blit(bg_img,(i,0))
    window.blit(bg_img,(width+i,0))
    if (i==-width):
        window.blit(bg_img,(width+i,0))
        i=0
    i-=1
    for event in pygame.event.get():
        if event.type == QUIT:
            runing = False
    pygame.display.update()
pygame.quit()
The final output of the code is shown below.
Conclusion
This type of background loops can be used to create some basic 2D games like a simple running or jumping game.
Hope you enjoyed the tutorial!
Thank you for reading!