🚀 Supercharge your YouTube channel's growth with AI.
Try YTGrowAI FreeRandom Password Generator in Python | GUI Tkinter

In this article, we’ll learn how to create a random password generator in Python. Using a strong password is necessary, rather recommended. As per Cyber Security Experts, a password must be a combination of alphabets, digits, and symbols, also making sure that the combination doesn’t make a sensible word or combination which can be easily guessed using the social engineering method.
A random password on the other hand of a minimum of 8 characters in length even after applying advanced security breach methods like Brute Force attacking it is hard to breach or crack or may take a very long time to breach it.
Code for Random Password Generator – GUI
Generating a strong random password of recommended length is a difficult task, obviously not more than remembering it. But here, we will code a python script to generate a random password.
1. Install and Import the required modules
We begin with installing the required libraries using the pip package manager. Enter the below commands in your command line or terminal to install the modules.
We need to install Tkinter to make our password generator GUI (Graphical User Interface) based pyperclip library to infuse the Copy to clipboard functionality.
pip install tkinter
pip install pyperclip
pip install random
After installing the required libraries from the terminal, we now move to our Python file to code. We start with importing the libraries as:
where random is used to generate random characters from a given list and string is used to get characters/text.
import random, string
from tkinter import *
import pyperclip
2. Initialize Tkinter Window
As a next step, we initialize our GUI window using the Tkinter module.
#Initialize Window

root =Tk()
root.geometry("400x400") #size of the window by default

#title of our window
root.title("Random Password Generator")
3. Code the Elements
We now start to code the elements as per the GUI, for heading, text, labels, buttons, etc.
To select the length of the password,
- We use the Label method to generate a label of text to define the purpose of the input field we wanted for the length of the password.
- The spinbox method is used to take the input against a value selector, ranging from 4 to 32, which you can change as per need, this defines the minimum and maximum length of the password.
#get length of password

pass_head = Label(root, text = 'Password Length', font = 'arial 12 bold').pack(pady=10) #to generate label heading

pass_len = IntVar() #integer variable to store the input of length of the password wanted
length = Spinbox(root, from_ = 4, to_ = 32 , textvariable = pass_len , width = 24, font='arial 16').pack()
We code a Generate Password Button, on which we click to generate a random password:
- We give our button some styling, along with the name – Generate Password. We use the command, which shows which function (here, randPassGen function) would run on the click (key press) of the button.
Button(root, text = "Generate Password" , command = randPassGen, font="Arial 10", bg='lightblue', fg='black', activebackground="teal", padx=5, pady=5 ).pack(pady= 20)
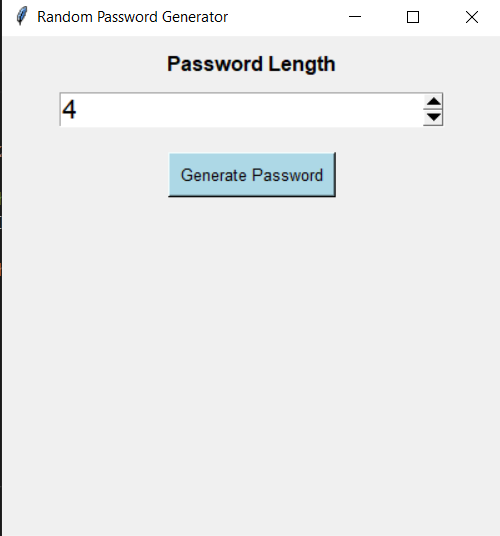
At this step, our window displays the below output:
After adding so, we now add the output elements in our code.
- We again add a label to show what is being displayed, we add a label of “Random Generated Password” with some styling.
- Yet again, we add an Entry widget to create an input field, this is intended to display our Randomly Generated Password
- The textvariable widget is used to show text from the value of output_pass variable, which hold the randomly generated password.
pass_label = Label(root, text = 'Random Generated Password', font = 'arial 12 bold').pack(pady="30 10")
Entry(root , textvariable = output_pass, width = 24, font='arial 16').pack()
- We now add the Add to Clipboard button in our code to display, the command widget of it shows that the copyPass function would run upon click on this button.
Button(root, text = 'Copy to Clipboard', command = copyPass, font="Arial 10", bg='lightblue', fg='black', activebackground="teal", padx=5, pady=5 ).pack(pady= 20)
On execution, our Tkinter output window looks like this:

4. Random Password function
Having finished the front-end (GUI) part, we now move to our code’s backend, where we add functionality to our buttons
- We code the most important function of this code, which is for Random Password Generation, we do so as in the code:
#Random Password generator

output_pass = StringVar()

all_combi = [string.punctuation, string.ascii_uppercase, string.digits, string.ascii_lowercase]  #list of all possible characters

def randPassGen():
    password = "" # to store password
    for y in range(pass_len.get()):
        char_type = random.choice(all_combi)   #to randomize the occurance of alphabet, digit or symbol
        password = password + random.choice(char_type) #to generate random characters as per the input length from the occurance list

    output_pass.set(password)
5. Copy Password function
As a final step, we add the Copy Password function in our code as:
- We use the copy method of the pyperclip library to save the password as copied to our system. We get password using the get method of the output_pass variable.
#Copy to clipboard function

def copyPass():
    pyperclip.copy(output_pass.get())
Though discussed late in the tutorial, the random password generator and the copy to clipboard function are not be included at the end of the code, as in this case, the program will throw an error if not found.
We declare our functions just after the initialization of our Window (after the code of step 2). As shown in the final code below:
Complete Python Code For a GUI Random Password Generator
import random, string
from tkinter import *
import pyperclip


#Initialize Window

root =Tk()
root.geometry("400x400") #size of the window by default

#title of our window
root.title("Random Password Generator")

# -------------------  Random Password generator function

output_pass = StringVar()

all_combi = [string.punctuation, string.ascii_uppercase, string.digits, string.ascii_lowercase]  #list of all possible characters

def randPassGen():
    password = "" # to store password
    for y in range(pass_len.get()):
        char_type = random.choice(all_combi)   #to randomize the occurance of alphabet, digit or symbol
        password = password + random.choice(char_type)

    output_pass.set(password)

# ----------- Copy to clipboard function

def copyPass():
    pyperclip.copy(output_pass.get())

#-----------------------Front-end Designing (GUI)

pass_head = Label(root, text = 'Password Length', font = 'arial 12 bold').pack(pady=10) #to generate label heading

pass_len = IntVar() #integer variable to store the input of length of the password wanted
length = Spinbox(root, from_ = 4, to_ = 32 , textvariable = pass_len , width = 24, font='arial 16').pack()

#Generate password button

Button(root, command = randPassGen, text = "Generate Password", font="Arial 10", bg='lightblue', fg='black', activebackground="teal", padx=5, pady=5 ).pack(pady= 20)

pass_label = Label(root, text = 'Random Generated Password', font = 'arial 12 bold').pack(pady="30 10")
Entry(root , textvariable = output_pass, width = 24, font='arial 16').pack()

#Copy to clipboard button

Button(root, text = 'Copy to Clipboard', command = copyPass, font="Arial 10", bg='lightblue', fg='black', activebackground="teal", padx=5, pady=5 ).pack(pady= 20)

root.mainloop()  #to bundle pack the code for tkinter
The Output of the GUI bases Random Password Generator is as:
Conclusion
That’s it for the tutorial. Hope you have learned well how to make a Random Password Generator in Python and that too with a level up by coding an Interface Based script.


