🚀 Supercharge your YouTube channel's growth with AI.
Try YTGrowAI FreeTkinter Tutorial – Add Padding to Your Windows

Hey Pythonies!, in this article, we shall study some GUI basics. Python has many libraries that support GUI development and maintain the simplicity of code simultaneously. One of them is Tkinter. The best thing is that Python is powered by this same package. It is very simple to learn and implement. We can make cool GUI projects and applications.
The basic parameters of a GUI app in Tkinter
- A GUI app in Tkinter runs on three things:
- Instance of the package which is the root – “root = Tk()”.
- Geometry of the application – screen width and screen height- “root.geometry(width x height)”
- The mainloop() – keeps the application running on the screen till it is closed.
Create a Simple Tkinter Window
In this section, we shall create a simple window using Tkinter with the title “Hello World” to get started. This will also clear all the above theories.
Code:
from tkinter import * # importing the package
root = Tk() # creating a root that acts as an instance
root.title("Hello World") # setting up the title of window
root.geometry("400x400") # giving the window its height and width
root.mainloop() # the mainloop
Output:

This is just a blank window that has the title “Hello World”. So, to make it more beautiful let us add widgets to it.
Add Padding in a Tkinter Window
Padding is placing the widgets in the two-dimensional GUI root window. This helps us to align them then according to our needs.
Now we must think of how the windows hold all the widgets. In computer graphics the least unit of representing a point on the screen is Pixel. If we can see on white dot on a blank screen then its measure is one pixel. The image which is in front of us on a mobile, computer, the laptop is the combinational adjustment of various colorful pixels.
- padx: Placing the widget in the window on x-axis.
- pady: Placing the widget in the window on y-axis.
Adding a padx parameter
The label in Tkinter is one of the widgets that have padx and pady parameters. Let us see an example:
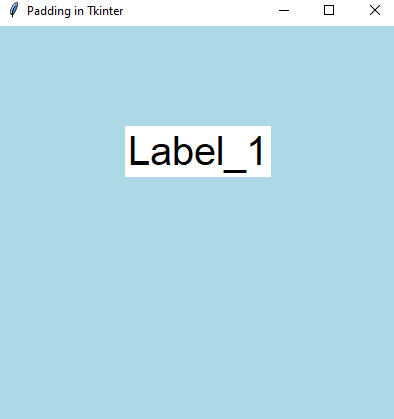
Code: without any padding
from tkinter import *

# basic setup
window = Tk()
window.title("Padding in Tkinter")
window.geometry("400x400")
window.config(background = "Light Blue")


# creating a label widget
label_1 = Label(window,
                text = "Label_1",
                bg = "white",
                fg = "black",
                font = ("Arial", 30))
label_1.pack()


# tkinter's mainloop
window.mainloop()
Output:
Explanation:
- In the first six lines of code it is the basic setup of Tkinter.
- The next is we create an instance of label widget.
- Give the display text as = “Label_1
- baground color as white using bg parameter.
- foreground or text color as block using fg.
- Set the font style to Arial and text size is 30.
- To display the label call the pack() method.
So, by default, Tkinter places the label in the center of the window.
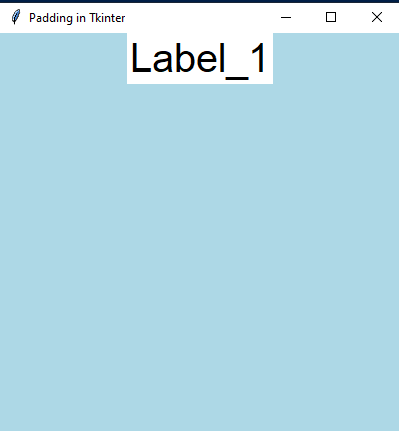
Code: with padx
from tkinter import *

window = Tk()
window.title("Padding in Tkinter")
window.geometry("400x400")
window.config(background = "Light Blue")

label_1 = Label(window,
                text = "Label_1",
                bg = "white",
                fg = "black",
                font = ("Arial", 30))
label_1.pack(padx = (100, 0))

window.mainloop()
Output:
Now we can see that when we set padx = (100, 0) it gets somewhat aside from the center.
Adding a pady paramter
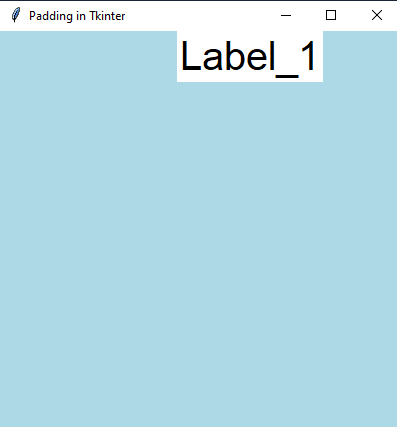
This option will place or move our label somewhat far from the top margin of the window. We will just change the parameter and the rest of the code remains the same.
Code:
from tkinter import *

window = Tk()
window.title("Padding in Tkinter")
window.geometry("400x400")
window.config(background = "Light Blue")

label_1 = Label(window,
                text = "Label_1",
                bg = "white",
                fg = "black",
                font = ("Arial", 30))
label_1.pack(pady = 100)

window.mainloop()
Output:
Here we can see that the padding has happened concerning y-coordinates. The label has a new position on the window.
Sample codes for more understanding
You can try some of the codes with Buttons in Tkinter and check whether padding works for them or not.
Code 1:
from tkinter import *

window = Tk()
window.title("Padding in Tkinter")
window.geometry("400x400")
window.config(background = "Light Blue")

button = Button(window,
                text = "Click me",
                bg = "white",
                fg = "red",
                border = 10,
                font = ("Arial", 30))

button.pack(padx = 100)

window.mainloop()
Code 2:
from tkinter import *

window = Tk()
window.title("Padding in Tkinter")
window.geometry("400x400")
window.config(background = "Light Blue")

button = Button(window,
                text = "Click me",
                bg = "white",
                fg = "red",
                border = 10,
                font = ("Arial", 30))

button.pack(pady = 40)

window.mainloop()
Conclusion
So, in this way we wrap up. Tkinter is a very simple but powerful module in Python and there have been a lot more improvements in it along with Python’s newer version. Padding is one of them. I hope this helps while you try to program your GUI.


