🚀 Supercharge your YouTube channel's growth with AI.
Try YTGrowAI FreeTkinter Tutorial – Drawing a Line Using Tkinter Canvas

Hello everyone! in this Tkinter tutorial we will be learning how to draw different lines using the built-in functions. This is one of the main concepts that students who learn Tkinter forget and then make things very messy. So, let us keep it simple and sweet, and let’s get started.
What is a Canvas in Tkinter?
Now, in different drawing applications like paint, the main white screen is Canvas. This canvas is the principal window that holds our shapes, strokes, sketches, and other stuff. In the same way, drawing shapes using Tkinter happens on Canvas. The main approach is that we need to set it up first and then make further modifications.
Rules for Setting up Tkinter Canvas
- The background should be set to white.
- The resolution should be less than the main window’s resolution.
- The resolution shall be enough to manage and hold all the shapes within itself.
- Always give the proper co-ordinate points while drawing shapes through built-in functions.
These are the four basic rules through which we shall make use to implement shape drawing.
Setting up Our Canvas
We use the Canvas class and give it height, width, and background color.
Code:
from tkinter import Canvas
from tkinter import *

window = Tk()
window.title("Canvas") # giving title to window
window.config(bg = "grey")
window.geometry("400x400") # setting up the geometry
window.resizable(False, False) # disabling the resize option from x-y sides

my_canvas = Canvas(width = 350, height = 350, bg = "white") # canvas object to create canvas
my_canvas.pack(pady = 20) # padding it 20 pixels below from margin of window

window.mainloop()
Output:

Explanation:
- Import the Canvas class from Tkinter.
- The first five lines are the basic setup of our main window.
- In the sixth and seventh lines, we create an instance of the canvas.
- We give height and width as 350.
- Set the background color as white.
- Then move the window towards the center by applying the “pad-y” parameter of value 20 in pack() function.
- Then run the main loop to display the application
Using the OOP approach we will be creating a simple line drawer app. For now, the above code is just a sample.
Shape Functions From the Canvas Class of Tkinter
Several functions integrate with Tkinter and help us to draw shapes. They can help us to draw:
- Circle
- Oval
- Ellipses
- Lines
- Squares
- Triangles and many more
How a shape is drawn on a Canvas
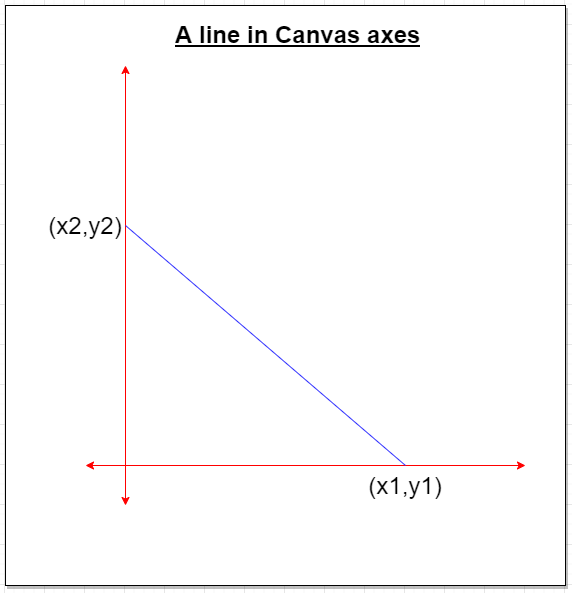
When we are drawing any line or a shape then while calling the functions, we need to give (x1, y1) and (x2, y2) as parameters. These decide the location of that particular shape on the canvas.
Remember to give the coordinates within the Canvas screen resolution. Because, if the points go out, we are unable to see shapes and objects inside the screen.
Drawing A Line Using The create_line() Function
This function/method is for drawing a line on our Canvas. Below are the basic parameters:
canvas_object.create_line(x1, y1, x2, y2, fill = "color_name")
Code:
from tkinter import *
window = Tk()
window.geometry("400x400")
window.config(bg = "grey")
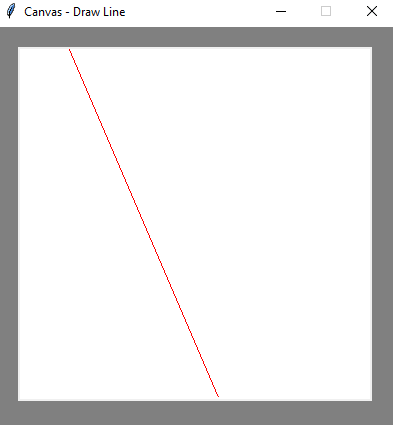
window.title("Canvas - Draw Line")
window.resizable(False, False)
# creating Canvas
canvasScreen = Canvas(window, width = 350, height = 350, bg = "white")
canvasScreen.pack(pady = 20)
canvasScreen.create_line(50, 0, 200, 350, fill = "red")
window.mainloop()
Output:
Explanation:
- We create a canvasScreen instance and give the width = 350 and height = 350.
- Then using the same object we call the create_line() function.
- Then we can give the necessary x-y coordinates. We color the line using the fill parameter. We give it red.
- In the last use the main loop to display the GUI window.
We can draw as many lines by calling the function create_line() those many times. Here is a set of more codes to draw random line designs:
from tkinter import *

window = Tk()
window.geometry("400x400")
window.config(bg = "grey")
window.title("Canvas - Draw Line")
window.resizable(False, False)

# creating Canvas
canvasScreen = Canvas(window, width = 350, height = 350, bg = "white")
canvasScreen.pack(pady = 20)
canvasScreen.create_line(0, 100, 100, 350, fill = "red")
canvasScreen.create_line(150, 0, 150, 250, fill = "green")
canvasScreen.create_line(0, 40, 200, 100, fill = "green")

window.mainloop()
Output:

Using classes and objects
from tkinter import Canvas
from tkinter import *


class window(Tk):
    def __init__(self, width, height):
        self.window = Tk()
        self.window.title("Canvas") # giving title to window
        self.window.config(bg = "grey")
        self.window.geometry(str(width) + "x" + str(height)) # setting up the geometry
        self.window.resizable(False, False) # disabling the resize option from x-y sides

    def create_canvas(self, wd, ht):
        self.my_canvas = Canvas(width = wd, height = ht, bg = "white") # canvas object to create canvas
        self.my_canvas.pack(pady = 20) # padding it 20 pixels below from top margin of window

        return self.my_canvas

    def drawLine(self, x1, y1, x2, y2, color):
        return self.my_canvas.create_line(x1, y1, x2, y2, fill = color)


    def run_app(self):
        self.window.mainloop()


win = window(400, 400)
win.create_canvas(350, 350)
win.drawLine(0, 150, 340, 200, "green")
win.drawLine(150, 0, 340, 300, "green")
win.run_app()
Output:

Conclusion
So, that’s all we can do with the Canvas and draw line functions using Tkinter. It is an interesting topic to learn about and make cool projects to showcase on your Github profile.


