🚀 Supercharge your YouTube channel's growth with AI.
Try YTGrowAI FreeJupyter Notebook for Python – Comprehensive Guide

In this tutorial, we’ll learn about a simple but powerful notebook for Python. We’ll learn what a notebook is, how to install the Jupyter Notebook, how to use it, and why to use Jupyter Notebook.
What is a notebook?
To know what a notebook is, we need to know what REPL is. REPL or read-eval-print loop is a type of programming environment that does what the name suggests –
- it reads the code written line by line
- then it evaluates that code
- finds errors and compiles every block
- and then prints the result (if any) on the REPL shell.
This may seem familiar as Python works like this. Normally we use a text editor or IDE to compile Python code, but at times for simpler computations, the Python shell works just fine.
A notebook is an environment that enhances the REPL experience. It improves upon many problems that REPL has, such as:
- we cannot undo the code written on a previous line
- none of the code compiled is saved
- and it doesn’t have any editing features such as code highlighting and auto-complete.
Visual Differences REPL Shell vs Jupyter Notebook
Let us see the visual contrast between a few blocks of code on a REPL shell vs on Jupyter Notebook.
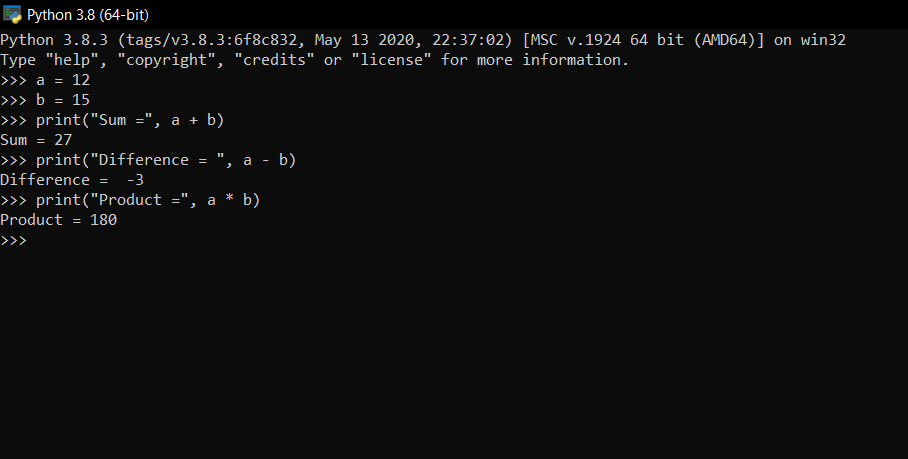
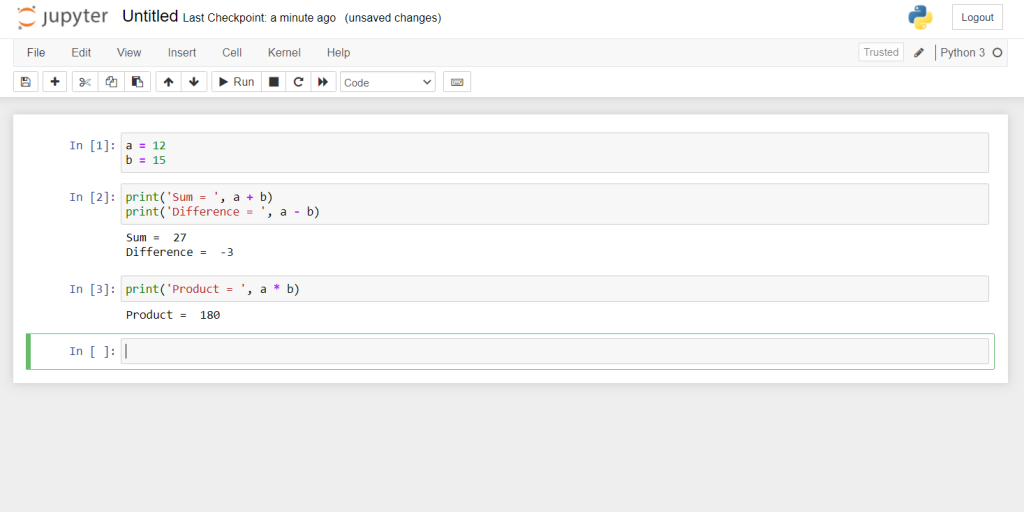
It is very clear from the images how Jupyter Notebook does essentially the same thing as the REPL shell, but it improves upon it in numerous ways.
“The Jupyter Notebook is an open-source web application that allows you to create and share documents that contain live code, equations, visualizations, and narrative text.”
Quote from the official Jupyter website.
Unlike a text editor, the code inside the Jupyter Notebook can be compiled whenever we need to, and it will give us the output of the block we decided to compile.
And unlike the REPL shell, it saves the code as well as the output, similar to a document. And similar to a document, we can add blocks of non-Python text such as headings and paragraphs, that may or may not be helpful for understanding the Python code written in the notebook.
Let’s begin with the first step in working with Jupyter Notebook.
Installing Jupyter Notebook
There are two ways to install Jupyter. It comes bundled with various other Python tools in Anaconda, and installing Anaconda is simple enough, but it is not in the scope of this tutorial.
Instead, we will be installing Jupyter Notebook without any other software apart from Python itself. Let’s get started.
1. Install Python
Assuming you don’t already have Python, go to Python Downloads, and select the latest stable version of Python for your operating system and download the installer, and then install Python in an appropriate location.
To check if you have successfully installed Python or if Python is already installed, run python in the terminal/command prompt (python3 for macOS). This should run the Python shell, to exit out of the shell, simple press Ctrl + C or type exit() and enter.
2. Upgrade PIP Package Manager
This is just to make sure that pip (a python package manager) works correctly. Go to the terminal/command prompt and type:
python -m pip install --upgrade pip
Wait for the latest version of pip to download and install, and now we can install Jupyter Notebook.
3. Install Jupyter Notebook
Go to the terminal/command prompt and type:
python -m pip install notebook
Wait for all the modules to download and now you should have Jupyter Notebook installed on your PC.
This should also add the path of Jupyter Notebook to the environment variables on Windows, so you can run Jupyter Notebook from the terminal.
4. Running the Jupyter Notebook
To run the notebook, you need to open it through the terminal/command prompt. Go there and type:
jupyter notebook
This will open the notebook in your PC’s default browser. Note: You need a browser to open the notebook and it will run as a tab on whichever browser you open it in.
Note – The process exits as soon as you close the terminal window.
This will open the notebook in the location: C:\Users\<User Name>, this is your user directory. You can go anywhere in your user directory to open a notebook, but you cannot go out of the user directory.
5. Configuring the Jupyter Notebook
Say you need to open the notebook in some other location, how do we do that?
- Choose a location where you need to open the notebook. Make sure the location is solely for Jupyter because a folder named .ipynb_checkpoints will be made inside the location. You can, however, choose the location anywhere if you don’t mind the folder.
- Now open the terminal/command prompt and write:
jupyter notebook --notebook-dir "<full location goes here>" - This will open the notebook in the location specified.
- This isn’t feasible to do every time you open the notebook, so it may be better to save this text in a .bat file (.sh for Linux) and run that file every time you need to open Jupyter Notebook.
Now that we have Jupyter Notebook up and running, we are ready to start using it.
Using Jupyter Notebook for Python
There are a few things that we should know how to do before we start writing code. Run the notebook and try the following things.
1. Creating a folder
Under the Files tab, on the upper right, there will be a button named New. Click it, and under the Other section, press Folder.
A folder named Untitled Folder will be created in the directory, check the box next to it, look under the Files tab and press a button named Rename and type the new name. (There’s also a delete button that you can use if you need to.)
Clicking the folder name will open that folder in the same tab.
2. Creating an iPython Notebook
Click on the New button under the Files tab, and click Python 3 under the Notebook section.
This will open a new notebook named Untitled in a new tab, you will probably want to change the name, and to do so, click on the name written on the very top of the page and you will be prompted to edit it.
3. Writing and running Python code
Now that we have a notebook with us, we can start to write and run Python code in it. Along the way, we will learn a few useful shortcuts of Jupyter Notebook.
The notebook should look something like this:

The cell surrounded by green is where we have to write the code, write a few lines of code and stop where you think you need to see the output.
Now comes the first shortcut: Shift + Enter. You can also click “Run”.
This will run the code you wrote and show the output below the cell. It will also create a new cell where you may continue the rest of the code.
It will look something like this:

Note that the scope of objects defined in a cell is not limited to that cell. The variables a and b here can be used anywhere in the notebook after they’ve been defined.
4. Creating Markdown Documents in Jupyter Notebook
A notebook is essentially a document containing all your code as well as your output. It also offers an added functionality to type as plain text.
To do this, you need to set your cell as “Markdown” instead of “Code”. So while in command mode, press m, and whatever you write will be treated as plain text (no syntax highlighting, and shift + enter will only create a new cell).
You can also select “Markdown” in the dropdown menu above to do this.
Press y while in markdown mode to go back to code.
Also, while in markdown, you can add headings. Similar to the convention, Heading 1 is the biggest and Heading 6 is the smallest one.
In Jupyter Notebook, type one # and one space before the line to make it a heading of level 1, type two #’s and one space before the line to make it a heading 2, and so on.
Typing 7 or more #’s and one space before the line will not convert it to any heading, it will remain as regular plain text. For example (in markdown mode):
# Heading 1
## Heading 2
### Heading 3

#Not Heading 1 because of no space after the hash
Note that the Hashes will vanish after pressing Shift + Enter on the cell. Output:


Using these tools, you can write code that may start to look something like this:

Jupyter Notebook Shortcuts
- Pressing Esc will shift the context out of the cell and take you into command mode. Now you can perform cell-related operations.
- Add cell “after”: Press a (Can also press the “+” button)
- Add cell “before”: Press b
- Delete currently selected cell: Press d twice (Also see the “Edit” tab)
- Find and replace: Press f
- Go back to edit mode: Press Enter
Why use Jupyter Notebook?
By now you may have realized that writing in Jupyter Notebook may be very similar to writing notes in a document:
- you write the code
- you also write the text that explains the code
- the code provides an output when run
- and all these can be changed dynamically – meaning changing the code will change the output.
When you open the file again, it will not only show you the code you wrote in all the different cells, but also the output it had when you last closed the notebook.
Understandably, this is very useful when you’re supposed to do programming that is not intended to create an application but to perform and analyze mathematical and/or technical operations.
Arguably, machine learning and data science are the biggest applications of a notebook.
But I find it incredibly useful in almost every Python program where the goal is to run the program and see the output without creating any end-product.
Conclusion
In this tutorial, we learned that notebooks are basically enhanced REPL shells, we learned how to download and install Jupyter Notebook through the Python package manager, pip, and we also learned how we can use the notebook to run Python code. I hope you enjoyed reading this tutorial.


