🚀 Supercharge your YouTube channel's growth with AI.
Try YTGrowAI FreeIntroduction to Django Static Files

In our last article, we discussed Django templates. Now in this article, we are going to learn about another similar topic of Django static files.
So now, if you go to any website, let’s say facebook.com, then you will see a variety of pictures and colors on the webpage and not only texts.
Now in the front end, this pretty view, which makes up the complete web page, is usually achieved using CSS(Cascading style sheets), JavaScript files, and pictures. We store all these pictures, CSS files, and JS in a folder called static, while the files are called static files.
Creating a Django Static files folder
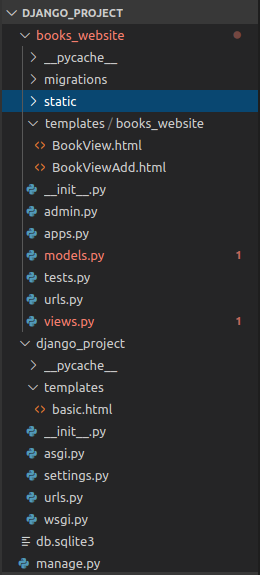
Just like the Templates that we learned in the previous article, Django static files are also saved in a separate folder named static.
Create a static folder in you Django apps directory as shown.
Namespacing Static Files Folder
Similar to our tutorial on Templates, static files need Namespacing. Here as well, we need to add the app name inside the Static directory.
This is because Django uses a shortcut to search for files (when they are imported/loaded).

When you request a static file, Django searches INSTALLED_APPS/settings.py serially and the first result is returned.
In case you have two static files with the same name in the apps folder, Django might return the wrong file.
Hence, just like in the previous article add a new folder(<apps_name>) inside the static folder as demonstrated in the below screenshot.

Creating a simple CSS file for the web page
Now we will create a simple CSS File and see how Django loads it up on the web page. Note that our primary focus is to learn Django, and hence don’t worry if you don’t understand the code written in CSS.
1. Add a background image to our page
Let us add a background image to our webpage (host website/books) using CSS.
It is preferred to save all the images that will be used on our webpage in a separate folder “images” under static/<app_name> folder.
Note: By separate folder, I meant, inside the <app_name> folder created in the static folder. Have a look at the below image to get a visual perspective of the directory structure.

Let’s create an “images” folder and save the below image in it.

2. Writing CSS code for “BookView” view in a static file
Time to write the code to display the image as a background. We’ll use CSS to display the background. You can simply copy the code without worrying about what it means.
Make sure you change the filename mentioned in the below image.
body{
    background: white url("images/books.jpg") no-repeat;
}
CSS syntax is easy to understand, and if you give it a try, you will get what we are trying to do. So basically here:
- Purpose: We are changing the background of the webpage
- background: white implies that the webpage should show white BG color in case the image does not load up due to some error
- URL(“images/books.jpg”) is the path for the image that we are using.
- No-repeat: indicates that the image should not repeat itself in case the browser window is larger than the image-size.
3. Modifying template files to incorporate static files
Now in the templates folder, open the template linked with the “BookView” view. In my case, it is BookView.html
In the previous article on Django Templates, our final BookView.html was :

Here’s a basic HTML file structure. If you haven’t used HTML before give it a try. It’s a pretty basic language and can be picked up within a couple of hours.
<html>
    <head>
        <p> Headeer Information </p>
    </head>

    <body>
        <p> Main Text Code </p>
    </body>

</html>
Let’s modify our HTML file to inculcate the proper syntax of an HTML file. Hence, the file will look as shown below.

I have removed the inclusion line, earlier present on line 4 and replaced it directly with the header “Books Hub”.
Now to link the CSS file to it, we use the HTML link tag in the <head>. The syntax looks like this.
<head>
   <link rel="stylesheet" type="text/css" href= "{%  static 'books_website/style.css' %}">
</head>
Here:
- Purpose: To link CSS file to the HTML file
- <link: is an HTML attribute through which we add CSS files to it
- rel: This attribute defines the relation between the current file and the linked object
- type: Defines the type of object we are linking.
- href: This attribute tells the path of the file that we are linking (CSS in this case)
Therefore, BookView.html will look like

4. Adding the {% load static %} line to the HTML file
If you now try to run the server, you will get an error when you enter this url – http://127.0.0.1:8000/books/.

You will notice, that the webpage is unable to load the path of the CSS file, we added in our HTML file.
This is because we didn’t load the static tag for our static file. That is, if we don’t load static tags, then Django won’t know what the word “static” used below means.
The line below searches for the path of the static folder and then loads it up.
{% load static %}
So when we use the below code, Django knows what the word static refers to.
{% static "books_website/styles.css%}
After adding the {% load static %} line. The file will now look like

Note: Always keep the Template inheritance line at the top. This is because the BookView.html file is an extrapolation of the base file (basic.html) present in the project directory.
So before Django reads this file, it should first read the inherited file.
Now save the BookView.html file. The server should reload itself. If not, use the command below in the shell
python manage.py runserver
And there you go! We have the background image is added to the webpage.

Similarly, create a BookIDView.html for the 127.0.0.1:8000/books/<book_name> endpoint:
{% load static %}
<html>

<head>
   <link rel= "stylesheet" type="text/css" href= "{%  static 'books_website/style.css' %}">
</head>

<body>
    {% block content %}

    <h3>{{book.title}}</h3>
    <h4>{{book.price}}</h4>
    <h5>{{book.genre}}</h5>

    {% endblock %}

</body>

</html>
Here we are using the same background image, therefore the link attribute for the CSS file remains the same.
Try to understand on your own for better learning, and if you have any doubts go to Django Templates’ article to understand
Lets run this webpage as well and check

Conclusion
That’s all for the Django static files tutorial! We hope you have gained sufficient knowledge about static files and their use in Django. Also, you can learn more about the Django Static files from the official documentation.
Stay tuned for more advanced tutorials on Django topics!


