🚀 Supercharge your YouTube channel's growth with AI.
Try YTGrowAI FreeDjango PostgreSQL – How to Set up and Use a PostgreSQL database with Django?

In this article, we will learn about Django PostgreSQL Database systems. Here we perform similar operations as we did with the Django MySQL earlier. This article will help those who are interested in using PostgreSQL instead of MySQL.
What is PostgreSQL?
Similar to the MySQL Database management system, PostgreSQL is another type of RDBMS used for accessing, storing, and handling the data in the form of database tables.
SQL – Structured Query Language is used in PostgreSQL, which is used to access, perform various tasks, and handle the databases in PostgreSQL.
The Basic Structure of PostgreSQL
The data is stored in the PostgreSQL database as database objects called tables.
Just like any RDBMS, tables in PostgreSQL is a collection of rows called records containing user entry information and columns called fields having specific information about every record in the table
For eg:
| Id | Name | Class | Grade |
|---|---|---|---|
| 1 | Emma | X | A |
| 2 | Sophia | IX | A |
| 3 | Riya | VII | B |
| 4 | Kylie | VIII | C |
| 5 | Claire | XI | A |
| 6 | Lilly | XII | D |
Here there are 4 fields and 6 records.
Difference between MySQL and PostgreSQL
Though both MySQL and PostgreSQL belong to RDBMS, there are some key differences between both.
- The core difference between MySQL and PostgreSQL is that PostgreSQL is an ORDBMS (Object Relational Database Management System) while MySQL is a community-driven RDBM System.
- Another key feature is that PostgreSQL supports modern applications feature like JSON, XML, etc. while MySQL only supports JSON.
Install PostgreSQL into your system
To install PostgreSQL, visit the link here – https://www.postgresql.org/download/
Once you’ve installed PostgreSQL from the above link, open the SQL shell and follow the prompts. You’ll be asked to enter a password for your database connection.

You are currently in the PostgreSQL DB. Now we will add a new DB with name Django to store all our Models in the SQL Shell write the code
CREATE DATABASE <db_name>;
The syntax used is the basic SQL syntax. To change the current Db to django use another code:
\c <db_name>;
That’s it now you are in the new django DB.

Install psycopg2 connection driver into your system
Just like MySQL Client, psycopg2 is connection driver for PostgreSQL that we need to install in order to connect Django with PostgreSQL
Write the below code in your terminal:
pip install psycopg2
Set up the Django PostgreSQL connection in settings.py
In settings.py change the Database from the default SQLite to PostgreSQL.
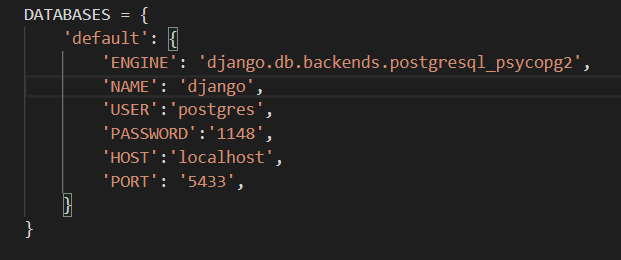
DATABASES = {

    'default': {

        'ENGINE': 'django.db.backends.postgresql_psycopg2',

        'NAME': ‘<db_name>’,

        'USER': '<db_username>',

        'PASSWORD': '<password>',

        'HOST': '<db_hostname>',

        'PORT': '<db_port>',

    }

}
Here,
- Engine: Change engine from .db.sqlite to .postgresql.psycopg2
- Name: use the DB name that we saw earlier in the shell (Postgres in my case)
- USER: This is the username we saw earlier(Postgres)
- Password: Write the password for the PostgreSQL username we entered earlier
- Host: The Db hostname(localhost)
- Port: This the DB port number that we saw earlier(5433 in my case).
Implementation of Django PostgreSQL
That’s it guys !! we now just need to make migrations to let Django know about the changes that we made, and then we are ready to go!!
python manage.py makemigrations
python manage.py migrate
You can check this from the shell as well. In the Django DB, SQLshell write the code to display all the information present in the DB
\d;

The last entry is our Model
That’s it guys !! Now we can run the server.
python manage.py runserver
Just like in the Django MySQL article, if you will go to admin site, Django will show an error message about the superuser.
This is because the information about the superuser, as well as the item records, were in the previous DB SQLite and not in the new PostgreSQL.
So in the terminal we need to create the superusers again
python manage.py createsuperuser
That’s it, guys !! Now we have successfully connected PostgreSQL with the Django web framework.
Performing Operations on the Django PostgreSQL Database setup
Similar to MySQL tutorial, we can add/edit/delete items via two ways: Through the Admin site or PHPMyAdmin site.
1) CRUD operations through admin site
This is the same well-known method that we were using until now. We were adding, editing, or deleting items from the ItemModel through the admin site.
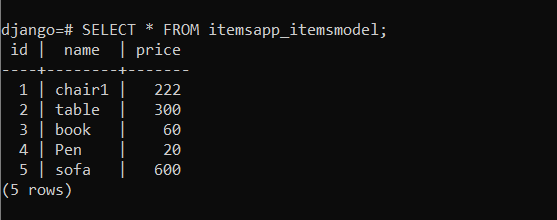
Now since we changed the Database to Django PostgreSQL, all the items in the Table will be lost. Hence we have to add a few items.

All the above information will automatically get added into the Postgres DB.
We can check this via the SQL shell. In the shell, write
SELECT * FROM <model_name>
2) CRUD Operations through SQL Shell
To add an item: In the SQL shell, write
INSERT INTO <model_name>(<fields>) VALUES <values>
The item will be added.

To edit: Write the code
UPDATE <model_name>
set column1 = value1 , column2 = value2 ....
where condition;

To DELETE: Write the code
DELETE FROM <model_name> where <condition>

You can view it in the admin site as well.
Reload the admin site, you will observe the new item there as well

See how easy it is to use Django PostgreSQL!!
Conclusion
That’s it, fellas!! We learned all about PostgreSQL and how we can connect it with Django. As a practice, do try making a web app using PostgreSQL as a database. You can learn more about PostgreSQL from the official website
Stay safe!! Keep practising !!


