🚀 Supercharge your YouTube channel's growth with AI.
Try YTGrowAI FreeGUI Applications Using Python Qt – A Beginner’s Guide

In this article, we’ll learn how to develop GUI applications with Python Qt. Without a great user interface, you can no longer expect to have a tool that works for the masses. And so, mastering the art of designing a simple interface for your applications can significantly speed up your development speed.
What is Python Qt?
Python Qt is one of the most popular Graphical User Interface development kits. Many of the big tech companies use it to develop desktop applications. Here are some of its key features:
- Cross platform: It is a cross platform software so, the applications can run on any OS.
- Open Source: A software developer can contribute to its repository using GitHub. Many programming languages support for its development. The list is:
- C/C++
- Python
- Ring
- Go
- Rust
- PHP
- Java
- Easy to learn: One can learn it at beginner level and has the ability to develop GUI apps.
- Supportive tools: It comes with a Designer studio that helps to create applications without code.
For more details visit the official website: https://www.qt.io/product/supported-platforms-languages
What is PyQt5?
PyQt5 is an extension of Qt designer studio for Python programming language. It is one of the famous GUI development APIs from Python including Tkinter, Kivy, CherryPy, and others. The main thing is we can develop apps using code and a design studio that helps place widgets without coding. Visit the project site: https://pypi.org/project/PyQt5/
Installation instructions
You need to consider the following specifications for your systems:
- Python: 3.6.x or above
- Operating systems: Windows/MAC/Linux
- IDE/Teext editor: Visual Studio Code, Vim, PyCharm, etc.
- Environment (optional): Anaconda
Open your command prompt or terminal and type in the following pip command.
pip install PyQt5

Building Simple GUI Applications Using Python Qt
Let’s get into the implementation of a simple GUI application using PyQt5 that we talked about before.
1. Creating a basic window
# importing the qtWidgets class from the PyQt5 class

from PyQt5 import QtWidgets as qtw

# creating a class of the main wndow and inheriting it from the QtWidgets QWidgrt class
class MainWindow(qtw.QWidget):
    def __init__(self):
        super().__init__()

        self.setWindowTitle('Hello GUI')
        self.show() # a method that displays everything on the screen


# instance of the QtWidget window
app = qtw.QApplication([])

# instance of the MainWindow() class
main = MainWindow()

# starting the application
app.exec_()
Output:

The explanation of the code itself will define each and every element in detail. There are basic six elements of any Qt app.
- The MainWindow class: This class holds all the widgets, buttons, texts, display screens, and other sub widgets in it. We can say it is a parent window of all the child objects.
- QtWidgets: This class is a collection of all the widgets that we use inside the MainWindow class. For any application development, it must be inherited inside the main class.
- self.setWindowTitle(): This method gives the title to our app window.
- self.show(): Everything from execution to placement and management of the whole application is under the command of this function. Just remember, if we do not call it inside the MainWindow class then the system will not display and it will only keep running in the background.
- QApplication’s instance: To run any Qt program creation of the class’s object is very essential. The QWidget module’s QApplication instance is named – app.
- MainWindows’ instance: MainWindow’s instance is to plant new functions to our application. We require it a few times but, it’s mandatory.
- Execution function: It performs the execution of our app. We shall call the function in the last line of codes.
There are several more widgets inside the PyQt5 library which are essential for rapid GUI programming.
- Box layouts: Output message boxes for displaying messages on any event.
- Labels: To define the functionality of each thing on the GUI Application we use labels. They can help a user to interact more easily with that application.
- Buttons: There are many types of buttons Qt provides like the Push button, Radio button, etc.
- Font: Fonts are attractive alphabets of various types. The main purpose of fonts is to make an attractive User Interface and give a great User Experience. They are for decorating the texts.
Electronic display (LCD)screen: Digital display of numbers adds an attractive look to the application. LCD numbers are mostly for Calculators or metric converter applications.
Installing Qt Designer Studio
This is a huge library that provides us with tons of options and packages that make GUI programming a lot easier. The main benefit is that it comes with a built-in Qt Designer Studio. It is a drag and drop interface that helps us in the rapid development of desktop applications.
In the previous versions, the Designer came built-in with the library. But, due to new development, it has been a separate package for PyQt5. So, to add it to the system, use the following:
- Open command prompt and type in pip install PyQt5Designer.
- To launch it simply type the command – ‘designer’ in the command prompt. The interface looks like this.

This is the simplest operational GUI builder. The only thing we need to do is to make the objects drag and drop into the Main Window. Then save that file and we are ready to program the inner functioning.
Point to note: The designer can only create a layout of the GUI Application. We need to explicitly program the app through Python code.
Designing GUI Applications with PyQt5 Designer studio
In this section, we will be creating a simple GUI application and executing it using command line arguments. It will not be a working one. This is just a demo of how we create basic layouts and then change them to the scripts. So let us start:
1. Setting up the main window
Open the designer by typing the designer.exe in the command prompt and then the selection pane opens. It will ask for the type of background window type. Choose the Main Window option and then it creates a blank interface for us:

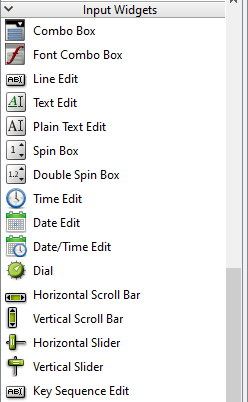
2. The widget selection box tour
The widget selection box is on the left side of the window. There are various types of widgets for every large to small use. So, we will just have a look at them:

Here are all of them:


3. Creating a simple push button app
The push button is a simple button that performs a single task. It may be logging in to a website, starting a process, launching a game, etc. We just need to give a push. The mechanism of our app is simple.
When we will click on it, it will say Clicked!!!. This is one of the common apps beginners try to build as it describes how a GUI will work.
- Open the designer and select the background placer as Main Window.
- Select push button from the widget menu and drag it inside the Main Window.

3. On the right side there is the properties palette. We can change the properties of each object through it. There is a necessity that every object shall have a unique name. So, we name the push Button click_me_button. After that, we change the size of our button by stretching it using the endpoints at each side.

4. Then we place a label and then we apply the same changes. The font is very small, so, we change the font size to 36 in the property palette. One can explore the font section as it has tons of options to modify. We change the text of the label to Hello and the button to Click me. Collectively our layout looks like this.


Now that we have a basic application. Just save it in the required directory of choice. So, go to the File option on the top left corner and click on Save or use keys ‘Ctrl + S’. The name we give it a myui.ui. But, it is an <?xml> file with the “.ui” extension.

To execute that file we need to convert it into a Python script. There is a special command for conversion:
pyuic5 -x app_name.ui -o app_name.py
Go to the command prompt and input this command and hit enter. We can give the python script any name but, make sure that the name of the UI file we saved previously should be correct otherwise the command will fail.

Now, we have the Python script namely my_app.py for our application. Remember to place it in the same directory where the .ui file exists, this makes future tasks much easier. When we open the script, it contains the whole code inside it which is auto-generated. It is just like magic. Let us see that:
Code (automatically created by the system with the “pyuic5” command):
# -*- coding: utf-8 -*-

# Form implementation generated from reading ui file 'myui.ui'
#
# Created by: PyQt5 UI code generator 5.15.6
#
# WARNING: Any manual changes made to this file will be lost when pyuic5 is
# run again.  Do not edit this file unless you know what you are doing.


from PyQt5 import QtCore, QtGui, QtWidgets


class Ui_MainWindow(object):
    def setupUi(self, MainWindow):
        MainWindow.setObjectName("MainWindow")
        MainWindow.resize(253, 264)
        self.centralwidget = QtWidgets.QWidget(MainWindow)
        self.centralwidget.setObjectName("centralwidget")
        self.click_me_button = QtWidgets.QPushButton(self.centralwidget)
        self.click_me_button.setGeometry(QtCore.QRect(0, 130, 251, 91))
        font = QtGui.QFont()
        font.setPointSize(36)
        self.click_me_button.setFont(font)
        self.click_me_button.setObjectName("click_me_button")
        self.helo_world_label = QtWidgets.QLabel(self.centralwidget)
        self.helo_world_label.setGeometry(QtCore.QRect(10, 40, 241, 81))
        font = QtGui.QFont()
        font.setPointSize(36)
        self.helo_world_label.setFont(font)
        self.helo_world_label.setObjectName("hello_world_label")
        MainWindow.setCentralWidget(self.centralwidget)
        self.menubar = QtWidgets.QMenuBar(MainWindow)
        self.menubar.setGeometry(QtCore.QRect(0, 0, 253, 21))
        self.menubar.setObjectName("menubar")
        MainWindow.setMenuBar(self.menubar)
        self.statusbar = QtWidgets.QStatusBar(MainWindow)
        self.statusbar.setObjectName("statusbar")
        MainWindow.setStatusBar(self.statusbar)

        self.retranslateUi(MainWindow)
        QtCore.QMetaObject.connectSlotsByName(MainWindow)

    def retranslateUi(self, MainWindow):
        _translate = QtCore.QCoreApplication.translate
        MainWindow.setWindowTitle(_translate("MainWindow", "MainWindow"))
        self.click_me_button.setText(_translate("MainWindow", "Click Me"))
        self.helo_world_label.setText(_translate("MainWindow", "Hello!"))


if __name__ == "__main__":
    import sys
    app = QtWidgets.QApplication(sys.argv)
    MainWindow = QtWidgets.QMainWindow()
    ui = Ui_MainWindow()
    ui.setupUi(MainWindow)
    MainWindow.show()
    sys.exit(app.exec_())
When we run this code, we get a basic user interface that does nothing.
Output:

Now, it’s time to add some action to the button.
When we click that button, the label shall display something. To make it happen we will define a function as press_the_button(). When someone clicks it, the label will display ‘Hello World’ instead of just ‘Hello’.
Code for the function:
 # a function that passes a string 'hello world' when we click a button
    def press_the_button(self):
        self.hello_world_label.setText('Hello world!')
Let’s add the function as a lambda parameter.
self.click_me_button = QtWidgets.QPushButton(self.centralwidget)
The purpose of using this anonymous function is: Passing an already existing function call to the new widget before its declaration creates an error and so lambda manages it very well. After the implementation it looks like this:

After this we save the code and relaunch the application and click on the button, it displays the text: ‘Hello World’.
Output:


So, in this way, we can make changes and create awesome GUI applications with PyQt5 and Python.
Conclusion
The topic of developing a Rapid GUI application with Qt and Python ends here. This library is very large and has many parts yet to be understood and implemented. So, I recommend the readers make sure they read the installation process and further sections carefully. A lot more is yet to come on this topic.


