🚀 Supercharge your YouTube channel's growth with AI.
Try YTGrowAI FreePython Tkinter: Celsius to Fahrenheit Converter

Hello fellow programmer! Today we are going to build our own application to convert Celsius to Fahrenheit using Python tkinter.
Building a Celsius to Fahrenheit Converter using Tkinter
The topic is self explanatory, hence we directly move to the implementation part.
Step 1: Creating a window
Before we begin with the main parts of the project we have to create a blank customized window. The code for the same is shown below:
import tkinter as tk
window = tk.Tk()
window.geometry("300x250")
window.config(bg="#A569BD")
window.resizable(width=False,height=False)
window.title('Celsius to Fahrenheit Converter!')
We make sure to do the following things in this step:
- Import
tkintermodule - Creating a window object and setting the dimensions and background color of the window
- Set the resizable attributes as false to make sure the dimensions mentioned stay fixed.
- Setting the title of the application
The result of the code mentioned above is as follows:

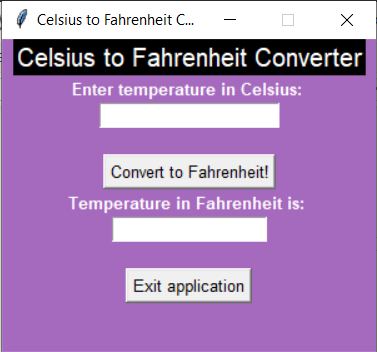
Step 2: Adding the basic elements to the screen
The basic elements used for the application as listed below:
- Two Labels: Information about the application
- Entry box: Take input of the temperature value
- Button_1: To convert the temperature to Fahrenheit
- Text Box: To show the result of the converted temperature
- Button_2: To exit the application
The code to add all the elements is shown below:
l1 = tk.Label(window,text="Celsius to Fahrenheit Converter",font=("Arial", 15),fg="white",bg="black")
l2= tk.Label(window,text="Enter temperature in Celsius: ",font=("Arial", 10,"bold"),fg="white",bg="#A569BD")
l3= tk.Label(window,text="Temperature in Fahrenheit is: ",font=("Arial", 10,"bold"),fg="white",bg="#A569BD")

empty_l1 = tk.Label(window,bg="#A569BD")
empty_l2 = tk.Label(window,bg="#A569BD")

e1= tk.Entry(window,font=('Arial',10))

btn1 = tk.Button(window,text="Convert to Fahrenheit!",font=("Arial", 10))
btn2 = tk.Button(window,text="Exit application",font=("Arial", 10))

t1=tk.Text(window,state="disabled",width=15,height=0)
In addition to all the mentioned elements, we make sure we have some empty labels to add new line between two elements.
For adding the elements on the screen we make use of the pack function and pack all elements in a particular order. Packing code is shown below:
l1.pack()
l2.pack()
e1.pack()
empty_l1.pack()
btn1.pack()
l3.pack()
t1.pack()
empty_l2.pack()
btn2.pack()
The output looks something like what’s shown below:
Step 3: Adding Functionalities to the Buttons
Button 1: Exit Application Button
Let us create a simpler button first to exit the application. All we need to do is create a function which will destroy the window. The code for the same is shown below:
def exit():
    window.destroy()
To execute the function on the button click, we add the command attribute to the exit application button. And add the command as the exit function.
Button 2: Convert Temperature Button
The second button converts the temperature to ‘Fahrenheit’ and the same involves the following steps:
- Get the Celsius temperature from the entry box
- Use the formula to convert the temperature obtained to Fahrenheit temperature
- Clear the textbox
- Insert the value of the temperature calculated into the textbox
The code for the same is shown below:
def convert():
    c = int(e1.get())
    f = ((c*9)/(5))+32
    t1.config(state='normal')
    t1.delete('1.0', tk.END)
    t1.insert(tk.END,f)
    t1.config(state='disabled')
To make the function, executable on the button click add the command attribute to the convert button.
Complete Code for Celsius to Farhenheit Converter
def exit():
    window.destroy()

def convert():
    c = int(e1.get())
    f = ((c*9)/(5))+32
    t1.config(state='normal')
    t1.delete('1.0', tk.END)
    t1.insert(tk.END,f)
    t1.config(state='disabled')

import tkinter as tk
window = tk.Tk()
window.geometry("300x250")
window.config(bg="#A569BD")
window.resizable(width=False,height=False)
window.title('Celsius to Fahrenheit Converter!')

l1 = tk.Label(window,text="Celsius to Fahrenheit Converter",font=("Arial", 15),fg="white",bg="black")
l2= tk.Label(window,text="Enter temperature in Celsius: ",font=("Arial", 10,"bold"),fg="white",bg="#A569BD")
l3= tk.Label(window,text="Temperature in Fahrenheit is: ",font=("Arial", 10,"bold"),fg="white",bg="#A569BD")

empty_l1 = tk.Label(window,bg="#A569BD")
empty_l2 = tk.Label(window,bg="#A569BD")

e1= tk.Entry(window,font=('Arial',10))

btn1 = tk.Button(window,text="Convert to Fahrenheit!",font=("Arial", 10),command=convert)
btn2 = tk.Button(window,text="Exit application",font=("Arial", 10),command=exit)

t1=tk.Text(window,state="disabled",width=15,height=0)

l1.pack()
l2.pack()
e1.pack()
empty_l1.pack()
btn1.pack()
l3.pack()
t1.pack()
empty_l2.pack()
btn2.pack()

window.mainloop()
Sample Outputs
The application above was tested for two test samples and the results were perfect! The output screes for both the inputs are shown below:


Conclusion
Congratulations! You have successfully built an application that converts Celsius temperature to Fahrenheit temperature.
Hope you liked the project! Keep coding!


