🚀 Supercharge your YouTube channel's growth with AI.
Try YTGrowAI FreeHow to create a chatroom in Python?

In this article, we’ll go from the start to end and create a chatroom in Python. Before we dive in, let’s gain a conceptual understanding of what a chatroom is.
What is Chatroom?
Chat room is a space for people across the globe to communicate with each other about various topics. The topics can range from anything such as app development to any recipes made in the kitchen. Chat rooms are great platforms for learning how to communicate. In this article, I shall introduce to you how to make a small chat room using the basic concepts with sockets and python.
Now, in this tutorial, we are going to build a real-time chat app using sockets in python. Let us begin with the concept of sockets.
What is a Socket?
A socket, in networking terminologies, serves as an intermediate connecting the application layer to the transport layer in the TCP/IP protocol suite. These network sockets are present on the client-side and the server-side.
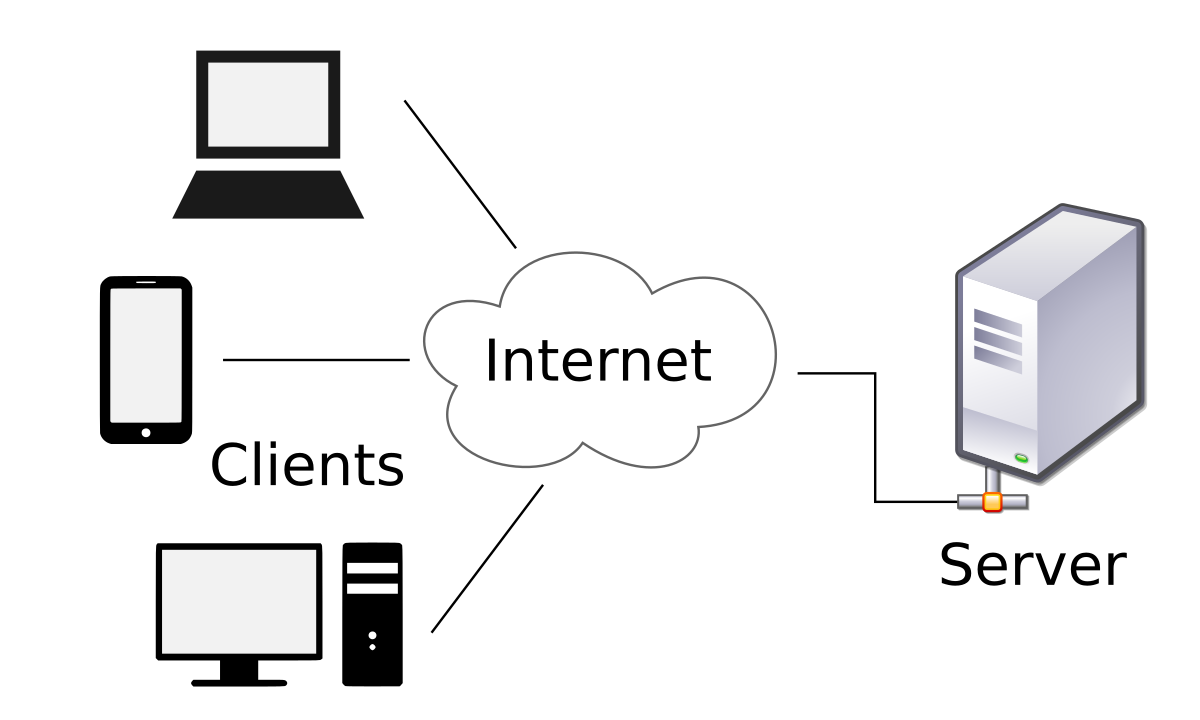
Socket programming is a way of connecting two nodes on a network to communicate with each other. One socket(node) listens on a particular port at an IP, while another socket reaches out to the other to form a connection. The server forms the listener socket while the client reaches out to the server.
Chatroom Server-Side Socket Programming
The server accepts connections from the clients to establish a network interface. We need to ensure that clients/users are unique. Hence we assign a unique IP address to each client. However many users prefer to be identified by a username. Hence we will assign usernames as well.
The role of the server is to collect any incoming messages and deliver them to the other client/clients.
Let’s begin coding the server-side. Firstly, create a file named server.py.
1. Importing Required Libraries
import socket
import sys
import time
Firstly, we import the socket library because this python library contains the necessary functions to implement sockets.
The sys library provides the system module which is responsible for providing data related to the system directory, functions, and methods.
The time module enables us to perform numerous actions about the conversions and descriptions of time.
2. Creating the Socket and Retrieving the Hostname
new_socket = socket.socket()
host_name = socket.gethostname()
s_ip = socket.gethostbyname(host_name)
port = 8080
The socket() function is a constructor of the socket library to create a socket.
Once the socket is created, we retrieve the hostname/local device name using the gethostname(), which is again a function of the socket library.
The gethostname() when sent with host_name as parameter retrieves the IP address of the other user and this IP is stored in s_ip.
The port is assigned as 8080. This port is chosen because this is a default-free port on most machines. Generally, ports like 3000, 5000, etc are used for other applications like express.js. You can also run it on any port such as ‘1234’.
3. Binding the Host and Port
new_socket.bind((host_name, port))
print( "Binding successful!”)
print("This is your IP: ", s_ip)
Now we will bind the port and host together using the bind function which is invoked on the socket object new_socket. Once the binding is successful, it prints “Binding successful!” on the console.
4. Listening for Connections
name = input('Enter name:')
new_socket.listen(1)
Here, we use the listen() function which takes in one argument namely number_of_connections. This parameter can be any whole number such as 1,2,3,…
5. Accepting Incoming Connections
conn, add= new_socket.accept()
print("Received connection from ", add[0])
print('Connection Established. Connected From: ',add[0])
The first variable which is conn is connected to the socket and the variable ‘add’ is assigned to the IP address of the client.
6. Storing Incoming Connection Data
client = (conn.recv(1024)).decode()
print(client + ' has connected.')
conn.send(name.encode())
The details of the incoming connection are stored in the client_name variable. The client’s name can be a maximum of 1024 bytes. It is decoded on the server and prints a message that it has been connected. The server then sends the hostname.
7. Delivering Packets/Messages
while True:
    message = input('Me : ')
    conn.send(message.encode())
    message = conn.recv(1024)
    message = message.decode()
    print(client, ':', message)
The user enters the message. This is encoded using encode() and then sent across through the socket. The message is sent using the send() function which is invoked on the connection object created during the invocation of accept() function earlier. It then displays “message has been sent…”.
The incoming message is received using the recv() of the conn object. It can receive up to 1024 bytes of information. The message is decoded on the server-side using decode().
Complete Server-Side Chatroom Code
Here’s the complete server side chatroom code:
import time, socket, sys

new_socket = socket.socket()
host_name = socket.gethostname()
s_ip = socket.gethostbyname(host_name)

port = 8080

new_socket.bind((host_name, port))
print( "Binding successful!”)
print("This is your IP: ", s_ip)

name = input('Enter name: ')

new_socket.listen(1)


conn, add = new_socket.accept()

print("Received connection from ", add[0])
print('Connection Established. Connected From: ',add[0])

client = (conn.recv(1024)).decode()
print(client + ' has connected.')

conn.send(name.encode())
while True:
    message = input('Me : ')
    conn.send(message.encode())
    message = conn.recv(1024)
    message = message.decode()
    print(client, ':', message)

Chatroom Client-Side Socket Programming
We’ll create a file named client.py and create our code to connect and communicate with the chat server.
1. Importing Libraries
import socket
import sys
import time
We import the same libraries used on the server-side.
2. Creating the Socket and Accepting User Input Hostname
socket_server = socket.socket()
server_host = socket.gethostname()
ip = socket.gethostbyname(server_host)
sport = 8080
- The socket at the server is created using the
socket()method. - The hostname of the server is retrieved at the client-side and stored as
server_host. - The IP address is stored in
ip. - The server port is stored as 8080 in the
sportvariable.
Please note, this port must match with the port mentioned on the server-side code.
3. Connecting to the Server
print('This is your IP address: ', ip)
server_host = input('Enter friend\'s IP address:')
name = input('Enter Friend\'s name: ')

socket_server.connect((server_host, sport))
The details of the server (friend) is entered first. Please note, it is important to enter the exact IP address otherwise the communication will fail.
The hostname of the server and the port are bound together in a way and connected to the socket.
4. Receiving Packets/Messages from the Server
socket_server.send(name.encode())
server_name = socket_server.recv(1024)
server_name = server_name.decode()

print(server_name,' has joined...')
while True:
    message = (socket_server.recv(1024)).decode()
    print(server_name, ":", message)
    message = input("Me : ")
    socket_server.send(message.encode())
To receive messages, the socket_server invokes the recv() function to accept 1024 of data. This is stored in the message object and decoded using decode() function. The message is then printed with the hostname of the server and the message received.
The client can enter any message as input and encode the same and send it to the server using the socket.
Hence, we have deployed a real-time chat room using sockets and python.
Complete Client-Side Chatroom Code
Here’s the complete code of the client-side of our chatroom:
import time, socket, sys

socket_server = socket.socket()
server_host = socket.gethostname()
ip = socket.gethostbyname(server_host)
sport = 8080

print('This is your IP address: ',ip)
server_host = input('Enter friend\'s IP address:')
name = input('Enter Friend\'s name: ')


socket_server.connect((server_host, sport))

socket_server.send(name.encode())
server_name = socket_server.recv(1024)
server_name = server_name.decode()

print(server_name,' has joined...')
while True:
    message = (socket_server.recv(1024)).decode()
    print(server_name, ":", message)
    message = input("Me : ")
    socket_server.send(message.encode())

Conclusion
Copy both the complete code snippets, save them as server.py and client.py respectively and you’ll have your first chatroom in Python! It’s very easy to work with and I’m sure you’ll learn a lot of the practical aspects of socket programming.
References


