🚀 Supercharge your YouTube channel's growth with AI.
Try YTGrowAI Free5 Ways To Display Images in Python

In this tutorial, we shall explore the different ways to read and display images using Python. We can achieve this in numerous ways. The reason for this is the abundant library support in Python for image processing. We will also explore how we can use them in crossbreeding with each other.
Ways to Display Images Using Python
The following is a list of libraries of Python that enable us to process the images and do the corresponding tasks.
- OpenCV
- Matplotlib
- Pillow
- Scikit-Image
- Tensorflow
Let’s now delve into how to display an image in a Python GUI window with ease. There may be many other modules and/or hacks to view images too, so don’t limit yourself to just these 5 modules!
1. Using OpenCV to Display Images in Python
OpenCV is a renowned, beginner-friendly open-source package pivotal for image processing in Python tutorials. With a small set of commands, we can take our Computer Vision journey to next level. OpenCV offers two main functions, cv2.imread and cv2.imshow, to read and display images in Python.
- cv2.imread()
- cv2.imshow()
Code:
import sys # to access the system
import cv2
img = cv2.imread("sheep.png", cv2.IMREAD_ANYCOLOR)

while True:
    cv2.imshow("Sheep", img)
    cv2.waitKey(0)
    sys.exit() # to exit from all the processes

cv2.destroyAllWindows() # destroy all windows
Output:

Explanation:
- Import the OpenCV package to access the functions. Also, import the sys module for additional packages.
- Create a variable as img that holds our image. Call the cv2.imread() function and deliver the image path/image name as a first parameter. Then set the cv2.IMREAD_ANYCOLOR is the next parameter to read every color of the image.
- Then, implement a while loop that continually renders the image until a user decides to exit the application.
- Then use the cv2.imshow() function inside the while loop. It takes two parameters, the image title and the image path variable img.
- The cv2.waitkey() method waits till we exit or click on the close button.
- Then call the sys.exit() method to safely exit the technique.
- Finally, we destroy all the created windows using cv2.destroyAllWindows().
2. Matplotlib
Matplotlib is a Python package primarily used for data visualization and image display. But, through the plotting techniques, we can view the image in a graphical format where each pixel lies on 2D x-y axes.
Thie library also has the equivalent functions as that of open cv. Just the package name changes.
- matplotlib.image.imread()
- matplotlib.pyplot.imshow()
Code:
from matplotlib import pyplot as plt
from matplotlib import image as mpimg
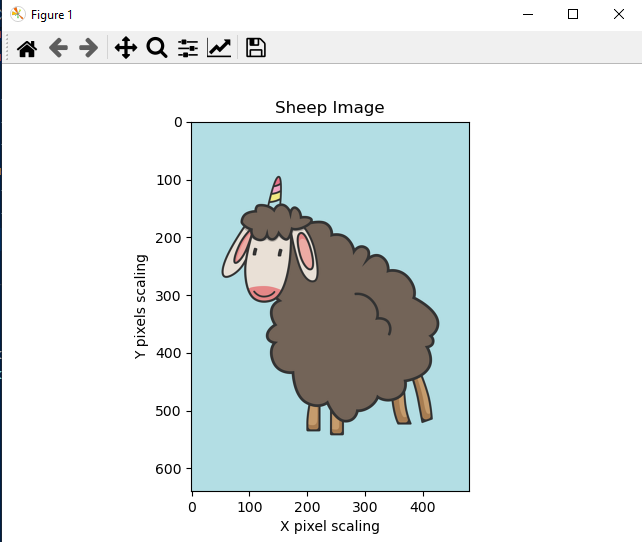
plt.title("Sheep Image")
plt.xlabel("X pixel scaling")
plt.ylabel("Y pixels scaling")
image = mpimg.imread("sheep.png")
plt.imshow(image)
plt.show()
Output:
Explanation:
- Import the Matplotlib packages’ pylot and image modules.
- Set the title of the image as Sheep Image using plt.title() method.
- As matplotlib reads the image in x-y plane. We need labels xlabel() and ylabel() functions to mention the axes and the pixels.
- Create a variable as an image that holds our image. Call the mpimg.imread() function and give the image path/image name as a first parameter.
- Then, implement a while loop that continually renders the image until a user decides to exit the application.
- Then use the plt.imshow() function that takes image variable img. But it will show it in the backend.
- To view it on the screen use the plt.show() method and we have our image with properly scaled parameters on the screen.
3. Pillow
Pillow, or Python Imaging Library, offers simple methods for image manipulations, making it a go-to Python Imaging Library. We can say that it is an image-only library because of its simplicity and adaptability. The functions we are gonna using are open() and show() from PILLOW’s Image module. This action is just within three lines of code.
Code:
from PIL import Image
img = Image.open("sheep.png")
img.show()
Output:

Explanation:
- Import the module Image from PIL.
- Create a variable img and then call the function open() in it. Give the path that has the image file.
- Call the show() function in joint with img variable through the dot operator “.”.
- It displays the image through the built-in Photo app in your respective OS.
4. Scikit-Image
Scikit-Image, a sub-module of Scikit-Learn, is essential for image processing in Python. It is built upon Python and supportive library Matplotlib thus it derives some of its functionalities. Methods are similar to that of the previous packages we saw before.
Code:
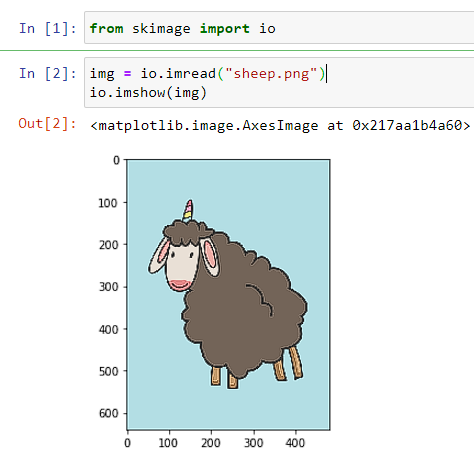
from skimage import io

img = io.imread("sheep.png")
io.imshow(img)
Output:
5. Tensorflow
TensorFlow, an AI and machine learning library from Google.Inc, is a powerful tool for data scientists. It works on different aspects of Machine Learning, Deep Learning, and related concepts. It also has built-in datasets to start a hassle-free journey of Data Science and ML engineering. It works specifically on the computer’s GPU CUDA cores. This makes the model training more efficient and gives less stress to the CPU.
We will be using this library in joint with the Matplotlib module. Because this makes image plotting and displaying much easier.
Code:
from warnings import filterwarnings
import tensorflow as tf
from tensorflow import io
from tensorflow import image
from matplotlib import pyplot as plt

filterwarnings("ignore")
tf_img = io.read_file("sheep.png")
tf_img = image.decode_png(tf_img, channels=3)
print(tf_img.dtype)
plt.imshow(tf_img)
# plt.show()
Explanation:
- Import TensorFlow. Then from TensorFlow also import io and image.
- Import matplotlib’s pyplot module for plotting purposes.
- (Optional) also, use the warnings package to avoid unnecessary warnings.
- Create a TensorFlow image variable “tf_img” and call the io.read_file() method. Give the image path inside it.
- It is read as a default file. To view it as the image we need to use the decode_png() function from the image to get recognized by the system. Make sure you use the correct decider function. They are different for each image type. Use channels = 3. for default GPU usage.
- Finally, display the captured image through the plt.imshow() method.
Output:

Conclusion
Thus, these are the diverse ways to display images in Python, each with its unique capabilities and challenges. Python has a ton of options for each unique task. Comment down which method and library do you like the most we implemented in this article.


