🚀 Supercharge your YouTube channel's growth with AI.
Try YTGrowAI FreeHandling Large Datasets for Machine Learning in Python

Large datasets have now become part of our machine learning and data science projects. Such large datasets don’t fit into RAM and become impossible to apply machine learning algorithms to them. Your system becomes slow which avoids you to perform other tasks as well. Therefore, in this tutorial, we will learn how to handle large datasets for your machine learning or data science projects.
Handling Large Datasets with Pandas
Pandas module is most widely used for data manipulation and analysis. It provides powerful DataFrames, works with file formats like CSV, JSON, etc, and is easy to remove duplicates and data cleaning.
However, dealing with large datasets still becomes a problem in pandas. Here are the things you can try.
We will load the training dataset of NYC Yellow Taxi 2015 dataset from Kaggle using various methods and see the memory consumptions using psutil.virtual_memory().
1. Chunking your data
If you do not need all the data at the same time, you can load your data in pieces called chunks. A chunk is a part of our dataset. We can use read_csv() and pass a parameter chunksize. Chunk size depends on how much RAM you have.
import pandas as pd
import psutil

# Loading the training dataset by chunking dataframe
memory_timestep_1 = psutil.virtual_memory()

data_iterator = pd.read_csv("dataset/train_2015.csv", chunksize=100000)
fare_amount_sum_chunk = 0
for data_chunk in data_iterator:
  fare_amount_sum_chunk += data_chunk['fare_amount'].sum()

memory_timestep_2 = psutil.virtual_memory()

memory_used_pd = (memory_timestep_2[3] - memory_timestep_1[3])/(1024*1024)
print("Memory acquired with chunking the dataframe: %.4f MB"%memory_used_pd)


# Loading the training dataset using pandas
memory_timestep_3 = psutil.virtual_memory()

training_data_pd = pd.read_csv("dataset/train_2015.csv")
fare_amount_sum_pd = training_data_pd['fare_amount'].sum()

memory_timestep_4 = psutil.virtual_memory()

memory_used_pd = (memory_timestep_4[3] - memory_timestep_3[3])/(1024*1024)
print("Memory acquired without chunking the dataframe: %.4f MB"%memory_used_pd)
Memory acquired with chunking the dataframe: 103.0469 MB
Memory acquired without chunking the dataframe: 854.8477 MB
2. Dropping columns
Sometimes, we only need a subset of columns and not all columns for our analysis. There are a lot of columns present in a dataset that is not needed. Thus, we will only load a few columns to our memory that are useful by using parameter in read_csv() called usecols.
import pandas as pd
import psutil

# Loading the training dataset by chunking dataframe
memory_timestep_1 = psutil.virtual_memory()

columns = ['fare_amount', 'trip_distance']
data_1 = pd.read_csv("dataset/train_2015.csv", usecols=columns)

memory_timestep_2 = psutil.virtual_memory()

memory_used_pd = (memory_timestep_2[3] - memory_timestep_1[3])/(1024*1024)
print("Memory acquired by sampling columns: %.4f MB"%memory_used_pd)


# Loading the training dataset using pandas
memory_timestep_3 = psutil.virtual_memory()

data_2 = pd.read_csv("dataset/train_2015.csv")

memory_timestep_4 = psutil.virtual_memory()

memory_used_pd = (memory_timestep_4[3] - memory_timestep_3[3])/(1024*1024)
print("Memory acquired without sampling columns: %.4f MB"%memory_used_pd)
Memory acquired by sampling columns: 25.7812 MB
Memory acquired without sampling columns: 896.5195 MB
3. Choosing right datatypes
The default datatypes used by pandas for values are not most memory efficient. We can change the datatypes of a few of our columns based on the values they store and thus can load large datasets in memory.
For example, our dataset contains column VendorID, which takes values 1 and 2 only. But the type used by pandas is int64. We can convert it to a boolean which reduces the storage. Also, we will convert columns pickup_latitude pickup_longitude, dropoff_latitude, dropoff_longitude from float64 to float32, and payment_type to categorical.
import pandas as pd
from sys import getsizeof

data = pd.read_csv("dataset/train_2015.csv")

size = getsizeof(data)/(1024*1024)
print("Initial Size: %.4f MB"%size)

# chaning VendorID to boolean
data.VendorID = data.VendorID.apply(lambda x: x==2)

# chaning pickup_latitude, pickup_longitude, dropoff_latitude, dropoff_longitude to float32
location_columns = ['pickup_latitude','pickup_longitude',
                    'dropoff_latitude','dropoff_longitude']
data[location_columns] = data[location_columns].astype('float32')

# chaning payment_type to categorical
data.payment_type = data.payment_type.astype('category')

size = getsizeof(data)/(1024*1024)
print("Size after reduction: %.4f MB"%size)
Initial Size: 957.8787 MB
Size after reduction: 873.8545 MB
Handling Large Datasets with Dask
Dask is a parallel computing library, which scales NumPy, pandas, and scikit module for fast computation and low memory. It uses the fact that a single machine has more than one core, and dask utilizes this fact for parallel computation.
We can use dask data frames which is similar to pandas data frames. A dask data frame consists of multiple smaller pandas data frames under the hood. A method call on a single Dask DataFrame is making many pandas method calls, and Dask knows how to coordinate everything to get the result.
Let’s load the training dataset of NYC Yellow Taxi 2015 dataset from Kaggle using both pandas and dask and see the memory consumptions using psutil.virtual_memory().
import pandas as pd
import dask.dataframe as ddf
import psutil

#Loading the training dataset using dask
memory_timestep_3 = psutil.virtual_memory()

training_data_ddf = ddf.read_csv("dataset/train_2015.csv")

memory_timestep_4 = psutil.virtual_memory()

memory_used_ddf = (memory_timestep_4[3] - memory_timestep_3[3])/(1024*1024)
print("Memory acquired using dask: %.4f MB"%memory_used_ddf)


# Loading the training dataset using pandas
memory_timestep_1 = psutil.virtual_memory()

training_data_pd = pd.read_csv("dataset/train_2015.csv")

memory_timestep_2 = psutil.virtual_memory()

memory_used_pd = (memory_timestep_2[3] - memory_timestep_1[3])/(1024*1024)
print("Memory acquired using pandas: %.4f MB"%memory_used_pd)
Memory acquired using dask: 5.1523 MB
Memory acquired using pandas: 832.1602 MB
One major difference between dask and pandas data frame is that dask data frame operations are lazy. The operations are not executed immediately like pandas but a task graph is made by dask and the values are read when they are needed. After the values have been used, they are discarded from memory, and that’s why dask works on data that doesn’t fit in memory.
Image Data Generator
If you are working with images that take huge memory on disk and can’t be loaded in the memory at the same time, you can use Keras ImageDataGenerator that will load images for you directly from the disk in batches.
Not just this, it also gives you the ability for Image Augmentation where you can transform your images using rotation, scaling, flipping, etc without creating new images which help you generate a diverse dataset for your ML projects.
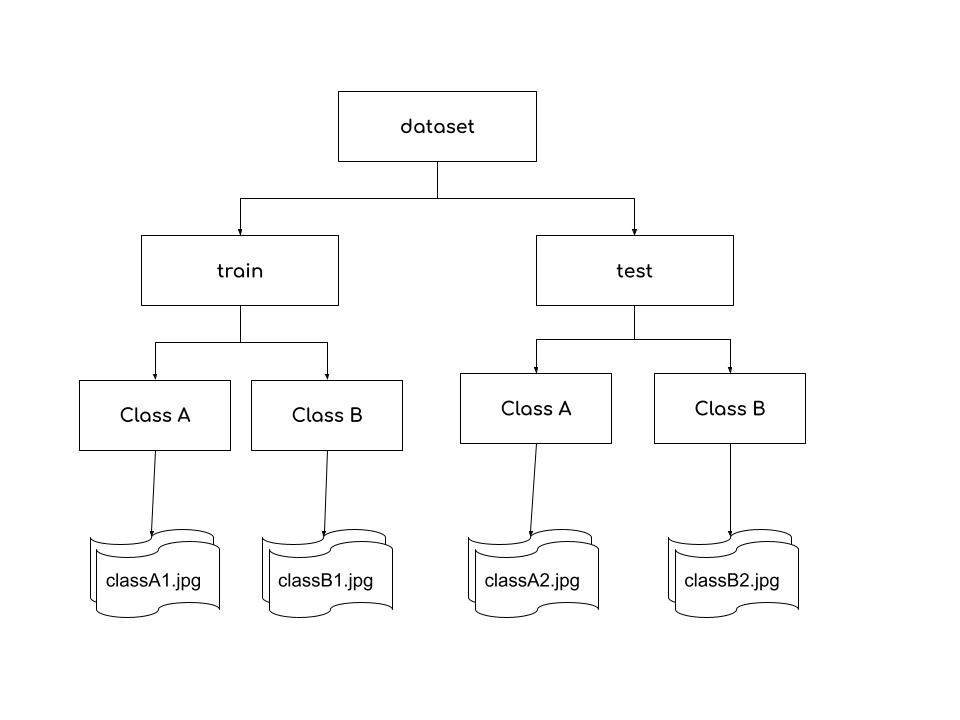
There is a standard way to make your dataset directory structure for using ImageDataGenerator. Your training dataset directory should contain subdirectories with the same names as your classes. Within your sub-directories, store your images of the same class, image file names don’t matter.
Let’s use Cats and Dogs dataset from Kaggle and load it using ImageDataGenerator. First we will create an object of ImageDataGenerator and will load the data using flow_from_directory() method.
from tensorflow.keras.preprocessing.image import ImageDataGenerator
import matplotlib.pyplot as plt

# Create object of ImageDataGenerator
datagen = ImageDataGenerator(
    rotation_range=20, # randomly rotate images by 20 degrees
    horizontal_flip = True # randomly flip images
)

# Create generator using flow_from_directory method
data_generator = datagen.flow_from_directory(
    directory = "/content/dataset/training_set/training_set", # specify your dataset directory
    batch_size=16, # specify the no. of images you want to load at a time
)

# load a batch using next
images, labels = next(data_generator)

nrows = 4
ncols = 4
fig = plt.figure(figsize=(10,10))
for i in range(16):
  fig.add_subplot(nrows, ncols, i+1)
  plt.imshow(images[i].astype('uint8'))
  plt.axis(False)

plt.show()

Custom Data Generator
If none of the above methods work for you and still looking for some magic to happen, this is what you can do.
You can define your own data generators with full control by inheriting tf.keras.utils.Sequence class. Your class must implement the __getitem__ and the __len__ methods. If you want to modify your dataset between epochs you may implement on_epoch_end.
This way you can directly load your dataset on fly from the directory and use only that much RAM that is needed. You can use this in your model.fit() to provide dataset.
import tensorflow as tf
import cv2
import numpy
import os
import matplotlib.pyplot as plt

class CustomDataGenerator(tf.keras.utils.Sequence):

  def __init__(self, batch_size, dataset_directory):
    self.batch_size = batch_size
    self.directory = dataset_directory
    self.list_IDs = os.listdir(self.directory)

  # Returns the number of batches to generate
  def __len__(self):
    return len(self.list_IDs) // self.batch_size

  # Return a batch of given index
  # Create your logic how you want to load your data
  def __getitem__(self, index):
    batch_IDs = self.list_IDs[index*self.batch_size : (index+1)*self.batch_size]
    images = []
    for id in batch_IDs:
      path = os.path.join(self.directory, id)
      image = cv2.imread(path)
      image = cv2.resize(image, (100,100))
      images.append(image)

    return images


dog_data_generator = CustomDataGenerator(
    batch_size = 16,
    dataset_directory = "/content/dataset/training_set/training_set/dogs"
)

# get a batch of images
images = next(iter(dog_data_generator))

nrows = 4
ncols = 4
fig = plt.figure(figsize=(10,10))
for i in range(16):
  fig.add_subplot(nrows, ncols, i+1)
  plt.imshow(images[i].astype('uint8'))
  plt.axis(False)

plt.show()

Conclusion
Congratulations! You now know different ways on how to handle large datasets. Now you can use them in your Data Science and Machine Learning projects and low memory will not be a problem now.
Thanks for reading!


