🚀 Supercharge your YouTube channel's growth with AI.
Try YTGrowAI FreePython: Image Segmentation

Hello there fellow coder! Today in this tutorial we will understand what Image Segmentation is and in the later sections implement the same using OpenCV in the Python programming language.
What is Image Segmentation?
Image Segmentation implies grouping a similar set of pixels and parts of an image together for easy classification and categorization of objects in the images.
Why is Image Segmentation Needed?
Image Segmentation is an important stage in Image processing systems as it helps in extracting the objects of our interest and makes the future modeling easy. It helps to separate the desired objects from the unnecessary objects.
Applications of Image Segmentation
Image Segmentation has various applications in the real life. Some of them are as follows:
- Traffic Management System
- Cancer and other medical issue detection
- Satellite Image Analysis
Image Segmentation Implementation
1. Importing Modules
All the necessary modules required for Image Segmentation implementation and Image plotting are imported into the program.
import numpy as np
import cv2
from matplotlib import pyplot as plt
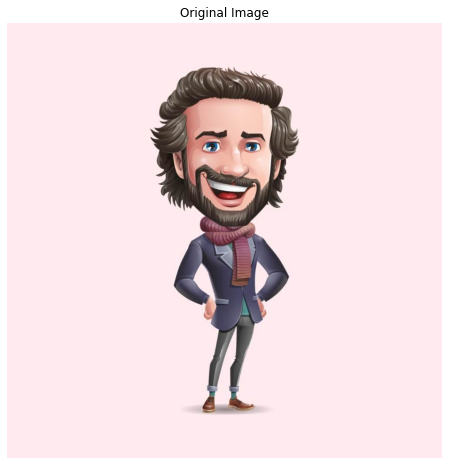
2. Loading Original Image
The next step is to load the original image ( stored in the same directory as the code file ) using the code below. The output is also displayed right below the code.
img = cv2.imread('image1.jpg')
img=cv2.cvtColor(img,cv2.COLOR_BGR2RGB)
plt.figure(figsize=(8,8))
plt.imshow(img,cmap="gray")
plt.axis('off')
plt.title("Original Image")
plt.show()
3. Converting to Grayscale
To make future image processing less complex and simple we will be converting the image loaded in the previous step to grayscale image using the code mentioned below. The output image is also displayed below the code.
gray = cv2.cvtColor(img, cv2.COLOR_BGR2GRAY)
plt.figure(figsize=(8,8))
plt.imshow(gray,cmap="gray")
plt.axis('off')
plt.title("GrayScale Image")
plt.show()

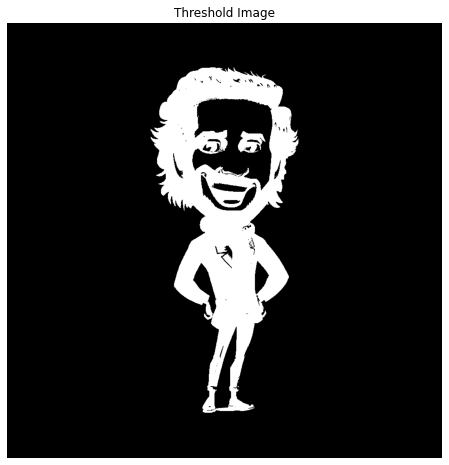
4. Converting to a Binary Inverted Image
To study the image in more detail and have a very precise study of the image we will be converting the image into a binary inverted image using the code mentioned below. The output is also displayed along with the code.
ret, thresh = cv2.threshold(gray, 0, 255,cv2.THRESH_BINARY_INV +cv2.THRESH_OTSU)
plt.figure(figsize=(8,8))
plt.imshow(thresh,cmap="gray")
plt.axis('off')
plt.title("Threshold Image")
plt.show()
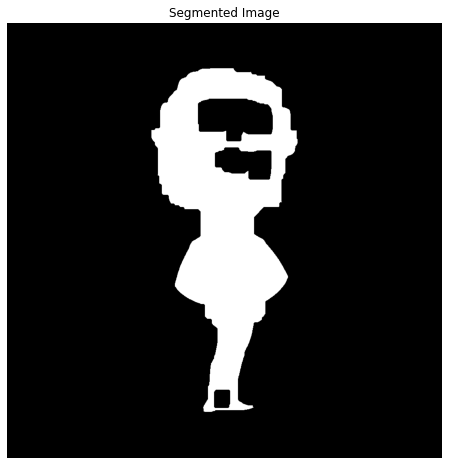
5. Segmenting the Image
Now the last step is to get the segmented image with the help of the code mentioned below. We will be making use of all the previous images somewhere or the other to try to get the most accurate segmented image we can.
kernel = np.ones((3, 3), np.uint8)
closing = cv2.morphologyEx(thresh, cv2.MORPH_CLOSE,kernel, iterations = 15)
bg = cv2.dilate(closing, kernel, iterations = 1)
dist_transform = cv2.distanceTransform(closing, cv2.DIST_L2, 0)
ret, fg = cv2.threshold(dist_transform, 0.02*dist_transform.max(), 255, 0)
cv2.imshow('image', fg)
plt.figure(figsize=(8,8))
plt.imshow(fg,cmap="gray")
plt.axis('off')
plt.title("Segmented Image")
plt.show()
The Final Output
After all the processing is done and the image is segmented, let’s plot all the results in one frame with the help of subplots. The code for the same is mentioned below.
plt.figure(figsize=(10,10))

plt.subplot(2,2,1)
plt.axis('off')
plt.title("Original Image")
plt.imshow(img,cmap="gray")

plt.subplot(2,2,2)
plt.imshow(gray,cmap="gray")
plt.axis('off')
plt.title("GrayScale Image")

plt.subplot(2,2,3)
plt.imshow(thresh,cmap="gray")
plt.axis('off')
plt.title("Threshold Image")

plt.subplot(2,2,4)
plt.imshow(fg,cmap="gray")
plt.axis('off')
plt.title("Segmented Image")

plt.show()
The final results are as follows.

The same algorithm was tested for another image and the results are as follows. You can see the results are pretty satisfying.

Conclusion
So today we learned about Image Segmentation and now you know how to implement the same on your own. Try out things by yourself for various images. Happy coding!
Thank you for reading!


