🚀 Supercharge your YouTube channel's growth with AI.
Try YTGrowAI FreePandas date_range – Return a fixed frequency DatetimeIndex

Let’s attempt to understand how to implement the date_range() function in this article, which is one of the general functions of the Pandas package. The Pandas package for the Python programming language is used to manipulate and comprehend data. Both “Panel Data” and “Python Data Analysis” are intended to be referred to by the word “Pandas.”It helps in working with time series and mathematical tables, it provides specific methodologies and data formats.
The Pandas package’s date_range() function is one such tool for handling time series. It facilitates the creation of unique timedeltaIndex series. Let’s explore its Python implementation and syntax.
Also read: What is Pandas bdate_range() function
Why is Pandas date_range() used?
The range of time points with equal spacing is returned using this function, and the frequency specifies the difference between any two adjacent points. Periods, or the number of timesteps in the range, can be used to determine this missing parameter if only one of start, end, or frequency is not specified.
Exact three of the four parameters start, end, periods, and freq must be given. The resultant DatetimeIndex will have evenly separated elements between the start and end if the frequency is left out (closed on both sides).
Other function like bdate_range() of the Pandas package is derived from this function.
Syntax of Pandas date_range()
pandas.date_range(start=None, end=None, periods=None, freq=None, tz=None, normalize=False, name=None, closed=_NoDefault.no_default, inclusive=None, **kwargs)
- start: string or datetime-like, optional
- For creating DatetimeIndex, this value is used as a left bound.
- end: string or datetime-like, optional
- For creating DatetimeIndex, this value is used as a right bound.
- periods: integer, optional
- The number of periods to produce.
- freq: string or DateOffset, default ‘D’
- Multiple frequency strings are possible, like “3H.” Possible frequencies
- tz: string or tzinfo, optional
- Name of the time zone being used return a localised DatetimeIndex, such as “Asia/Hong Kong.” The generated DatetimeIndex is timezone-naive by default.
- normalize: bool, default=False
- Prior to constructing a date range, normalise the start and end dates to midnight.
- name: string, default=None
- Resulting DatetimeIndex’s name.
- closed: {None, ‘left’, ‘right’}, default = None, optional
- Close the interval to either the left, right, or both sides of the specified frequency (None).
- inclusive: {“both”, “neither”, “left”, “right”}, default “both”
- Add boundaries; choose whether to mark each boundary as closed or open.
- **kwargs
- in order to be compatible. has no impact on the outcome.
Argument closed is no longer recommended in order to standardize boundary inputs. To specify whether each bound is closed or open, use inclusive instead. Both closed and inclusive arguments work the same.
Implementing Pandas date_range()
Before beginning the methods, be sure to load the pandas package into your IDE. Run the following line of code in your IDE to accomplish this.
import pandas as pd
Example 1: Passing only start and end parameter
pd.date_range(start='1/20/2023', end='1/25/2023')

Note in the above example that the frequency is automatically set to days; hence, all days between the start and end are present in the output.
Example 2: Passing the periods parameter
x = pd.date_range(start='01/20/2023', end='1/25/2023', periods=3)
y = pd.date_range(start='01/20/2023', periods=3)
z = pd.date_range(end='1/25/2023', periods=3)
print(x, "\n\n", y, "\n\n", z)
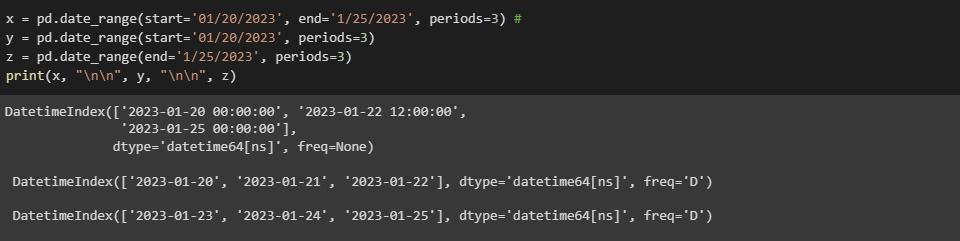
Note: When all three parameters ‘start’, ‘end’ and ‘periods’ are mentioned, then the frequency is automatically generated (linearly spaced).
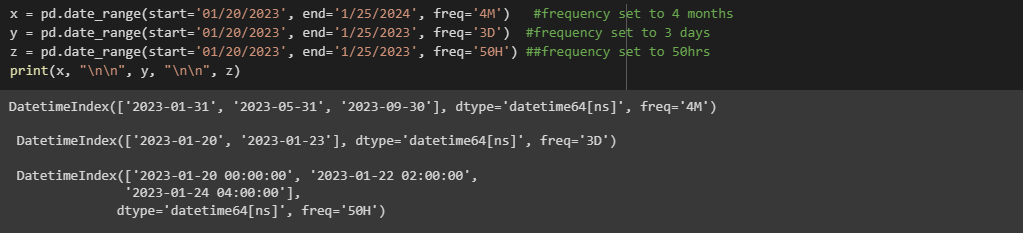
Example 3: Passing the frequency ‘freq’ parameter
x = pd.date_range(start='01/20/2023', end='1/25/2024', freq='4M')   #frequency set to 4 months
y = pd.date_range(start='01/20/2023', end='1/25/2023', freq='3D')  #frequency set to 3 days
z = pd.date_range(start='01/20/2023', end='1/25/2023', freq='50H') ##frequency set to 50hrs
print(x, "\n\n", y, "\n\n", z)
Example 4: Passing closed parameter
x = pd.date_range(start='01/20/2023', end='1/25/2023')  #default
y = pd.date_range(start='01/20/2023', end='1/25/2023', closed='right')
z = pd.date_range(start='01/20/2023', end='1/25/2023', closed='left')

print(x, "\n\n", y, "\n\n", z)

Example 5: Passing tz (timezone) parameters
x = pd.date_range(start='1/10/2023', periods=2, tz='Asia/Kolkata')
y = pd.date_range(start='1/10/2018', periods=2, tz='Europe/Paris')
z = pd.date_range(start='1/10/2018', periods=2, tz='US/Central')
print(x, "\n\n", y, "\n\n", z)

Example 6: Passing other parameters
pd.date_range(start='1/1/2018', periods=3, freq='3M',normalize=True, name="output")

Summary
Working with data is facilitated by the Pandas package for the Python programming language. Making customized time series with the required frequency or interval is made much easier with the help of the function we have covered. Click here for more articles on the Python programming language and the Pandas function.
Reference