🚀 Supercharge your YouTube channel's growth with AI.
Try YTGrowAI FreePython timeit Module

The Python timeit module is a simple interface to quickly measure the execution time for small blocks of code.
When you are creating an application, you may wonder how this block of code will perform and would want to test it under different scenarios.
For this, the timeit module provides a very simple solution to this problem. Let’s look at how we can use this to time our code snippets!
We shall be looking at both the Command Line Interface and a Callable interface.
Python timeit – Command Line Interface
The command-line interface is very similar to that of running a Python program.
You need to import the external module timeit using the -m option and apply it to your code.
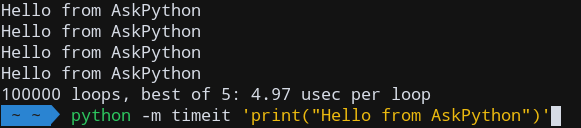
python -m timeit 'print("Hello from AskPython")'
This will run the snippet, passed as a string, using timeit.
By default, this will run the code 1 million times on Linux and 20 million times on Windows, and measure the best time among those values. The below outputs are from my Linux system.
Note that if you already have a for loop in your snippet, the module will ensure that the total number of iterations is close to 1 million, so your entire loop will not run for 1 million times!

Python timeit – Python Interface
We can also use timeit via the Python interpreter, and import it using:
import timeit
To find the execution time, pass the code as a string to timeit.timeit().
execution_time = timeit.timeit(code, number)
We can control the number of iterations using the number parameter.
>>> import timeit
>>> timeit.timeit('"-".join(str(n) for n in range(100))', number=10000)
0.19053685299877543
>>> timeit.timeit('"-".join([str(n) for n in range(100)])', number=10000)
0.172546762998536
>>> timeit.timeit('"-".join(map(str, range(100)))', number=10000)
0.13625987299747067
>>>
Using the timeit Module
Let’s now look at how we can use timeit to time a snippet, inside our program.
But before that, you may be wondering about something. What if your code required some previous setup to be done? And if you need to import certain modules too?
Well, the solution to this problem is to use a setup code block, which will do all the necessary work in setting up all required modules and variables.
setup_code = "import math"
Writing a setup block is very simple. You simply write whatever code you need, and pass it as a string, into a variable.
After this, you can write your main code block and pass it to timeit.timeit(), using the setup and stmt parameters.
execution_time = timeit.timeit(setup = setup_code, stmt = main_block, number = 100)
timeit will ensure that the setup is done before your main loop is measured, so it is only executed once!
Let’s quickly look at an example now.
This code tries to get all sub-arrays from the starting element of a numpy array. Notice that the setup block is run only once.
import timeit

# Setup is run only once
setup_code = '''
import numpy as np
a = np.arange(0, 1000)
print(a.shape)
def print_subarrays(a):
    op = []
    for i in range(a.shape[0]):
        op.append(a[:i])
'''

main_block = '''
print_subarrays(a)
'''

# Main Block is run 1000 times
print('Best execution Time among 1000 iterations:', timeit.timeit(setup=setup_code, stmt=main_block, number=1000))
Output
(1000,)
Best execution Time among 1000 iterations: 0.3830194959991786
Compare the Performance of Code Blocks
We can easily compare the performance of multiple blocks of code using timeit.
We will use a timer for this purpose, using timeit.default_timer().
The time taken for a code block will be the current time minus the initial time taken as reference, which you can pass through variables.
import timeit

start_time = timeit.default_timer()
function_1()
time_1 = timeit.default_timer() - start_time

start_time = timeit.default_timer()
function_2()
time_2 = timeit.default_timer() - start_time

print('Function 1 took', time_1)
print('Function 2 took', time_2)
Let’s test 2 functions on a numpy array range() and np.arange() and see how they compare.
import timeit
import numpy as np

def time_range(size):
    for i in range(size):
        pass

def time_arange(size):
    np.arange(size)

if __name__ == '__main__':
    # For smaller arrays
    print('Array size: 1000')

    start_time = timeit.default_timer();
    time_range(1000)
    range_time_1 = timeit.default_timer() - start_time

    start_time = timeit.default_timer();
    time_arange(1000)
    arange_time_1 = timeit.default_timer() - start_time

    # For large arrays
    print('Array size: 1000000')

    start_time = timeit.default_timer();
    time_range(1000000)
    range_time_2 = timeit.default_timer() - start_time

    start_time = timeit.default_timer();
    time_arange(1000000)
    arange_time_2 = timeit.default_timer() - start_time

    print(f'size 1000: range() took {range_time_1}')
    print(f'size 1000: arange() took {arange_time_1}')
    print(f'size 1000000: range() took {range_time_2}')
    print(f'size 1000000: arange() took {arange_time_2}')
Output
Array size: 1000
Array size: 1000000
size 1000: range() took 2.2970001737121493e-05
size 1000: arange() took 8.393999451072887e-06
size 1000000: range() took 0.02567379199899733
size 1000000: arange() took 0.0031752489994687494
Thus, we could easily use timeit to compare the performance of different functions.
Time a Particular Function
We can also only time the performance of a specific function in a script, without running the other code blocks.
If the earlier file was called numpy_compare.py, we can find the execution time using the below invocation:
python -m timeit -s 'import numpy_compare' 'numpy_compare.time_range(1000)'
Output

Conclusion
Hopefully, you’re now familiar with the basics of this module, so it’s time for you to start using it and increase your productivity!
References
- Python timeit module Documentation
- StackOverflow Question on timeit module
- JournalDev article on Python timeit module


