🚀 Supercharge your YouTube channel's growth with AI.
Try YTGrowAI FreeIntroduction to PyVista in Python

PyVista (previously `vtki`) is an adaptable assistance module and a high-level API for the Visualization Toolkit (VTK). It is a streamlined interface for the VTK that enables Python-based mesh analysis and 3D figure plotting. It was introduced in May 2019 by C. Bane Sullivan and Alexander A. Kaszynski (research paper). Before delving into the specifics of PyVista, let’s take a quick look at VTK.
Introduction to VTK (Visualization Toolkit)
VTK is a cutting-edge toolkit that consists of a C++ class library and interpreted interface layers, such as Java, Python, and Tcl/Tk. It blends the speed of C++ execution with the rapid prototyping capabilities of Python.
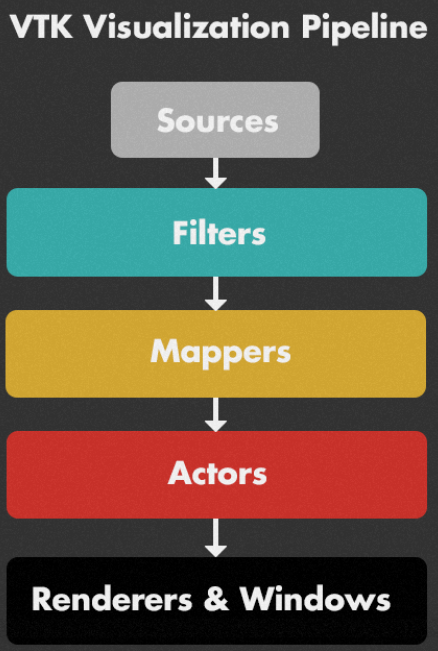
The open-source package VTK includes a robust processing and rendering pipeline as well as numerous advanced visualization methods. The VTK design is based on a robust pipeline concept. Here is a summary of this concept’s essential components:
However, simple applications such as constructing a mesh object require a lengthy code when using VTK, but PyVista can accomplish the same operation with just a few lines of Pythonic and straightforward code.
PyVista encapsulates the VTK through the NumPy library, and various classes and methods permit direct array access. It allows for the visual integration of spatial data, rapid prototyping, and mesh analysis.
Implementation of PyVista in Python
This section will cover the PyVista implementation and display various 3D shapes and objects. We will start off by importing the PyVista module along with the examples under the module using the code snippet below.
import pyvista as pv
from pyvista import examples
We will be making use of an in-built example file that displays an airplane in the form of a mesh. Look at the code snippet below. We will also be reading the mesh data of the plane file in the code snippet below.
plane_file = examples.planefile
plane_mesh = pv.read(plane_file)
The next step involves plotting the plane as well as its mesh on the 3D plot using the code below. The third line of the code combines the mesh and the plane together.
cpos = plane_mesh.plot()
plane_plotter = pv.Plotter()
plane_plotter.add_mesh(plane_mesh)
The output looks somewhat like shown below.

Looks amazing right? Let’s try out some other shapes and objects and watch the amazing results. The code snippet below will help us get a doorman as the output.
mesh = examples.download_doorman()
mesh.plot(cpos="xy")

Woah! What a detailed model right? I am sure you are amazed with the results as well. Let’s have a look at one more final object! The code snippet below will result into something amazing. Just give it a try and you will be amazed.
mesh = examples.download_bunny_coarse()
cpos = [(0.2, 0.3, 0.9), (0, 0, 0), (0, 1, 0)]
mesh.plot(cpos=cpos, show_edges=True, color=True)

Such a cute little bunny we have on our screen right?
Conclusion
I hope you loved the tutorial on PyVista and learned something new in this tutorial. If you liked this tutorial, I recommend you to have a look at the following tutorials as well:
- ASCII Art in Python Programming Language
- 3-Dimensional Plots in Python Using Matplotlib
- Plotly Contour Plot – A Complete Guide
Thank you for reading!