🚀 Supercharge your YouTube channel's growth with AI.
Try YTGrowAI FreeTkinter Colors – A Complete Guide

Tkinter is an inbuilt module available in Python for developing Graphical User Interfaces (GUI). It allows us to develop desktop applications. Tkinter is very simple and easy to work with. It provides us with different widgets like button, canvas, label, menu, message, etc. for building the GUIs in Python.
You can explore all of our Tkinter tutorials as well! This tutorial will introduce you to the use of different colour options in Tkinter.
What are Colors in Tkinter?
Colours are mainly used for making the GUI attractive. Tkinter treats colours as strings. Colours can be mentioned in two ways:
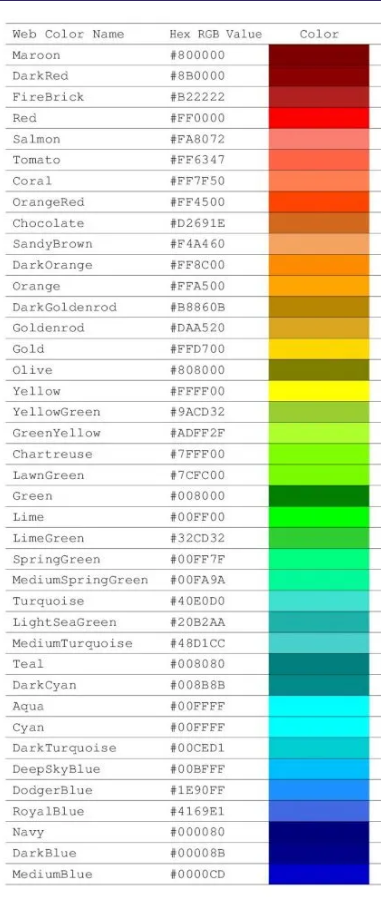
- Hexadecimal values
Ex. #FF0000 (Red), #008000 (Green), #FFFF00 (Yellow), etc. - Colour Name
Ex. Gold, Silver, Blue, etc.
Here is a list of colour codes for quick reference:
Now, let’s explore the different colour options available to us in Tkinter.
Colour Options in Tkinter
First, let’s see the general structure of the GUI that we will be using to explore all the colour options.
import tkinter as tk
from tkinter import *

#main window
root = tk.Tk()
#title of the window
root.title("Tkinter Colors")
#disabling resizing of the window
root.resizable(0, 0)

#---frame for top name---
top = Frame(root, width = 500, height = 70, bd=8, relief="raise")
top.pack(side = TOP)

#--name in the frame--
name = Label(top, text="Colour Option Name", width=30, height=2,
                       font = ("Lucida Console", 14, "italic"))
name.grid(padx = 18)

#--button--
button = Button(top, text="Click Here", width=20, height=3)
button.grid(padx = 2)


root.mainloop()
Output:

The above is a basic GUI having the title ‘Tkinter Colors’. It consists of a frame at the top which will display the colour choice name and a button below it that will be used to demonstrate the functionality.
An element or widget is an active element if pointing the cursor on it and pressing the mouse button it will perform some action.
1. activebackground
We can use this option on an active element to set the background colour of the widget when the widget is active.
import tkinter as tk
from tkinter import *

#main window
root = tk.Tk()
#title of the window
root.title("Tkinter Colors")
#disabling resizing of the window
root.resizable(0, 0)

#---frame for top name---
top = Frame(root, width = 500, height = 70, bd=8, relief="raise")
top.pack(side = TOP)

#--name in the frame--
name = Label(top, text="Active Background", width=30, height=2,
                 font = ("Lucida Console", 14, "italic"))
name.grid(padx = 18)

#--button--
button = Button(top, text="Click Here", width=20, height=3,
                    activebackground='red')
button.grid(padx = 2)

root.mainloop()
Output:
The above video shows that the button background turns red when it is clicked i.e. active. This is how activebackground works.
2. activeforeground
This option specifies the foreground colour of the widget when it is active i.e. activating the widget will make the colour change to the one specified in the code.
import tkinter as tk
from tkinter import *

#main window
root = tk.Tk()
#title of the window
root.title("Tkinter Colors")
#disabling resizing of the window
root.resizable(0, 0)

#---frame for top name---
top = Frame(root, width = 500, height = 70, bd=8, relief="raise")
top.pack(side = TOP)

#--name in the frame--
name = Label(top, text="Active Foreground", width=30, height=2,
            font = ("Lucida Console", 14, "italic"))
name.grid(padx = 18)

#--button--
button = Button(top, text="Click Here", width=20, height=3,
                font = ("Lucida Console", 12, "bold"), activeforeground='red')
button.grid(padx = 2)

root.mainloop()
Output:3.
As seen in the above video, when we click on the button, the colour of the text ‘Click Here’ changes to red as mentioned in the code.
3. background
This colour denotes the background colour of a widget. It can be used for active as well as inactive elements. The background can also be specified as bg. Here, instead of a button, we have used a label as a widget to demonstrate the option.
import tkinter as tk
from tkinter import *

#main window
root = tk.Tk()
#title of the window
root.title("Tkinter Colors")
#disabling resizing of the window
root.resizable(0, 0)

#---frame for top name---
top = Frame(root, width = 500, height = 70, bd=8, relief="raise")
top.pack(side = TOP)

#--name in the frame--
name = Label(top, text="Background", width=30, height=2,
                  font = ("Andalus", 14))
name.grid(padx = 18)

#--label--
label = Label(top, text="Label background", width=20, height=3, borderwidth=5, relief="solid",
               font = ("Lucida Console", 12, "bold"), background='yellow')
label.grid(padx = 2)

root.mainloop()
Output:

The background of the label is yellow in colour here.
4. foreground
This colour denotes the foreground colour of a widget. It can also be used for both active and inactive elements. The foreground can also be specified as fg. Here as well, instead of a button, we have used a label as a widget to demonstrate the option.
import tkinter as tk
from tkinter import *

#main window
root = tk.Tk()
#title of the window
root.title("Tkinter Colors")
#disabling resizing of the window
root.resizable(0, 0)

#---frame for top name---
top = Frame(root, width = 500, height = 70, bd=8, relief="raise")
top.pack(side = TOP)

#--name in the frame--
name = Label(top, text="Foreground", width=30, height=2,
                  font = ("Andalus", 14))
name.grid(padx = 18)

#--label--
label = Label(top, text="Label foreground", width=20, height=3, borderwidth=5, relief="solid",
              font = ("Lucida Console", 12, "bold"), foreground='blue')
label.grid(padx = 2)

root.mainloop()
Output:

As we see, the foreground colour of the label is blue here.
Conclusion
That’s it for this tutorial. We have learnt about the different colour options available in Tkinter.


