🚀 Supercharge your YouTube channel's growth with AI.
Try YTGrowAI FreeImport Error- No Module named Tensorflow found [SOLVED]

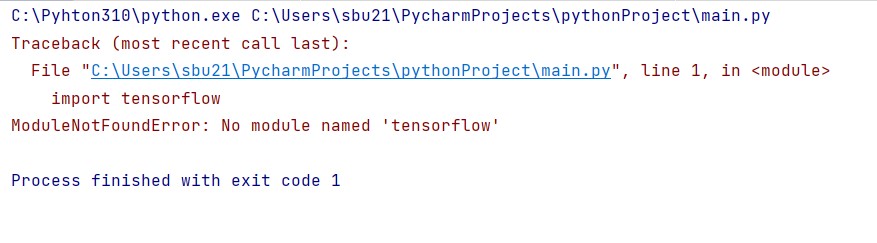
Getting Prompt like Module Not Found Error: No module named ‘TensorFlow’, Just like I got in my IDE(Py-Charm). No worries, I have got you covered. Let’s Start.
No Module named Tensorflow found because the module is not installed
If the TensorFlow module is not installed on your systems Import Error message will surely show up. So, how to check whether the Tensorflow module is installed or not?
To check, open the terminal in your respective operating systems and write:
pip show tensorflow

After executing the above command the following prompt came up which means the TensorFlow package needs to be installed.
Install Tensorflow
The Tensorflow module can be installed by executing the following steps:
TensorFlow requires a recent version of pip, so upgrade your pip installation to make sure you’re running the latest version.
pip install --upgrade pip
Then, install TensorFlow with pip
pip install tensorflow
After installation gets completed run the following command:
pip show tensorflow

There you go you have successfully installed the Tensorflow module.
After, installing the module there are very less chances that you get an Import Error message.
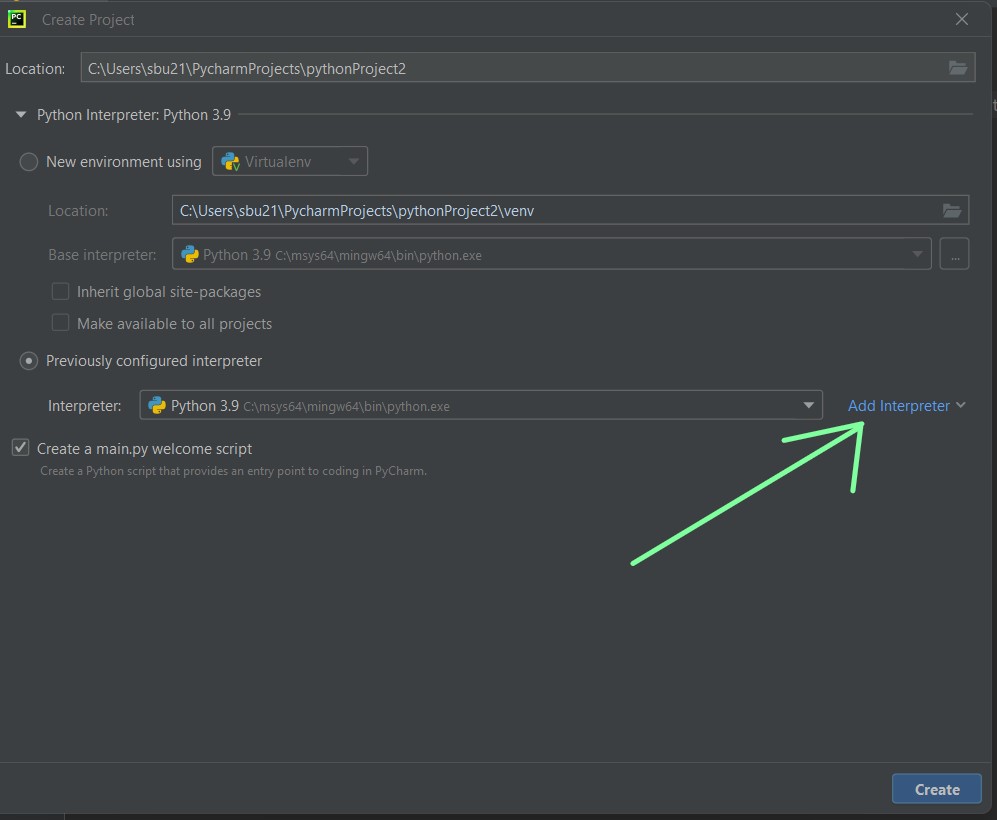
Python Interpreter Selection – PyCharm
Now there can be another situation where the module is already installed on the system but still getting the error message.
Many of us use PyCharm as an IDE to write our Python Programs. While creating a new project in PyCharm, we have the option to select Python Interpreter.
At this step, PyCharm provides us with two options i.e. New environment using and Previously configured interpreter. By default the first option New environment using is set which leads to the Import Error message if Inherit global site-packages is not checked.

If you are at this stage make sure you select Previously Configured Interpreter and click Add Interpreter then give the correct path of python.exe file (Do this Carefully).
Refer to the next section for detailed Information.
If you have selected the option New environment using while creating a new project then no worries you can easily change the interpreter settings by following the steps 🙂
- Go to the File option at the top left corner of PyCharm IDE and select Settings
- Select the Python Interpreter and click Add Interpreter

- Under System Interpreter, select the three dots to give the path to the python.exe file

- Give the correct path of the python.exe file (Do this step carefully)

- Great, click OK and Apply Changes
That was all about the Python Interpreter settings in PyCharm, hope it helps you with the Error Message.
Tip: If you want to move forward with the virtual environment option for the python interpreter just check the box shown in the image below

Summary
Always make sure that you never create a python file with the name of a module i.e. tensorflow.py, pandas.py, matplotlib.py, etc. This also leads to these Import Error messages. Make sure you have installed the latest version of the module.
Thanks for reading and Happy Coding 😀


