🚀 Supercharge your YouTube channel's growth with AI.
Try YTGrowAI FreeTkinter TreeView Widget

Hello again! As a part of our Tkinter tutorial series, today’s post will cover the TreeView widget.
The TreeView widget is very useful if you want to display a hierarchy of items, with all attributes listed side by side.
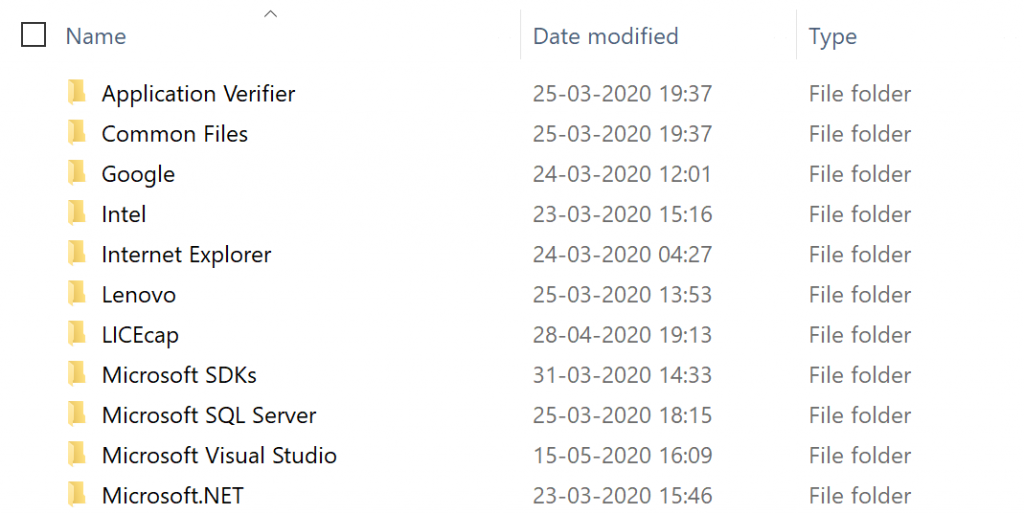
For example, if you want to construct an application which looks like the Windows File Explorer, we can do this using Tkinter’s TreeView widget.
So, what TreeView allows us to do is to build a tree-like structure and insert items accordingly, along with their attributes.
You can dynamically add or remove nodes from your Tree when you want to, so this is very useful for a lot of your GUI applications.
We can construct the Tree according to our preference.
If you want to replicate the file explorer, you’d create a TreeView of files with their attributes, and add nested files and folders as the children of the parent folders!
While we won’t be doing this exercise, I’d suggest you try this out on your own, so that you can get a good understand of how TreeView works.
Let’s now look at how we can construct a TreeView widget, and perform operations on it – like insertion and deletion.
Construct a TreeView Widget
The TreeView widget belongs to the tkinter.ttk module, so we must import this.
import tkinter.tk as ttk
Now, we can refer to the widget as ttk.TreeView().
To create a new TreeView widget, the syntax is simple.
tree = ttk.Treeview(master, columns)
Here, tree corresponds to the root node of the newly formed tree. Here, master refers to the main Tkinter application master node.
columns is a tuple, which refers to the names of the columns.
For example, we can construct a TreeView widget like this, having the columns “Name” and “ID”:
tree = ttk.Treeview(master, columns=("Name", "ID"))
This tree will be constructed using master as the base widget. Typically, you would want it to be the main master object of your application:
master = tk.Tk()
Now, while we have a TreeView widget, it makes no sense to display it since it is empty.
Let’s first insert some objects, so that we can view the TreeView in our actual applications.
Keep in mind that the rows of a TreeView node consists only of strings, like this:
"Label" , "Hello", "Second Col", "Third Col"
Now, let’s insert some nodes to our newly constructed TreeView.
Insert to a TreeView
The insert syntax is very simple. We take the TreeView object, and insert some values, labelled using a text. We can also specify a unique ID for the node, using the iid parameter.
tree.insert(parent, index, iid, text, values)
Here, we insert the node to parent. If you want the parent widget as the master (root) node, we can set this to the empty string (”). Otherwise, we must mention the iid of an existing parent node.
The child number of this node is referenced using index.
For example, if you want to insert at the first child, you specify index=0. If you want to insert at the end, you can mention the special value 'end'.
tree.insert(parent='', index='end', iid=0, text="Label", values=("Hello", "Second Col", "Third Col"))
The above is an example of inserting to the end of a root node, with the values as the below row:
"Label" , "Hello", "Second Col", "Third Col"
Unfortunately, there isn’t an easy way to construct a TreeView, since you need other widgets to visualize the output properly.
Please ensure that you have gone through our tutorial sections on the Tkinter Button, Grid Manager, and Tkinter Entry widgets before proceeding further.
I’ll provide a sample application to visualize the output, using these widgets:
import tkinter as tk
import tkinter.ttk as ttk

class Application(tk.Frame):
    def __init__(self, root):
        self.root = root
        self.initialize_user_interface()

    def initialize_user_interface(self):
        # Configure the root object for the Application
        self.root.title("Application")
        self.root.grid_rowconfigure(0, weight=1)
        self.root.grid_columnconfigure(0, weight=1)
        self.root.config(background="green")

        # Define the different GUI widgets
        self.name_label = tk.Label(self.root, text="Name:")
        self.name_entry = tk.Entry(self.root)
        self.name_label.grid(row=0, column=0, sticky=tk.W)
        self.name_entry.grid(row=0, column=1)

        self.idnumber_label = tk.Label(self.root, text="ID")
        self.idnumber_entry = tk.Entry(self.root)
        self.idnumber_label.grid(row=1, column=0, sticky=tk.W)
        self.idnumber_entry.grid(row=1, column=1)

        self.submit_button = tk.Button(self.root, text="Insert", command=self.insert_data)
        self.submit_button.grid(row=2, column=1, sticky=tk.W)

        self.exit_button = tk.Button(self.root, text="Exit", command=self.root.quit)
        self.exit_button.grid(row=0, column=3)

        # Set the treeview
        self.tree = ttk.Treeview(self.root, columns=('Name', 'ID'))

        # Set the heading (Attribute Names)
        self.tree.heading('#0', text='Item')
        self.tree.heading('#1', text='Name')
        self.tree.heading('#2', text='ID')

        # Specify attributes of the columns (We want to stretch it!)
        self.tree.column('#0', stretch=tk.YES)
        self.tree.column('#1', stretch=tk.YES)
        self.tree.column('#2', stretch=tk.YES)

        self.tree.grid(row=4, columnspan=4, sticky='nsew')
        self.treeview = self.tree

        self.id = 0
        self.iid = 0

    def insert_data(self):
        self.treeview.insert('', 'end', iid=self.iid, text="Item_" + str(self.id),
                             values=("Name: " + self.name_entry.get(),
                                     self.idnumber_entry.get()))
        self.iid = self.iid + 1
        self.id = self.id + 1

app = Application(tk.Tk())
app.root.mainloop()
Here, I have created some labels and entries for the input. I’ve also created a TreeView, which comprises of two parts:
- The TreeView Headings (To display the column names)
- The TreeView Columns and the
insert_data()method
Whenever we press the “Insert” button, the insert_data() method will be called on our TreeView widget.
Now, enough of talking. Let’s now test our program for insertion!

Okay, that seems to work quite well! Let’s now add a Delete button so that we can delete a selected row.
Deleting a row from the TreeView
There exists a TreeView.delete() method that we can take advantage of. This will delete the corresponding node (row, in our case) from our TreeView widget.
tree.delete(iid)
This simply takes the iid Identification Number of the node, and deletes it from the TreeView!
We’ll wrap this up on a method called delete_data().
Now, the big question is how we can get the id number of our row, from the TreeView widget.
Well, this depends on how you’re going to be performing the deletion operation.
We’ll delete a row whenever we select that row using the mouse. After the row gets highlighted, we can press the delete button, and this will remove it from the TreeView widget.
To do this, we will use the TreeView.focus() method, to get the iid of the row (as a string). We can use this to delete that row directly!
    def delete_data(self):
        row_id = int(self.tree.focus())
        self.treeview.delete(row_id)
Let’s add a delete button and use this method as a callback function!
After adding it, the application will look like this:
import tkinter as tk
import tkinter.ttk as ttk

class Application(tk.Frame):
    def __init__(self, root):
        self.root = root
        self.initialize_user_interface()

    def initialize_user_interface(self):
        # Configure the root object for the Application
        self.root.title("Application")
        self.root.grid_rowconfigure(0, weight=1)
        self.root.grid_columnconfigure(0, weight=1)
        self.root.config(background="green")

        # Define the different GUI widgets
        self.name_label = tk.Label(self.root, text="Name:")
        self.name_entry = tk.Entry(self.root)
        self.name_label.grid(row=0, column=0, sticky=tk.W)
        self.name_entry.grid(row=0, column=1)

        self.idnumber_label = tk.Label(self.root, text="ID:")
        self.idnumber_entry = tk.Entry(self.root)
        self.idnumber_label.grid(row=1, column=0, sticky=tk.W)
        self.idnumber_entry.grid(row=1, column=1)

        self.submit_button = tk.Button(self.root, text="Insert", command=self.insert_data)
        self.submit_button.grid(row=2, column=1, sticky=tk.W)

        self.delete_button = tk.Button(self.root, text="Delete", command=self.delete_data)
        self.delete_button.grid(row=100, column=100)

        self.exit_button = tk.Button(self.root, text="Exit", command=self.root.quit)
        self.exit_button.grid(row=0, column=3)

        # Set the treeview
        self.tree = ttk.Treeview(self.root, columns=('Name', 'ID'))

        # Set the heading (Attribute Names)
        self.tree.heading('#0', text='Item')
        self.tree.heading('#1', text='Name')
        self.tree.heading('#2', text='ID')

        # Specify attributes of the columns (We want to stretch it!)
        self.tree.column('#0', stretch=tk.YES)
        self.tree.column('#1', stretch=tk.YES)
        self.tree.column('#2', stretch=tk.YES)

        self.tree.grid(row=4, columnspan=4, sticky='nsew')
        self.treeview = self.tree

        self.id = 0
        self.iid = 0

    def insert_data(self):
        self.treeview.insert('', 'end', iid=self.iid, text="Item_" + str(self.id),
                             values=("Name: " + self.name_entry.get(),
                                     self.idnumber_entry.get()))
        self.iid = self.iid + 1
        self.id = self.id + 1

    def delete_data(self):
        row_id = int(self.tree.focus())
        self.treeview.delete(row_id)

app = Application(tk.Tk())
app.root.mainloop()
Output
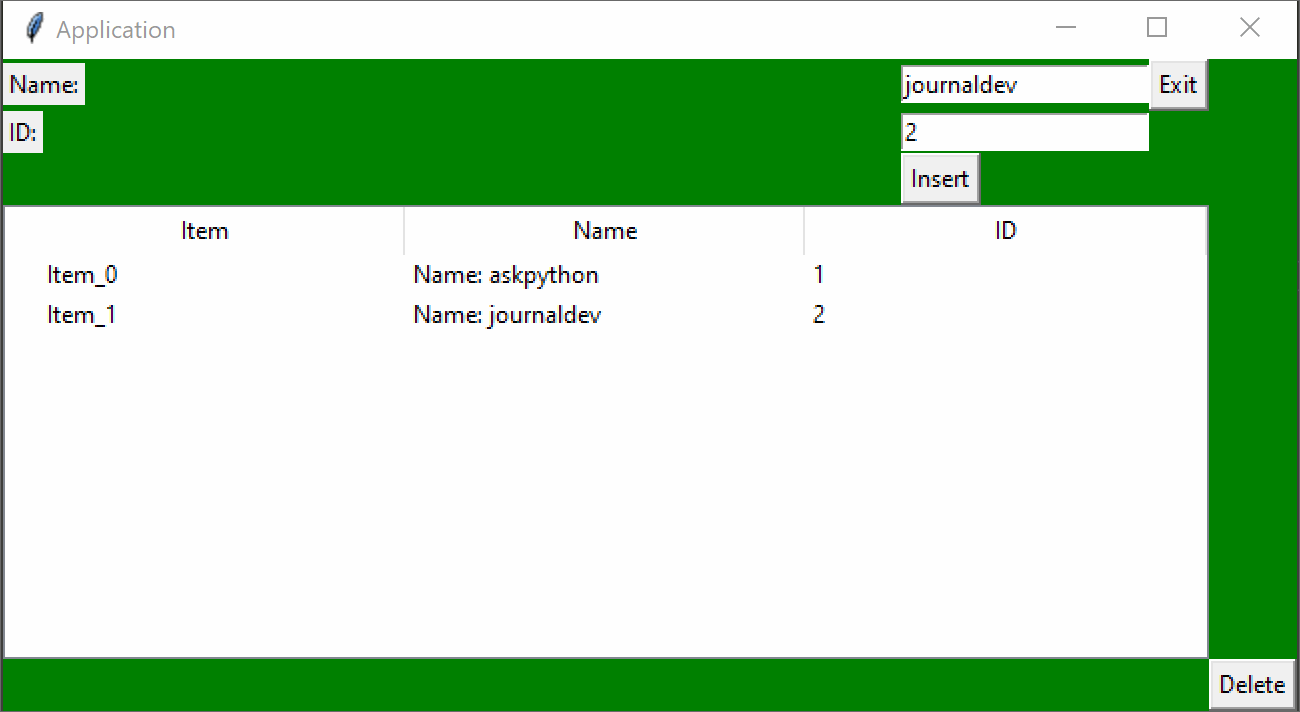
Now, we have the basic structure of the TreeView completed, and also implemented bare-bones insertion and deletion operations.
I’d suggest you to add more functionality to this application by dealing with other operations, such as updating some rows. You may also notice that the item numbers are not ordered properly after deletion.
Here’s a simple template function for update() that you can use as a reference:
def update(self):
    for idx, node in enumerate(self.treeview.get_children()):
        self.tree.item(node, text="Updated_Item_" + str(idx))
This updates all the rows of your TreeView and changes your text label. You can modify other attributes similarly.
These are among the various improvements that you could make to your application.
Conclusion
Hopefully, you’ve got this simple application working using TreeView. We briefly looked at how we could use this widget to display rows and columns of our application, structured as a Tree.


