🚀 Supercharge your YouTube channel's growth with AI.
Try YTGrowAI FreeHow to Build a GUI Calculator using Tkinter in Python?

In this article today we will learn how to create a simple GUI calculator using Tkinter. We will understand the entire code step by step.
Getting started with our GUI Calculator using Tkinter
Before we start out, make sure you have the Tkinter library installed for Python. Tkinter is the standard GUI library for Python Programming language. When python is merged with Tkinter, it provides a fast and easy way to create Graphical User Interface applications.
Tkinter provides a powerful object-oriented interface to the Tk GUI toolkit. If Tkinter is not pre-installed in your python then open your windows cmd and type in the following command.
pip install python-tk
Tkinter Messagebox
Messagebox is a widget in Python’s Tkinter library. It is used to display the message boxes in the python applications. This module is used to display a message using a certain number of functions.
Syntax:
messagebox.Name_of_the_function(title,message[, options])
Parameters:
- Function_Name: This parameter is used to represents an appropriate message box function.
- title: This parameter is a string which is shown as a title of a message box.
- message: This parameter is the string to be displayed as a message on the message box.
- options: There are two options that can be used are:
- default: This option is used to specify the default button like ABORT, RETRY, or IGNORE in the message box.
- parent: This option is used to specify the window on top of which the message box is to be displayed.
Structure of the GUI Calculator using Tkinter
Python Tkinter Label: The Label is used to specify the container box where we can place the text or images. This widget is used to provide the message to the user about other widgets used in the python application.
Python Frames: Frame is a type of widget only. Frames in python are nothing but simple containers for its child elements. Using these we can give the child containers mainframes and we can divide the entire layout frame by frame.
Suppose we run the program, we have a label at the start and then a few buttons on a root window. We can divide this root window part by part e.g the label as one part and then the buttons into different part. If we put these parts in one frame then that frame will be a parent element. This will help us simplify the complex design.
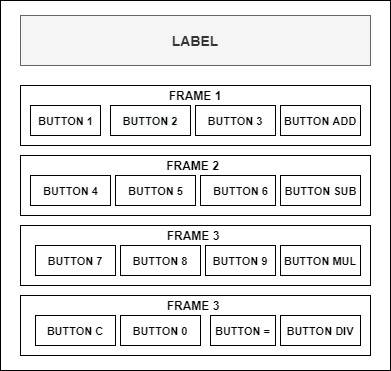
After adding frames the calculator structure will be like:
- Label
- Frame 1 : 4 Buttons
- Frame 2 : 4 Buttons
- Frame 3 : 4 Buttons
- Frame 4 : 4 Buttons
Python Buttons: The Button widget is used to add buttons in a Python application. These buttons can display text or images that convey the purpose of the buttons. You can attach a function or a method to a button which is called automatically when you click the button.
1. Defining Functions
Here we will start with the coding part for the buttons.
val=""
A = 0
operator=""

def btn_1_isclicked():
    global val
    #Concatinate string value 1 with the val and store it in the variable val again
    val = val + "1"
    data.set(val)
We will define the first function named btn_1_isclicked( ). We give it an elaborative name so that it becomes easier for us to understand what the function is actually doing just by looking at it.
Here we want that whenever we click on any number button, we want that number to be displayed on our label and store it in a different variable so that it becomes easy to calculate.
We will accept a variable globally to avoid the variable name issue. In Python, a variable declared outside of the function or in global scope is known as a global variable.
This means that a global variable can be accessed inside or outside of the function. val here is a global variable. In the above code, we created val as a global variable and defined a btn_1_isclicked( ) to print the global variable val and store its value.
Follow the same steps for all the Tkinter buttons.
#import the necessary libraries
import tkinter
from tkinter import *
from tkinter import messagebox

val=""
A = 0
operator=""

def btn_1_isclicked():
    global val
    val = val + "1"
    data.set(val)

def btn_2_isclicked():
    global val
    val = val + "2"
    data.set(val)

def btn_3_isclicked():
    global val
    val = val + "3"
    data.set(val)

def btn_4_isclicked():
    global val
    val = val + "4"
    data.set(val)

def btn_5_isclicked():
    global val
    val = val + "5"
    data.set(val)

def btn_6_isclicked():
    global val
    val = val + "6"
    data.set(val)

def btn_7_isclicked():
    global val
    val = val + "7"
    data.set(val)

def btn_8_isclicked():
    global val
    val = val + "8"
    data.set(val)

def btn_9_isclicked():
    global val
    val = val + "9"
    data.set(val)

def btn_0_isclicked():
    global val
    val = val + "0"
    data.set(val)

def btn_add_clicked():
    global A
    global operator
    global val
    A = int(val)
    operator = "+"
    val = val + "+"
    data.set(val)

def btn_sub_clicked():
    global A
    global operator
    global val
    A = int(val)
    operator = "-"
    val = val + "-"
    data.set(val)

def btn_mul_clicked():
    global A
    global operator
    global val
    A = int(val)
    operator = "*"
    val = val + "*"
    data.set(val)

def btn_div_clicked():
    global A
    global operator
    global val
    A = int(val)
    operator = "/"
    val = val + "/"
    data.set(val)

def btn_equal_clicked():
    global A
    global operator
    global val
    A = int(val)
    operator = "="
    val = val + "="
    data.set(val)

def C_pressed():
    global A
    global operator
    global val
    val = ""
    A=0
    operator=""
    data.set(val)


def result():
    global A
    global operator
    global val
    val2 = val
    if operator == "+":
        x=int((val2.split("+")[1]))
        c = A + x
        data.set(c)
        val=str(c)
    elif operator == "-":
        x=int((val2.split("-")[1]))
        c = A - x
        data.set(c)
        val=str(c)
    elif operator == "*":
        x=int((val2.split("*")[1]))
        c = A * x
        data.set(c)
        val=str(c)
    elif operator == "/":
        x=int((val2.split("/")[1]))
        if x==0:
            messagebox.show("Error","Division by 0 Not Allowed")
            A==""
            val=""
            data.set(val)
        else:
            c=int(A/x)
            data.set(c)
            val=str(c)
2. Creating the window for our GUI Calculator using Tkinter
To initialize tkinter, we have to create a Tk root widget, which is a window with a title bar and other decoration provided by the window manager.
The root window is a main application window in our programs. It has a title bar and borders.
These are provided by the window manager. It must be created before any other widgets.
The geometry method sets a size for the window and positions it on the screen. The first two parameters are the width and height of the window. The last two parameters are x and y screen coordinates.
By setting root.resizable to (0,0) programmer will not be able resize the window. Its better to use root.resizable(0,0) because it will make the calculator look proper in place.
#create a root window
root = tkinter.Tk()
#set geometry
root.geometry("250x400+300+300")
#disable the resize option for better UI
root.resizable(0,0)
#Give the tiltle to your calculator window
root.title("AskPython-Cal")
3. Setting up the label formatting
Label is a display box where you can place text or images. The text displayed by this widget can be updated at any time you want. It is also possible to underline part of the text (like to identify a keyboard shortcut) and span the text across multiple lines.
The label’s parent is root. This means it wont be limit to a single frame but an entire root window. Then we will put a simple text which we will dinamically change throughout the code till the number buttons we click gets displayed on the label.
The Tkinter StringVar helps you manage the value of a widget such as a Label or Entry more effectively. Container is a widget that the StringVar object associated with. If you skip the container, it defaults to the root window, value is the initial value that defaults to an empty string.
anchor: It controls where the text is positioned if the widget has more space than the text needs. The default is anchor=SE(the widget will be placed in the bottom right corner of the frame).
textvariable : In order to be able to retrieve the current text from your entry widget, you must set this option to an instance of the StringVar class i.e data
#Label
data= StringVar()
lbl=Label(
    root,
    text="Label",
    anchor=SE,
    font=("Verdana",20),
    textvariable=data,
    background="#ffffff",
    fg="#000000",
)
#expand option deals with the expansion of parent widget.
lbl.pack(expand=True,fill="both",)
4. Packing the buttons on the window
Frame is a widget in python. It is very important for the process of grouping and organizing other widgets in a somehow friendly way. It works like a container, which is responsible for arranging the position of other widgets.
It uses rectangular areas in the screen to organize the layout and to provide padding of these widgets.
A frame can also be used as a foundation class to implement complex widgets.
We give the variable name to the fame as btnrow1. The syntax for frame is:
variable_name=Frame(parent_window,options..)
- Parent_window− root represents the parent window here in our code.
- options − Here is the list of most commonly used options for our code. These options can be used as key-value pairs separated by commas.
- bg: The normal background color displayed behind the label and indicator.
Then we pack the frame. Repeat the same steps for other three frames too, by calling the root window.
#Frame Coding for Buttons
#Frame for root window
#Frame 1
btnrow1=Frame(root,bg="#000000")
#If frame gets some space it can expand
btnrow1.pack(expand=True,fill="both",)

#Frame 2
btnrow2=Frame(root)
btnrow2.pack(expand=True,fill="both",)

#Frame 3
btnrow3=Frame(root)
btnrow3.pack(expand=True,fill="both",)

#Frame 4
btnrow4=Frame(root)
btnrow4.pack(expand=True,fill="both",)
5. Adding Buttons to our GUI Calculator using Tkinter
The Button widget is used to add buttons in our GUI calculator using Tkinter library in Python. These buttons can display text or images that convey the purpose of the buttons. You can attach a function or a method to a button which is called automatically when you click the button.
relief : With the default value, relief=GROOVE. You may set this option to any of the other styles like : SUNKEN, RIGID, RAISED, FLAT.
command is the function or method to be called when the button is clicked. Here we call command = btn_1_isclicked, the function that we created earlier to carry out the task.
We follow the same method for the other buttons too.
#Button row One
#Button 1
btn1=Button(
    btnrow1,
    text = "1",
    font = ("Verdana",22),
    relief =GROOVE,
    border=0,
    command = btn_1_isclicked,
)
#Buttons will be side by side
btn1.pack(side=LEFT,expand=True,fill="both",)

#Button 2
btn2=Button(
    btnrow1,
    text = "2",
    font = ("Verdana",22),
    relief =GROOVE,
    border=0,
    command = btn_2_isclicked,
)
#Buttons will be side by side
btn2.pack(side=LEFT,expand=True,fill="both",)

#Button 3
btn3=Button(
    btnrow1,
    text = "3",
    font = ("Verdana",22),
    relief =GROOVE,
    border=0,
    command = btn_3_isclicked,
)
#Buttons will be side by side
btn3.pack(side=LEFT,expand=True,fill="both",)

#Button add
btnadd=Button(
    btnrow1,
    text = "+",
    font = ("Verdana",22),
    relief =GROOVE,
    border=0,
    command = btn_add_clicked,
)
#Buttons will be side by side
btnadd.pack(side=LEFT,expand=True,fill="both",)

#Button row Two
#Button 4
btn4=Button(
    btnrow2,
    text = "4",
    font = ("Verdana",22),
    relief =GROOVE,
    border=0,
    command = btn_4_isclicked,
)
#Buttons will be side by side
btn4.pack(side=LEFT,expand=True,fill="both",)

#Button 5
btn5=Button(
    btnrow2,
    text = "5",
    font = ("Verdana",22),
    relief =GROOVE,
    border=0,
    command = btn_5_isclicked,
)
#Buttons will be side by side
btn5.pack(side=LEFT,expand=True,fill="both",)

#Button 6
btn6=Button(
    btnrow2,
    text = "6",
    font = ("Verdana",22),
    relief =GROOVE,
    border=0,
    command = btn_6_isclicked,
)
#Buttons will be side by side
btn6.pack(side=LEFT,expand=True,fill="both",)

#Button Subtraction
btnsub=Button(
    btnrow2,
    text = "-",
    font = ("Verdana",22),
    relief =GROOVE,
    border=0,
    command = btn_sub_clicked,
)
#Buttons will be side by side
btnsub.pack(side=LEFT,expand=True,fill="both",)

#Button row Three
#Button 7
btn7=Button(
    btnrow3,
    text = "7",
    font = ("Verdana",22),
    relief =GROOVE,
    border=0,
    command = btn_7_isclicked,
)
#Buttons will be side by side
btn7.pack(side=LEFT,expand=True,fill="both",)

#Button 8
btn8=Button(
    btnrow3,
    text = "8",
    font = ("Verdana",22),
    relief =GROOVE,
    border=0,
    command = btn_8_isclicked,
)
#Buttons will be side by side
btn8.pack(side=LEFT,expand=True,fill="both",)

#Button 9
btn9=Button(
    btnrow3,
    text = "9",
    font = ("Verdana",22),
    relief =GROOVE,
    border=0,
    command = btn_9_isclicked,
)
#Buttons will be side by side
btn9.pack(side=LEFT,expand=True,fill="both",)

#Button Multiply
btnmul=Button(
    btnrow3,
    text = "*",
    font = ("Verdana",22),
    relief =GROOVE,
    border=0,
    command = btn_mul_clicked,
)
#Buttons will be side by side
btnmul.pack(side=LEFT,expand=True,fill="both",)

#Button row Four
#Button C
btnC=Button(
    btnrow4,
    text = "C",
    font = ("Verdana",22),
    relief =GROOVE,
    border=0,
    command = C_pressed,
)
#Buttons will be side by side
btnC.pack(side=LEFT,expand=True,fill="both",)

#Button 0
btn0=Button(
    btnrow4,
    text = "0",
    font = ("Verdana",22),
    relief =GROOVE,
    border=0,
    command = btn_0_isclicked,
)
#Buttons will be side by side
btn0.pack(side=LEFT,expand=True,fill="both",)

#Button Equal to
btnequal=Button(
    btnrow4,
    text = "=",
    font = ("Verdana",22),
    relief =GROOVE,
    border=0,
    command=result,
)
#Buttons will be side by side
btnequal.pack(side=LEFT,expand=True,fill="both",)

#Button Divide
btndiv=Button(
    btnrow4,
    text = "/",
    font = ("Verdana",22),
    relief =GROOVE,
    border=0,
    command = btn_div_clicked,

)
#Buttons will be side by side
btndiv.pack(side=LEFT,expand=True,fill="both",)


root.mainloop()
Finally, we enter the mainloop. The event handling starts from this point. The mainloop receives events from the window system and dispatches them to the application widgets. It is terminated when we click on the close button of the titlebar or call the quit() method.

Conclusion
In this article we covered Tkinter buttons, frames, labels, and its functionalities, Tkinter windows, Input boxes and how these all can be put together to build GUI applications. By understanding the code we were successful in building up a working GUI calculator using tkinter library and its widgets. Hope this article helps.
Thank you and happy learning!


