🚀 Supercharge your YouTube channel's growth with AI.
Try YTGrowAI FreeCreate a Number Guessing Game GUI in Python: Part 2

This is the second part of the tutorial – Create Number Guessing Game GUI in Python. In the first part, we have seen how to implement the guessing game in a command-line interface. In this tutorial, we will be taking it to the next level by making a graphical user interface app that can interact with the user.
In case you haven’t read the previous article I would recommend you to read that first because it explains the logic and the main source code implementation of the game.
Designing the number guessing game GUI
Python offers a library for GUI called Tkinter. Tkinter is relatively lightweight and provides many basic 3-D interactive elements for our python environment. So we will be using Tkinter for this tutorial. A beginner level understanding of Tkinter is expected from the reader.
So let us just sketch out a GUI for our application that are we are designing today. Here is a basic layout of the GUI:
- There will be title Displaying the name of the game.
- There will be one input form element that will take in the numbers
- One button to start the game
- One button to close the GUI.
Most of these listed points are pretty intuitive but this design before coding is a great practice that helps to avoid confusion and misunderstanding in future.
Importing the libraries
We import the necessary libraries. Tkinter as we discussed earlier will be used for GUI creation and random module for generating random numbers.
import tkinter as tk
import random
Creating a blank window
At first we create a blank window with a background of our choice with no text or interactive elements in it.
import tkinter as tk
import random

# Create a new window
window = tk.Tk()

# Set the dimensions of the created window
window.geometry("600x400")

# Set the background color of the window
window.config(bg="#065569")

window.resizable(width=False,height=False)

# Set Window Title
window.title('Number Guessing Game')

# The code for the buttons and text and other
# interactive UI elements go here

# Start the window
window.mainloop()

This is the basic scratchpad. We will be adding elements inside this window in the next steps. You need to forcefully close the window for now, because there is no close button. So our first priority is getting an exit button which gracefully closes the application
Adding an Exit button
To add a button we use the `tkinter.Button()` function.
# Create exit Button
# We can customize the background(bg) and foreground(fg) color
# Here we have chosen bg to be Red for visual aesthetic

exit_button = tk.Button(window,text="Exit Game",font=("Arial",14), fg="White", bg="#b82741", command=exit)

# Place the exit button at a suitable place
exit_button.place(x=300,y=320)

Note : Now that we have a basic working exit button, we can add rest of the elements and reposition them without forcing the window to close.
Adding the rest of the number guessing game GUI
Creating Labels
We will be needing two labels for the application. The first one for the Game labels and the other one for displaying the result and hints.
# Heading of our game
title = tk.Label(window,text="Guessing Game",font=("Arial",24),fg="#fffcbd",bg="#065569")
# Result and hints of our game
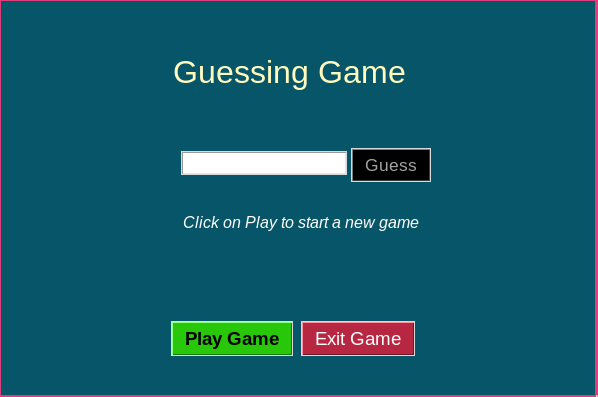
result = tk.Label(window, text="Click on Play to start a new game", font=("Arial", 12, "normal", "italic"),fg = "White", bg="#065569", justify=tk.LEFT)
# Display labels
title.place(x=170, y=50)
result.place(x=180, y=210)
Adding Buttons
We need 3 buttons – The Play Game , Guess and Exit button. We have already implemented Exit button for the sake of our usability.
# The play button

play_button = tk.Button(window, text="Play Game", font=("Arial", 14, "bold"), fg = "Black", bg="#29c70a")

# The guess button
# This button initially disabled because we don't want the user to guess a number before the game has started

guess_button = tk.Button(window,text="Guess",font=("Arial",13), state='disabled', fg="#13d675",bg="Black")

# Place the buttons in the window
guess_button.place(x=350, y=147)
play_button.place(x=170, y=320)
Note: The buttons are generally associated with commands that are executed when the button is clicked. The commands associated with the buttons will be discussed in the next section.
Creating Form/Entry Field
Lastly we need a entry field to take the number input from the user. We also need a variable that will store the value entered in the form.
# The object that stores the value in the entry field
guessed_number = tk.StringVar()

# Create entry field and attach it the guessed_number object that stores the value
number_form = tk.Entry(window,font=("Arial",11),textvariable=guessed_number)

# Place it in the window
number_form.place(x=180, y=150)
Implementing the logic
After we have made the UI. It is time to look back at our logic of the game. We need to define what happens when we press the guess and play button. So we define functions that will be associated with the two buttons in our application.
Firstly we will be using two global variable TARGET and RETRIES to store the target number and the number of retires, we will set both of them of the initial value.
TARGET = 1.
RETRIES = 0
Now we define a function that updates the result label accordingly.
def update_result(text):
    result.configure(text=text)
We are now all set to define the functions for the Play and Guess button.
The Play button should reinitialize the global variables with proper values and set the Guess button to normal, so that user can register their input by pressing that button.
def new_game():
# Change the state of guess button
guess_button.config(state='normal')
# Mention to use global variables
global TARGET, RETRIES
# Create a new target
TARGET = random.randint(0, 1000)
# Reset number of retires to 0
RETRIES = 0
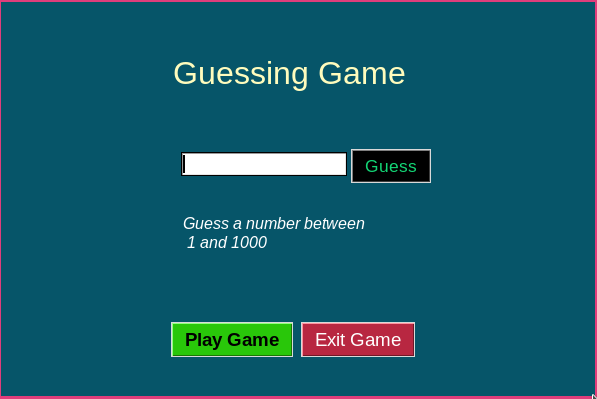
update_result(text="Guess a number between\n 1 and 1000")
The Guess button reads the input in the entry form and gives the result and hint accordingly. If the user gives a correct result, the state of the guess button is again set to disabled , thus enforcing the user to start a new game or exit the application instead of guessing the game which has already finished.
def play_game():
    global RETRIES

    choice = int(number_form.get())

    if choice != TARGET:

        RETRIES += 1

        result = "Wrong Guess!! Try Again"
        if TARGET < choice:
            hint = "The required number lies between 0 and {}".format(result)
        else:
            hint = "The required number lies between {} and 1000".format(choice)
        result += "\n\nHINT :\n" + hint

    else:
        result = "You guessed the correct number after {} retries".format(RETRIES)
        # Set the state to disabled again
        guess_button.configure(state='disabled')
        result += "\n" + "Click on Play to start a new game"

    update_result(result)
Add the button commands
Now finally we need to assign commands to each button. We need to append the command variable to the end of the function call. The new button definitions will look like
# Play Button
play_button = tk.Button(window, text="Play Game", font=("Arial", 14, "bold"), fg = "Black", bg="#29c70a", command=new_game)

# Guess Button
guess_button = tk.Button(window,text="Guess",font=("Arial",13), state='disabled', fg="#13d675",bg="Black", command=play_game)
Final Code
So here is the final block of code for the application.
import tkinter as tk
import random

# Create a new window
window = tk.Tk()

# Set the dimensions of the created window
window.geometry("600x400")

# Set the background color of the window
window.config(bg="#065569")

window.resizable(width=False,height=False)

# Set Window Title
window.title('Number Guessing Game')

# The code for the buttons and text and other
# interactive UI elements go here

TARGET = random.randint(0, 1000)
RETRIES = 0


def upate_result(text):
    result.configure(text=text)

# Create a new game
def new_game():
    guess_button.config(state='normal')
    global TARGET, RETRIES
    TARGET = random.randint(0, 1000)
    RETRIES = 0
    update_result(text="Guess a number between\n 1 and 1000")

# Continue the ongoing game or end it
def play_game():
    global RETRIES

    choice = int(number_form.get())

    if choice != TARGET:
        RETRIES += 1

        result = "Wrong Guess!! Try Again"
        if TARGET < choice:
            hint = "The required number lies between 0 and {}".format(result)
        else:
            hint = "The required number lies between {} and 1000".format(choice)
        result += "\n\nHINT :\n" + hint

    else:
        result = "You guessed the correct number after {} retries".format(RETRIES)
        guess_button.configure(state='disabled')
        result += "\n" + "Click on Play to start a new game"

    update_result(result)

# Heading of our game
title = tk.Label(window,text="Guessing Game",font=("Arial",24),fg="#fffcbd",bg="#065569")

# Result and hints of our game
result = tk.Label(window, text="Click on Play to start a new game", font=("Arial", 12, "normal", "italic"),fg = "White", bg="#065569", justify=tk.LEFT)

# Play Button
play_button = tk.Button(window, text="Play Game", font=("Arial", 14, "bold"), fg = "Black", bg="#29c70a", command=new_game)

# Guess Button
guess_button = tk.Button(window,text="Guess",font=("Arial",13), state='disabled', fg="#13d675",bg="Black", command=play_game)

# Exit Button
exit_button = tk.Button(window,text="Exit Game",font=("Arial",14), fg="White", bg="#b82741", command=exit)


# Entry Fields
guessed_number = tk.StringVar()
number_form = tk.Entry(window,font=("Arial",11),textvariable=guessed_number)


# Place the labels

title.place(x=170, y=50)
result.place(x=180, y=210)

# Place the buttons
exit_button.place(x=300,y=320)
guess_button.place(x=350, y=147)
play_button.place(x=170, y=320)

# Place the entry field
number_form.place(x=180, y=150)

# Start the window
window.mainloop()
Here are some instances of the Graphical User Interface of our Game.
Opening instance of the game

UI instance when user starts a game
UI instance when the user makes a wrong guess

UI instance when user guesses the number correctly

Conclusion
We come to the end of this 2-part tutorial on Random Guessing Game. I encourage you to tweak the UI to make it more suited your color and UI preferences. And stay tuned for more such python articles.


