🚀 Supercharge your YouTube channel's growth with AI.
Try YTGrowAI FreeHow To Write Android Apps In Python?

Want to build Android Apps in Python? More than 3 billion devices in this world run on android. That makes it one of the most or probably the most important smartphone OS in the world. Assuming the importance of android, there are a lot of android building tools such as Android Studio, Kotlin, etc.
But ever wondered if android apps can be made in Python as well?
Yes, that is possible and this article is directed towards explaining and demonstrating to the readers how an android app can be written in Python.
The framework for this task will be employed as Kivy and APK packaging will be executed by Buildozer.
Using Kivy To Build Android Apps in Python
Kivy is used to create mobile apps and is usually adopted as the framework in Python. This software is free to use and certified under MIT License. We will start by understanding the installation procedure of Kivy.
Setting up and Configuring Kivy
We will be initiating the installation of Kivy in PyCharm for its ease of use.
Note: Linux distribution is required in all the steps below, and at the time of packing the app into android, we would be using Buildozer which is heavily dependent on Linux. If you are on Windows, then you don’t need to worry, you can install a virtual machine to produce a Linux environment, whereas if you are on windows 10 then you can simply download ubuntu distribution directly from the Microsoft store.
Reference to configuring WSL(Windows Subsystem to Linux) – Here
Steps to installation:
- The first step requires setting up Linux distribution for Windows users, Linux users can skip this step.
- In the beginning we will start by forming a fresh project in PyCharm, then go to PyCharm terminal (for windows users, choose Ubuntu instead of ‘local’ in the terminal drop down).
- We will have to set up a virtual environment. A virtual environment is a collection of Python directories that store all the required libraries and scripts in one place. If a virtual environment is already active, we will deactivate it and create a new one where Kivy can be installed. To deactivate type ‘deactivate’ in the terminal. Then type:
pip3 install virtualenv
Installation of virtualenv will be initiated by the above command, then:
virtualenv -p python3.8 venv
The above command will form a virtual environment for your project, ‘venv’ is the name we gave for this virtualenv but you can use any name that is suitable.
- Now we need to activate this virtualenv for our project. Once activated, whatever library we install, it will get activated for this project.
For windows type:
source ./venv/scripts/activate
In windows, the script directory is present inside the virtualenv directory.
For Linux:
source venv/bin/activate
If everything is executed in the way described above, the virtual environment will get activated and the path location of your virtualenv will appear in closed brackets. In the image below, the red highlight shows the path location of venv after it has been activated.
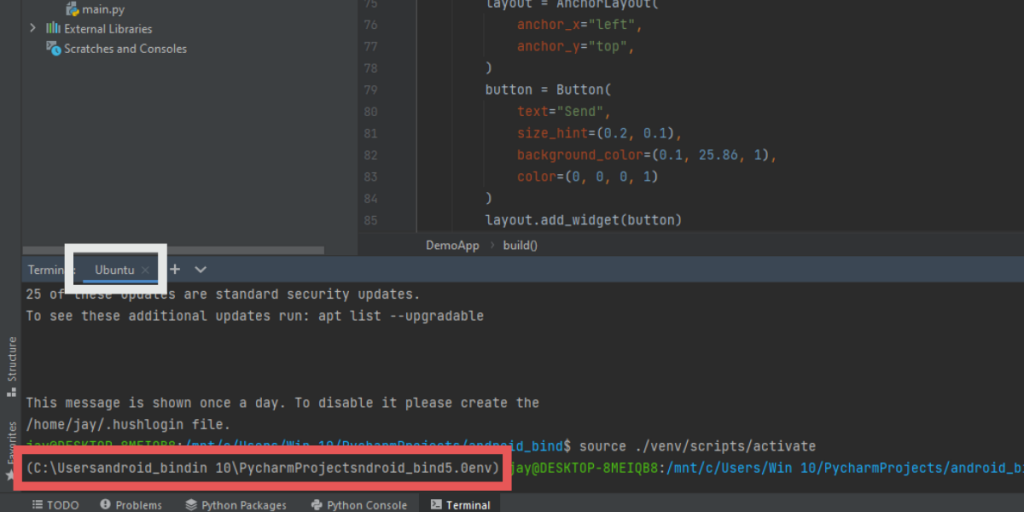
Couldn’t get your virtual environment set up? Check the references section for further guidance.
Once everything is set up, type the command
pip install kivy
To check if successfully installed, enter the command python and press enter
Inside python, type ‘import kivy’. If the terminal throws no errors, that means kivy is successfully installed
After the installation is completed, we will be understanding the fundamentals of Kivy and the different ways through which it will be implemented in Python. Below is a rudimentary python program that produces the string stored in the variable ‘text’ and shows it in a new dialog box.
Code:
from kivy.app import App
from kivy.uix.label import Label


class TrialApp(App):
    def build(self):
        return Label(
            text="Making an android app"
        )

demo=TrialApp()
demo.run()
Import packages: kivy.app import App, kivy.uix.label import Label
TrialApp = It is the name of the class.
text = variable
demo=object created
def build(self): It is a method inside which widgets will be called
label: text displaying widget
Understanding Widgets
Widgets are simply selections, that initiate a response when a specific event is fired in (like when the user gives a click/keystroke input). It allows the users to get the specific task done without the need to type lots of code or event-specific commands each time. There are numerous widgets in Kivy to use such as labels, text boxes, buttons, etc.
Mainly two types of widgets are there:
Property event widgets: Fires up a response when an alteration in the characteristics of the widget takes place such as a modification in scale, outline, color.
Widget defined event: Fires up a response when a modification in widget takes place, such as writing something in a textbox and getting output for it.
Understanding layouts of Kivy
Grid layout
The grid layout allows you to form a matrix and place your widgets in a table-like structure adding rows and columns into it. The placement of widgets can be done specifically in rows and columns through this layout.
The program below demonstrates how a grid layout is implemented to add widgets.
class Format_layout_Grid(GridLayout):
    def __init__(self, **kwargs):
        super().__init__(**kwargs)
        self.rows=3
        self.cols=3

        self.label=Label(
            text="Click ---->"
        )
        self.add_widget(self.label)
        self.but0n=Button(
                text="Tap Here",
                size_hint = (0.3, 0.3),
                background_color = (0.6, 25.7, 1.9),
                color = (1, 0, 1, 1)
                )
        self.add_widget(self.but0n)
Anchor Layout:
Anchor layout lets you place or ‘anchor’ your widgets at either 4 corners or in the center of the output screen. It can be set using anchor_x and anchor_y codes.
class DemoApp(App):
    def build(self):
        layout=AnchorLayout(
            anchor_x="left",anchor_y="top"
        )
        but0n=Button(
            text="This box anchors",
            size_hint=(0.3,0.3),
            background_color=(0.4,25.8,3),
            color=(0,0,0,1)
        )
        layout.add_widget(but0n)
        return layout
Float layout
This layout lets us place our widgets wherever we want to. Unlike grid layout which required rows and columns or anchor layout which only lets us place widgets at corners or center, with float layout we can place widgets at whichever position we want. Though by default all widgets are placed at the bottom left corner in this layout, and proper x,y values must be given to properly adjust all widgets.
class Format_float(FloatLayout):
    def __init__(self,**kwargs):
        super().__init__(**kwargs)

        self.label = Label(
            text="Tap on Blue",
            size_hint=(0.1, -0.1),
            pos_hint = {"x": 0.3, "y": 0.7},
        )
        self.add_widget(self.label)

        self.button = Button(
            text="Press here",
            size_hint=(0.4, 0.1),
            pos_hint={"x":0.4,"y":0.5},
            background_color=(0.6, 25.3, 2),
            color=(1, 0, 1, 2)
        )
        self.add_widget(self.button)
Page Layout
This layout is a little different from the other layouts we have discussed so far. This layout lets us create different pages and place multiple widgets on different pages, and also lets the user slide through the pages. The size or other properties of the page cannot be altered in this layout.
class page_format_layout(PageLayout):
    def __init__(self, **kwargs):
        super().__init__(**kwargs)

        self.but0ni = Button(
            text="Slide I"
        )
        self.add_widget(self.but0ni)

        self.but0ni2 = Button(
            text="Slide II"
        )
        self.add_widget(self.but0ni2)

        self.but0ni3 = Button(
            text="Slide III"
        )
        self.add_widget(self.but0ni3)
Creating an app
As we have covered the basics of Kivy and discussed the widely used layouts and widgets present. Now we will be looking at how we can create a standalone app that can run on android phones. In the example below, we will be creating a search engine that takes user input and uses google API to output results.
from kivy.app import App
from kivy.uix.anchorlayout import AnchorLayout
from kivy.uix.button import Button
from kivy.uix.floatlayout import FloatLayout
from kivy.uix.label import Label
from kivy.uix.textinput import TextInput
import webbrowser

search_api="www.google.com/search=?source=jv&fdf_njg64gfjf=hello"
class Format_float(FloatLayout):
    def __init__(self,**kwargs):
        super().__init__(**kwargs)

        self.l = Label(
            text="Place your search query below",
            size_hint=(1.0, 0.6),
            pos_hint = {"x": 0.0, "y": 0.2},
        )
        self.add_widget(self.l)

        self.t = TextInput(
            size_hint=(0.8, 0.06),
            pos_hint={"x": 0, "y": 0}
        )
        self.add_widget(self.t)
        self.bt0n = Button(
            text='send',
            size_hint=(0.2,0.05),
            pos_hint={"x":0.8,"y":0}
        )
        self.bt0n.fbind("on press", lambda x: self.search_api())
        self.add_widget(self.bt0n)

    def search_api(self):
        msg=self.t.text
        print(msg)
        webbrowser.open(search_api.format(msg))


class DemoApp(App):
    def build(self):
        layout = AnchorLayout(
            anchor_x="left",
            anchor_y="top",
        )
        button = Button(
            text="Send",
            size_hint=(0.2, 0.1),
            background_color=(0.1, 25.86, 1),
            color=(0, 0, 0, 1)
        )
        layout.add_widget(button)
        return Format_float()


demo=DemoApp()
demo.run()
Note: The API used here is a user-specific API and is no more functional. To get a functional API, click here
Packaging the app
Once your code is complete, the last step is to bundle the application and package it into an Android APK. To do that, we would be employing Buildozer.
Buildozer is a Linux-based application packaging software that bundles your app into an Android package (APK) or IOS-based application. We cannot run Buildozer in windows and it only works in Linux machines and Mac OS machines.
To install Buildozer, you need to follow the steps mentioned in Buildozer’s official Documentation.
Once installation is completed, packaging can be done in two ways:
- If you are on a mac/Linux machine, you can follow the steps mentioned in official documentation to target the package and build the app.
- If you are on a windows machine, then running building process in virtual machine or linux distribution would throw multiple errors in between. To overcome this situation, you can use google Collab. It is a shared linux server that does the job for you.
Few things to note:
- File name where source code is written should be renamed to ‘main.py’, and any other file with the same name should be removed.
- The command ‘buildozer init’ creates a gradle file which consists all the necessary app building data in it. You need to fill in: title, package.name, package.domain lines with your own details.
- The command ‘buildozer -v android debug’ starts the process of building the application. It’s a lengthy process that takes 17-20 minutes, where in between you need to give permissions by typing ‘y’ and pressing enter.
- After the building process is completed, the app will be created in the ‘lib’ folder.
Conclusion
We have learned in this article how android apps can be written in Python. We got to learn about the rudimentary fundamentals of Kivy – about different layouts and widgets, setting up WSL on windows, and packaging of our application with Buildozer. Hope this article helpd you.
References
Turning python file to apk: https://towardsdatascience.com/3-ways-to-convert-python-app-into-apk-77f4c9cd55af
App building reference: https://youtube.com/playlist?list=PLtFHvora00y-6UmADZBOhYxFHYyJ3c25O
.py to apk tutorial: Link here
Tutorial for Setting up Virtual Environement: Link


