🚀 Supercharge your YouTube channel's growth with AI.
Try YTGrowAI FreeOpenCV imwrite() – A Beginner’s Guide

Python OpenCV is based on C++ functions developed by Intel in 2000. In this article, a detailed explanation is provided over how imwrite() function is used to save images into a user-specified directory.
Installing Open CV
As OpenCV is a third-party library function, it is not preinstalled in any Python IDE. So, at first, you need to learn to install and configure OpenCV in order to use it as an import package.
You may like: Top 5 Best IDEs for Python
In this example, we are using Pycharm IDE for configuring Open CV as it is simpler than other IDE’s.
Let’s install the latest version of PyCharm IDE. Once installed, follow the below steps to configure it:
- Create a new project.
- Make a python file into that project (.py extension)
- Then go to File > Settings, on left pane click on the name of the project you created. In drop down menu, you will find an option named Python Interpreter.
- Python Interpreter contains all the necessary interpreters required for that project. You need to find and click on + sign situated just above ‘Package’ column.

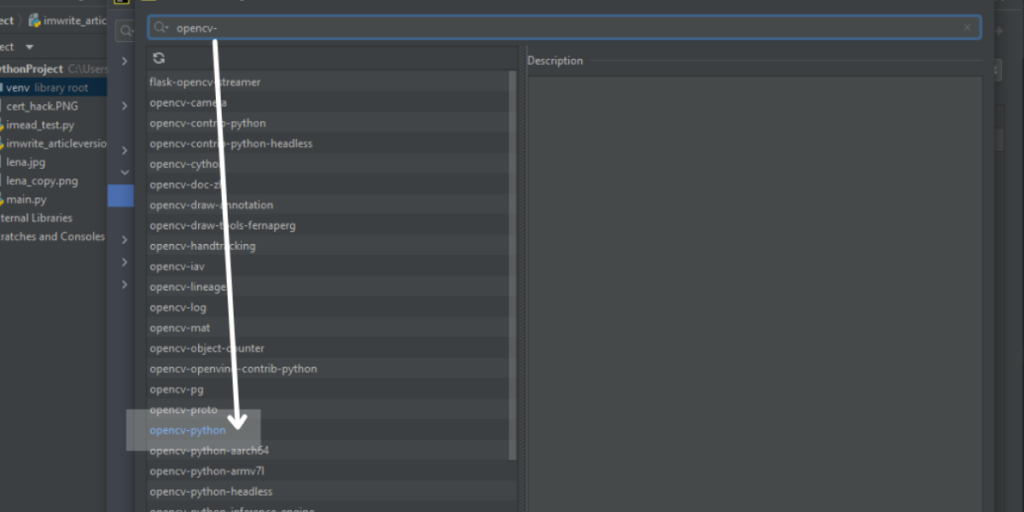
- Clicking on it opens a new window where a great list of python interpreters are available. You need to search ‘opencv-Python’ and choose the one which is just named ‘opencv-python’, nothing else
- Click on install package situated below. This will install opencv package in your pycharm system along with other necessary packages if it is missing like ‘pip’, ‘numpy’, etc

Working With OpenCV imwrite()
Once the above steps are completed, the PyCharm IDE project would be ready to use. Now we come to the coding part.
The content below will provide the steps for saving an image using python OpenCV imwrite().
1. Import OpenCV
To start with image saving, we’ll import the two packages that we need: cv2, os.
import cv2
import os
This particular article will employ two OpenCV functions in order to save an image. The two required cv2 functions are:
- imread()
- imwrite()
2. Reading An Image
The programmer needs to specify the file path and directory to the compiler before the image is read.
At first, the variable ‘imagelocation’ is initialized with the file path of the image while another variable ‘filedirectory’ is used to save the directory path where the new image file will be saved.
When both the variables are initialized, imread() function is used to read the image
Example code:
imagelocation = (r"C:\Users\Win 10\PycharmProjects\pythonProject\lena.jpg")

filedirectory = (r"C:\Users\Win 10\Pictures")

image = cv2.imread(imagelocation)
Note: The image file, to be saved, should be present in the Python project folder. You can copy the image and paste it into the folder using PyCharm IDE or can manually search for the folder and paste the image in it.
3. Saving An Image
Here, a new name is stored in the variable ‘newfilename’ and then the function imwrite() takes the variable ‘image’ used in the previous example and saves it with the new name.
Example code:
newfilename = 'image_savedasnew.jpg'<br><br>cv2.imwrite(newfilename, image)
4. Complete Code For Working With OpenCV imwrite()
import cv2
import os

imagelocation = (r"C:\Users\Win 10\PycharmProjects\pythonProject\lena.jpg")

filedirectory = (r"C:\Users\Win 10\Pictures")

image = cv2.imread(imagelocation)


# Reading the image
image = cv2.imread(imagelocation)

# Using print command here is not necessary but helpful. If the filepath in both the variables ‘imagelocation’, and ‘filedirectory’  is stored successfully, this command will print a matrix of the image. If there is any mistake in filepath, the compiler will return ‘none’.

print(image)

#to direct compiler towards specified directory
os.chdir(filedirectory)

# It shows the contents of the directory before file is saved

print("list of files available before saving function is executed:")

print(os.listdir(filedirectory))

newfilename = 'image_savedasnew.jpg'

# This is the function specified above that saves image file
cv2.imwrite(newfilename, image)

#Lists directory contents after saving

print("Following execution of imwrite function:")
print(os.listdir(directory))
print('Image Saved Positively')
Output:

Conclusion
That brings us to the end of this quick and easy tutorial on the Python OpenCV imwrite() function. There’s a lot more you can explore within the OpenCV library and I’d encourage you to browse through our collection of OpenCV tutorials here.


