🚀 Supercharge your YouTube channel's growth with AI.
Try YTGrowAI FreePython Tkinter: A Simple Email Slicer

Hello learner! Today we are going to build a simple Email Slicer using the tkinter module in Python. Before we begin the project let us know what an Email Slicer is.
What is an Email Slicer?
Email Slicer is a simple tool where the email address is provided as an input and as an output, the application returns the username and the domain of the email address given. It makes use of the slicing operations of Python.
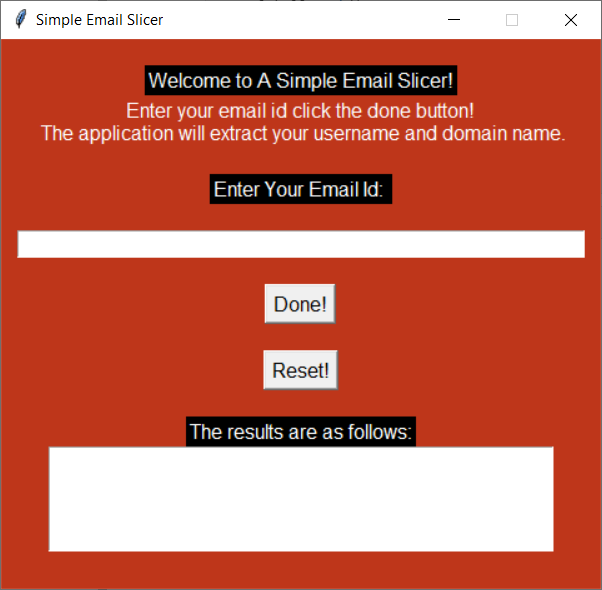
Also Before we start writing the code let me show you how your final output screen is going to look like. Check out the image below.
Looks pretty cool right? So let us begin!
Building the Email Slicer in Python
In building the email slicer let us first design the screen and then declare functions for the functionalities of the buttons.
1. Designing the Screen
To design the screen let’s import the Tkinter module and then create a blank window to start with. At this step, we will also configure some changes such as background color and application name. The code below will help you do the same.
import tkinter as tk
window = tk.Tk()
window.geometry("480x440")
window.config(bg="#BE361A")
window.resizable(width=False,height=False)
window.title('Simple Email Slicer')
Here we first imported the module. Then we created a window, set the window dimensions, and made the background color orangish (you can customize your screen according to your preference!).
We made sure the dimensions remain constant overall so we set the resizable attributes to ‘False’. We also set the title of the application as the name of the application. Now last but not least you need to view the window, don’t you?
So for that, we run the mainloop function. And the result should look something like the image shown below!

2. Adding necessary elements to our window
Now an important part is adding all the necessary elements in our application. The elements that we require for the application are:
Now let’s add all the information about the application first. Now you can change it however you want. I will keep them as per my preference. The code to add the required labels is shown below.
import tkinter as tk
window = tk.Tk()
window.geometry("480x440")
window.config(bg="#BE361A")
window.resizable(width=False,height=False)
window.title('Simple Email Slicer')

greeting = tk.Label(text="Welcome to A Simple Email Slicer!",font=(12),foreground="white",background="black")
Info = tk. Label(text="Enter your email id click the done button!\n The application will extract your username and domain name.",foreground= "white",background="#BE361A",font=(10))

greeting.pack()
Info.pack()

window.mainloop()
The added lines have been highlighted for your reference. Obviously, the Label declaration and packing goes before we launch the window. If you have noticed, I have also made some changes such as the foreground and background and the font size. Again, you can choose all the changes according to your requirements. The new results are as follows:

Just like we added the labels, we will be adding the buttons as well as the entry boxes. By now, I am guessing you are familiar with all that stuff. So I will be showing you the whole design code now!
import tkinter as tk
window = tk.Tk()
window.geometry("480x440")
window.config(bg="#BE361A")
window.resizable(width=False,height=False)
window.title('Simple Email Slicer')

# All the Labels
greeting = tk.Label(text="Welcome to A Simple Email Slicer!",font=(12),foreground="white",background="black")
Info = tk. Label(foreground= "white",background="#BE361A",font=(10),text="Enter your email id click the done button!\n The application will extract your username and domain name.")
entry_label = tk.Label(foreground= "white",font=(10),background="black",text="Enter Your Email Id: ")
result_label = tk.Label(font=(10),foreground= "white",background="black",text="The results are as follows:")
empty_label0=tk.Label(background="#BE361A")
empty_label1=tk.Label(background="#BE361A")
empty_label2=tk.Label(background="#BE361A")
empty_label3=tk.Label(background="#BE361A")
empty_label4=tk.Label(background="#BE361A")
empty_label5=tk.Label(background="#BE361A")

#The Entry box
entry = tk.Entry(font=(11),width=50,justify='center')

#The two Buttons
button = tk.Button(text="Done!",font=(11))
reset=tk.Button(text="Reset!",font=(11))

#Result
text_box = tk.Text(height=5,width=50)

#Packing Everything Together
empty_label0.pack()
greeting.pack()
Info.pack()
empty_label1.pack()
entry_label.pack()
empty_label4.pack()
entry.pack()
empty_label2.pack()
button.pack()
empty_label5.pack()
reset.pack()
empty_label3.pack()
result_label.pack()
text_box.pack()

window.mainloop()
Now you might have noticed some empty labels defined which seem to be pretty useless but they are helpful to add line breaks between various elements when we use pack to place the elements and not place (requires x and y coordinates). Now let me show you how our final screen looks!

So now that we are done with the design currently the buttons are not doing anything at all. For that we will add some additional functions and variables to our code.
3. Adding Functionalities to the Buttons
Before jumping directly to the buttons we need a place to store our email address so we create a ‘String Variable’ to store whatever is entered in the entry box. We make use of StringVar and add an attribute named textvariable to our Entry box created. I am only showing you the part that you need to change for the same.
e1=tk.StringVar()
entry = tk.Entry(font=(11),width=50,justify='center',textvariable=e1)
Function 1: Get Username and Domain
Now that storing of the email address is done! We will create two functions for the two buttons as well. The first function will take the email address from the e1 the variable we created earlier and then use the stripping operations on the email address in order to extract the username and domain.
The code to do the same operations is shown below.
def result():
    try:
        email=entry.get()
        inp_email = email.strip()
        username = inp_email[0:inp_email.index('@')]
        domain = inp_email[inp_email.index('@') + 1:]
        text_box.delete('1.0', tk.END)
        msg = 'Email entered was: {}\nYour email username is {}\nAnd your email domain server is {}'
        msg_formatted = msg.format(email,username,domain)
        text_box.insert(tk.END,msg_formatted)
        entry.delete(0, 'end')
    except:
        text_box.delete('1.0', tk.END)
        text_box.insert(tk.END,"ERROR!")
Now, the question is ‘why have I used the try-except block here?’
The reason is that if a person doesn’t enter a valid email address the code might result into a series of unhandled errors and even the user won’t realize what’s wrong with the application.
Hence to avoid that situation we make sure that if the user enters an invalid email id then except block will print the ‘Error’ message.
Now the operations are pretty simple. get email from the entry box variable, strip the string to remove all the whitespaces (if any).
Now to get the username slice the string until we reach the ‘@’ symbol and the rest (excluding the @ symbol) goes into the domain name.
Now the last operation is to make use of the textbox we have created. To be on a safer end, we remove everything that is inside the textbox (if any) and then insert a message which tells the user about the domain and username found. We will also make sure that the entry box is clean for the next input. In case any invalid entry is found, the except block is run and it prints the ‘Error’ message.
Function 2: Reset the Application
Now after the first function is successfully made the reset function becomes pretty simple. All the reset function does is that it cleans the text box and the entry box. The code for the same is shown below.
def reset_all():
    text_box.delete('1.0', tk.END)
    entry.delete(0, 'end')
But the buttons won’t work yet! Why? Because we haven’t added the functions in the Buttons definitions. Basically, all you need to do is add an attribute of the name command to the Buttons definitions. The code below displays the same.
button = tk.Button(text="Done!",command=result,font=(11))
reset=tk.Button(text="Reset!",command=reset_all,font=(11))
Awesome! Now we are all set to run our application!
The final Code and Output
import tkinter as tk
window = tk.Tk()
window.geometry("480x440")
window.config(bg="#BE361A")
window.resizable(width=False,height=False)
window.title('Simple Email Slicer')

def result():
    try:
        email=entry.get()
        inp_email = email.strip()
        username = inp_email[0:inp_email.index('@')]
        domain = inp_email[inp_email.index('@') + 1:]
        text_box.delete('1.0', tk.END)
        msg = 'Email entered was: {}\nYour email username is {}\nAnd your email domain server is {}'
        msg_formatted = msg.format(email,username,domain)
        text_box.insert(tk.END,msg_formatted)
        entry.delete(0, 'end')
    except:
        text_box.delete('1.0', tk.END)
        text_box.insert(tk.END,"ERROR!")

def reset_all():
    text_box.delete('1.0', tk.END)
    entry.delete(0, 'end')

# Labels
greeting = tk.Label(text="Welcome to A Simple Email Slicer!",font=(12),foreground="white",background="black")
Info = tk. Label(foreground= "white",background="#BE361A",font=(10),text="Enter your email id click the done button!\n The application will extract your username and domain name.")
entry_label = tk.Label(foreground= "white",font=(10),background="black",text="Enter Your Email Id: ")
result_label = tk.Label(font=(10),foreground= "white",background="black",text="The results are as follows:")
empty_label0=tk.Label(background="#BE361A")
empty_label1=tk.Label(background="#BE361A")
empty_label2=tk.Label(background="#BE361A")
empty_label3=tk.Label(background="#BE361A")
empty_label4=tk.Label(background="#BE361A")
empty_label5=tk.Label(background="#BE361A")

#Entry
e1=tk.StringVar()
entry = tk.Entry(font=(11),width=50,justify='center',textvariable=e1)

#Buttons
button = tk.Button(text="Done!",command=result,font=(11))
reset=tk.Button(text="Reset!",command=reset_all,font=(11))

#Result
text_box = tk.Text(height=5,width=50)

#Packing Everything Together
empty_label0.pack()
greeting.pack()
Info.pack()
empty_label1.pack()
entry_label.pack()
empty_label4.pack()
entry.pack()
empty_label2.pack()
button.pack()
empty_label5.pack()
reset.pack()
empty_label3.pack()
result_label.pack()
text_box.pack()

window.mainloop()
The Image below shows the output of the code when run on a sample email address. Test it out with various email addresses yourself!

Conclusion
Congratulations! You have successfully learned how to implement a simple Email Slicer all by yourself! Hope you learned something! Happy Coding!


