🚀 Supercharge your YouTube channel's growth with AI.
Try YTGrowAI FreeFlask Debug Mode – Enable Debug Mode and Debug Toolbar in Flask

In this mode, we will learn about the Flask debug mode. Later, we will also implement a debugger toolbar for debugging in Flask. So let’s get started with it!
Activating the Flask Debug Mode
Consider a Flask Application with Debug Mode = False. When you update some code, you need to restart the server for the changes to come upon the web page.
This can be quite repetitive since we keep changing and updating our code. So to make coding easy, Flask gives us the Debug Mode!
Hence, with the Debug Mode on, all the application code changes will get updated right away in the development stage, eliminating the need to restart the server.
Implementation of The Debug Mode in Flask
Let’s add the code to enable debug mode in Flask! Here’s another tutorial if you also wish to enable logging in Flask.
#Method 1
app.debug = True

#or
#Method @
app.run('host' = localhost, debug = True)
See, it’s that simple! Now just refresh the server, and all the changes are up there.
Note: Never enable the Debug Mode or any other built-in debugger in a production environment. The debugger allows executing arbitrary Python code from the browser. Although that requires a protection key, it is still not secure.
Adding an external debugger toolbar into the Flask Application
Flask also provides a debugger toolbar to debug our web application on a larger scale. Now, why a toolbar?
Well, all developers, at some point in life, come across errors. Searching and eliminating them is not an easy task. Sometimes, it might take a lot of time to point out the error. Hence every developer must know the art of debugging.
But with Flask, as expected, everything has been made so much simpler. We need a Flask Debug Toolbar, and we are done !!
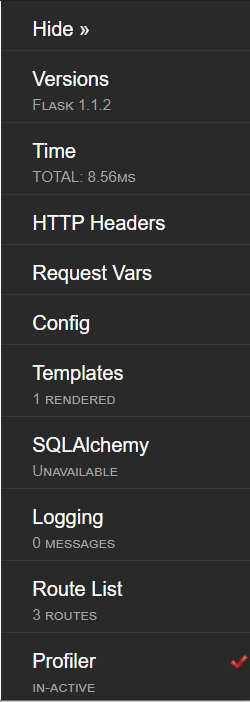
Okay, now let’s take a look at what it consists of:
- Version: Indicates the Version of Flask Libraries used for running the webpage.
- Time: Indicates the loading time of the web page.
- HTTP Headers: Gives information about the HTTP Header key value pairs
- Request: Gives Information about the request Variables- Views, sessions, cookies etc
- Config: Tells various configurations of the Flask Application
- Templates: Gives Information about Templates
- SQLAlchemy: Gives Information about the SQLAlchemy Queries called on the webpage. (Check out our Flask Postgres SQLAlchemy article for more information about SQLAlchemy)
- Logging: Gives Information about the log records. ( Check out Flask Logging for more information)
- Route List: Displays all the URL routes possible in our web app.
- Profiler: When activated, gives information about the Flask Profilers used.
Hands-On with Flask Debug Toolbar
First we need to install the toolbar. Run the code:
pip install flask-debugtoolbar
That’s it the toolbar is installed
1. Adding the toolbar to the Flask Application
To add the toolbar, the syntax is:
from flask import Flask
from flask_debugtoolbar import DebugToolbarExtension

app = Flask(__name__)

app.debug = True
toolbar = DebugToolbarExtension(app)
The WebPage will show the debug toolbar only when its in the Debug = True mode. When in production server (Debug = False), the web app will not display the toolbar.
Therefore, consider the following Flask Application Example:
from flask import Flask
from flask_debugtoolbar import DebugToolbarExtension

app = Flask(__name__)

app.debug = True
toolbar = DebugToolbarExtension(app)

@app.route('/form')
def form():
    return render_template('form.html')

app.run(host='localhost', port=5000)
And the form.html:
<html>
   <body>
      <form action="/login" method = "POST">
         <p>name <input type = "text" name = "name" /></p>
         <p>age <input type = "integer" name = "age" /></p>
         <p><input type = "submit" value = "Submit" /></p>
      </form>
   </body>
</html>
Note: The template should contain the <body> attribute for the toolbar to work.
2. Running the Flask Application
Let’s now fire up the server and check:

Perfect! There is the toolbar right on the webpage.
Conclusion
That’s it, fellas!! This was all about Flask Debug Mode and Toolbar. Do check out our other Flask articles on the site. Happy Coding!


