🚀 Supercharge your YouTube channel's growth with AI.
Try YTGrowAI FreePySimpleGUI: An easy way to create GUIs in Python

Whenever we talk about Python Programming, we often discuss the large community around it that uses this language for so many useful purposes and the wide variety of problems we can solve with it. Most python programs use the “command line” at their core. This in most cases isn’t an issue with the people who often see a terminal in their everyday programming scenarios.
This is not the case with a normal person who still wants to use Python programs, but there is a digital divide that may be seen as a “GUI Gap”.
So, what is this GUI that are we talking about?
GUI or Graphical User Interface provides a graphical tool that can be used interactively to perform certain operations which makes the programs more approachable to all kinds of audiences. Another hurdle that GUIs need to address is that they are not easy to program ourselves. What’s the solution to this one?
Well, PySimpleGUI comes in really handy providing us with several options to program a GUI with ease and using fewer lines of code.
Also read: Tkinter Tutorial – Drawing a Line Using Tkinter Canvas
An Introduction to PySimpleGUI
PySimpleGUI is a Python package that provides us with various options to create GUIs for all levels of Python programmers. This package implements most of the “boilerplate code”(sections of code that are repeated in multiple places with little to no variation). Depending on the program and framework used, a PySimpleGUI program may require 1/2 to 1/10th amount of code to create an identical window using one of the frameworks directly.
In order to program a simple GUI, we need to specify what is called our “window” using a “layout”, which contains widgets or “Elements” (called in PySimpleGUI). This layout that we specified is used to create a window and uses 4 supported frameworks that do all the heavy lifting for our application to display and interact with our window.
The supported frameworks include Tkinter, Qt, WxPython, and Remi. These packages are sometimes referred to as “wrappers”.
Using PySimpleGUI to understand the core concepts
- Installing the PySimpleGUI Library and importing it as sg
!pip install library
- Import
import PySimpleGUI as sg
- Define the window’s contents: Here we are defining the layout for our GUI.
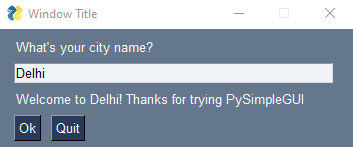
The layout’s first part is the top line text for the GUI, i.e. “What’s your city name?”.
The second part is the input statement, with key=’-INPUT-‘. The key part of the syntax will connect our input to the value, that will be consumed while displaying the output.
The third part of the layout supposed is the output layer, which is given a specific size, and again the key=”-OUTPUT-“ is provided for the same.
The fourth part of the layout are the graphical buttons with the texts “Ok” and “Quit” aligned side-by-side.
This sums up our layout definition.
#Define the window's contents
layout = [[sg.Text("What's your city name?")],
          [sg.Input(key='-INPUT-')],
          [sg.Text(size=(40,1), key='-OUTPUT-')],
          [sg.Button('Ok'), sg.Button('Quit')]]
- Now, that we have our layout defined, we are providing a “Title” for our layout, while creating our GUI window. We are passing the title and the layout variable as args for the same using the Window method provided by PySimple GUI package
#Create the window
window = sg.Window('Window Title', layout)
- The next part of the code is defining a conditional. The window.read method reads the “event” which in this case is the click event on the “X”(close) button in our window to close it, which is handled by the “WINDOW_CLOSED” function provided by the PySimple GUI or the “Quit” button which also fires an event. In both cases, we are handling those events and breaking from the loop, and closing our GUI.
- The final part of the conditional is the place where we use the key “-OUTPUT-“, which has been already linked to the output layer of our window, and we are updating the output layer with the string ‘Welcome to ‘ + values[‘-INPUT-‘] + “! Thanks for trying PySimpleGUI“, which again, has been linked with the key “-INPUT-“, and the window.read function catches the value and displays it in our pre-defined layout.
#Display and interact with the Window using an Event Loop
while True:
    event, values = window.read()
    # See if user wants to quit or window was closed
    if event == sg.WINDOW_CLOSED or event == 'Quit':
        break
    # Output a message to the window
    window['-OUTPUT-'].update('Welcome to ' + values['-INPUT-'] + "! Thanks for trying PySimpleGUI")

# Finish up by removing from the screen
window.close()
Complete PySimpleGUI code with output
#install PySimpleGUI library
!pip install library


import PySimpleGUI as sg

#Define the window's contents
layout = [[sg.Text("What's your city name?")],
          [sg.Input(key='-INPUT-')],
          [sg.Text(size=(40,1), key='-OUTPUT-')],
          [sg.Button('Ok'), sg.Button('Quit')]]

#Create the window
window = sg.Window('Window Title', layout)

#Display and interact with the Window using an Event Loop
while True:
    event, values = window.read()
    # See if user wants to quit or window was closed
    if event == sg.WINDOW_CLOSED or event == 'Quit':
        break
    # Output a message to the window
    window['-OUTPUT-'].update('Welcome to ' + values['-INPUT-'] + "! Thanks for trying PySimpleGUI")

# Finish up by removing from the screen
window.close()
Output

Conclusion
In this article, we used the PySimple GUI library to create a very simple window. The whole idea behind this package is to provide an easy-to-use and human-readable abstraction over the underlying code implementations to create a GUI with a few lines of code. Thus, it’s a great library for almost all levels of python developers to create GUIs simply and intuitively.
Reference


